
There is a specific hour in October, just after sunset, when a living room lit only by its ceiling fixture feels flat and unfinished. Add three small points of warm light, a glowing pumpkin here, a lantern there, a candle ring on the table, and the same room suddenly feels like autumn moved in. These diy fall decor ideas for autumn 2026 are built on that shift: light does the heavy lifting, and simple handmade pieces give it something to shine on.
Each of the 22 projects below comes with exact measurements, material lists with real price ranges, and honest notes on what to avoid. Most cost between 8 and 35 dollars and take under two hours, and every one is sized for real rooms.
Start with the project that matches the spot you see first when you walk in. Build that one vignette this weekend, check the measurements twice, and let the glow do the rest.
Burlap Lantern Wraps
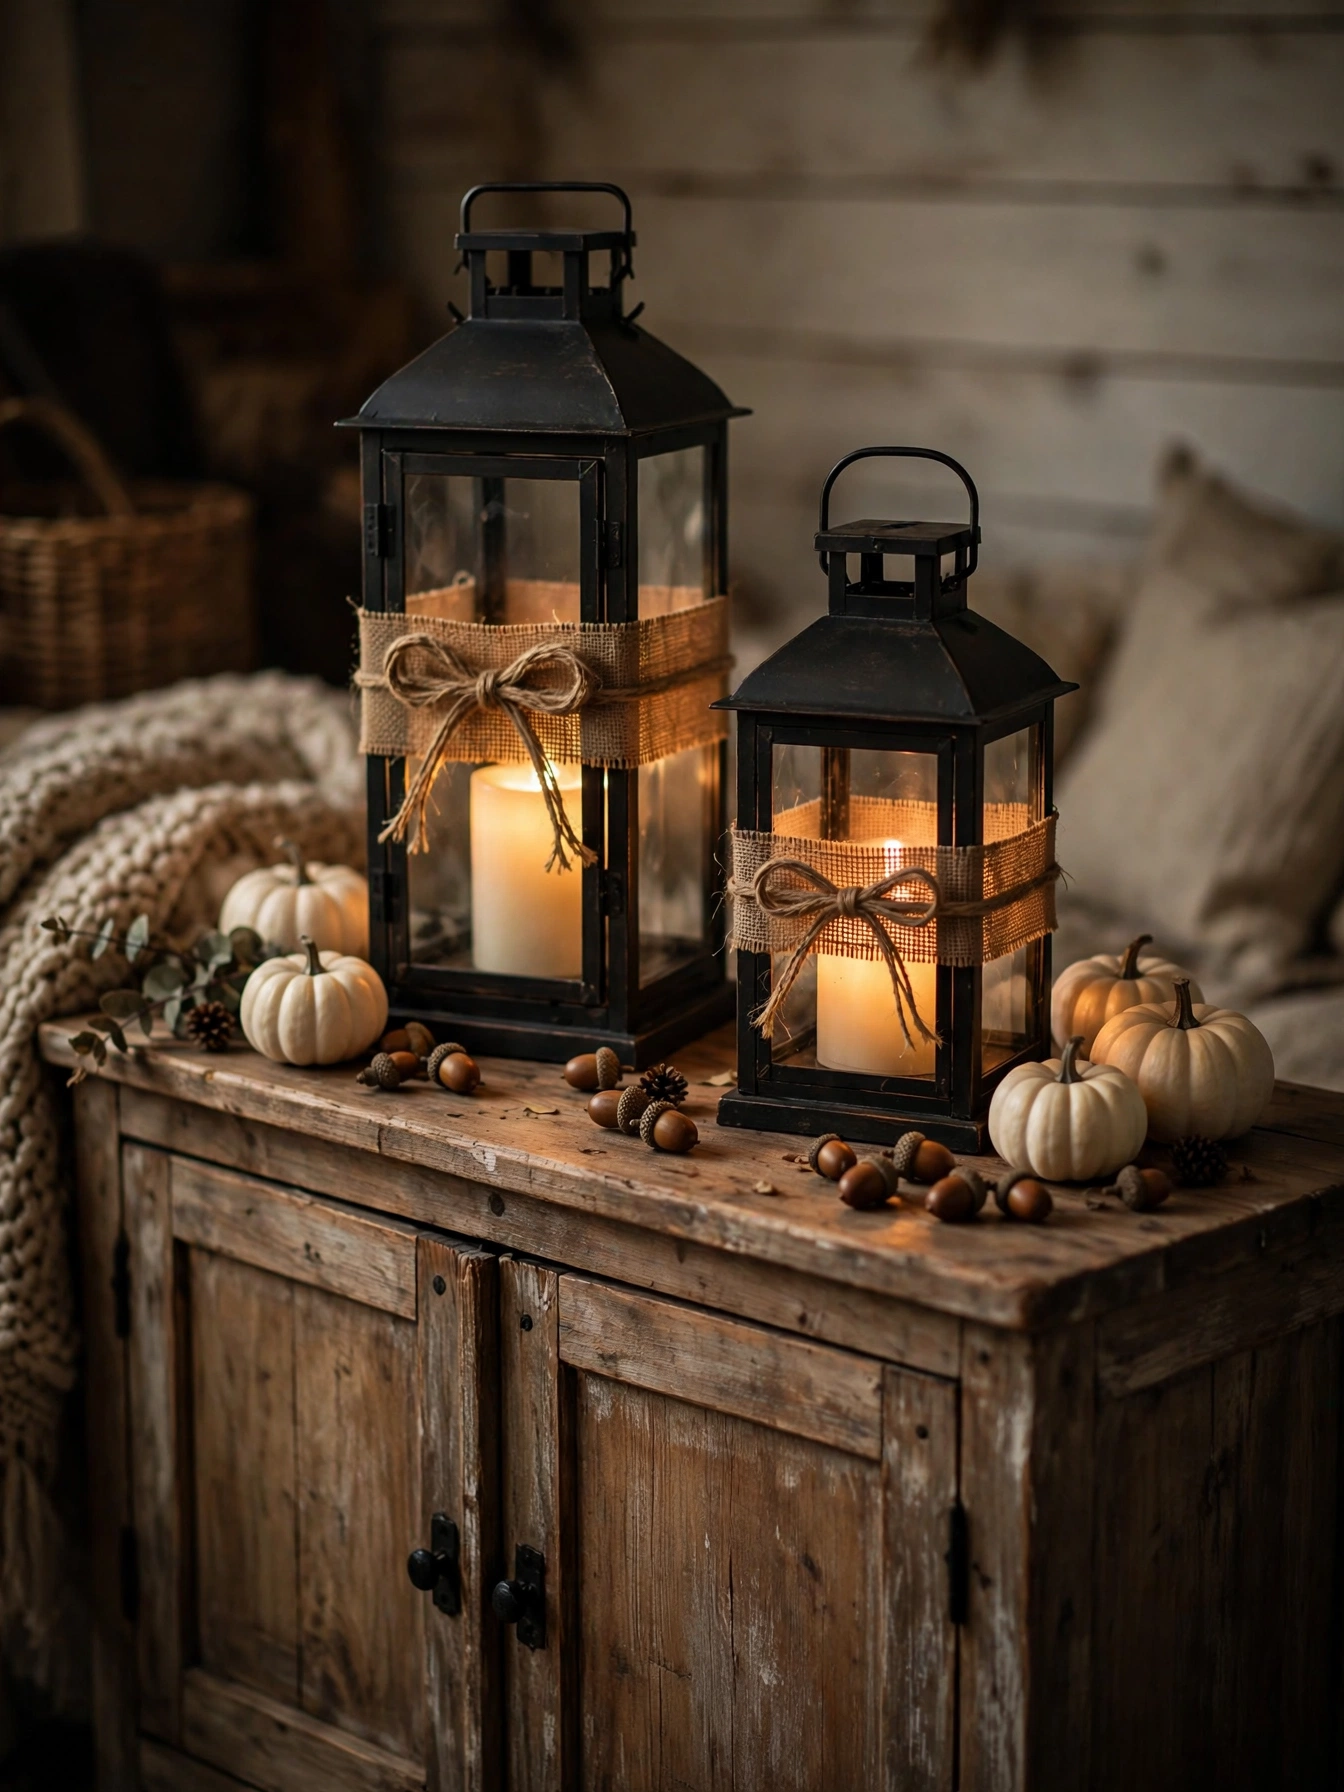
Why This Works:
- Burlap bands soften industrial black lanterns without any sewing
- Two lantern heights (12 and 16 inches) create rhythm on a long sideboard
- LED pillars give real candle flicker with zero dripping wax on wood
- The whole project costs under 25 dollars and takes 30 minutes
Choose metal lanterns 10 to 16 inches tall with glass panels at least 4 inches wide, so the LED pillar inside reads clearly. Cut burlap into 4 inch wide strips and wrap twice around each lantern, securing with a 24 inch length of jute twine tied in a flat bow at the front. Use LED pillar candles 3 inches in diameter and 6 inches tall with a 5-hour timer; a pair costs 14 to 20 dollars. Avoid wrapping burlap over the lantern’s ventilation slots if you ever switch to real flame, since restricted airflow makes flames smoke; with LEDs this is a non-issue, but build the habit. Keep the finished lanterns at least 12 inches from curtain panels, following standard clearance guidance for any heat-producing decor.
Farmhouse and rustic living rooms carry this best, where the burlap echoes other natural textiles. The usual pitfall is cutting the burlap too narrow; strips under 3 inches slide down the glass within days, so 4 inches is the practical minimum. Burlap sheds fibers for the first week, so shake each strip outdoors before wrapping. A limitation worth knowing: burlap absorbs cooking odors in open-plan spaces, so skip this one if the sideboard sits within 10 feet of the stove.
Mason Jar Leaf Luminaries

Why This Works:
- Pressed leaves on glass glow like stained glass when backlit
- Pint-size jars (16 oz) are the sweet spot: big enough for light, small enough for sills
- Five jars in a row fill a standard 36 inch windowsill edge to edge
- Total cost stays under 15 dollars if you press leaves from the yard
Use 16-ounce wide-mouth mason jars, which measure about 5 inches tall and 3 inches across, giving leaves room to lie flat. Press maple or oak leaves between book pages for 7 to 10 days until fully dry; damp leaves mold under the adhesive within 48 hours. Brush matte decoupage medium on the jar, press the leaf, then seal with two thin top coats, letting each dry 1 hour. Avoid thick gloppy coats; they dry cloudy and trap air bubbles that show when lit. Drop in one LED tea light per jar (2 inches wide); a 12-pack costs about 8 dollars and each runs 100-plus hours.
This project suits crafters who want maximum glow for minimum money, and kids over 8 can help with the leaf placement. The weak point is patience: rushing the pressing step is the number one reason these fail, so start the leaves a week before jar day. Once sealed, the jars wipe clean with a damp cloth, but never submerge them; water seeps under the decoupage edge and lifts it. They look best where daylight hits them from behind during the day and the tea lights take over at night.
Wheat Sheaf Candle Ring
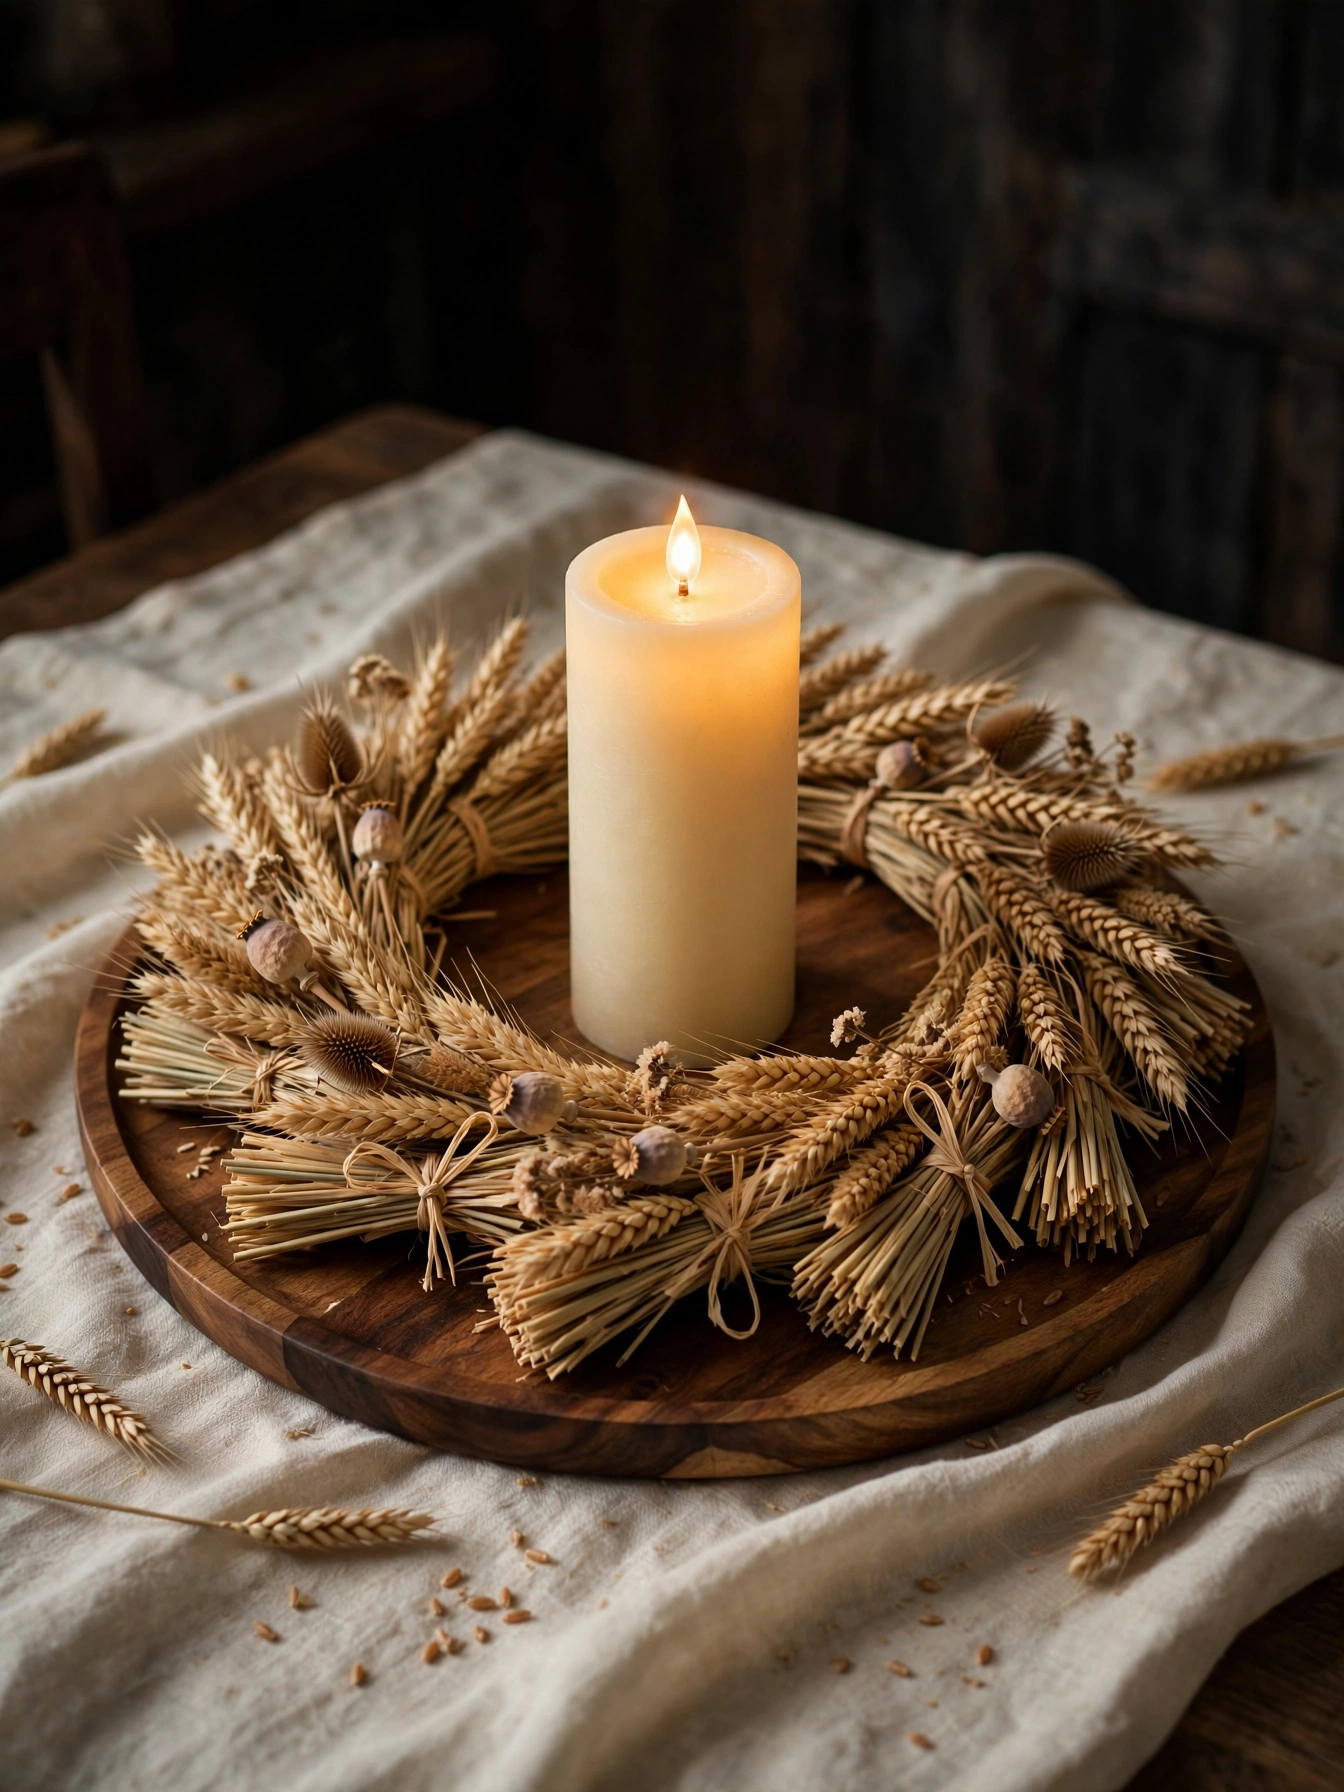
Why This Works:
- A wheat ring turns any plain pillar candle into a harvest centerpiece
- The 12 inch tray footprint fits dining tables without crowding place settings
- Dried wheat costs 10 to 14 dollars a bundle and covers two rings
- The whole assembly lifts off as one piece for table clearing
Start with a round tray 12 to 14 inches across; smaller trays crowd the wheat and larger ones waste table space. Bundle 20 to 25 wheat stalks, each 24 to 30 inches tall, and lean them in a teepee around a 3 by 6 inch LED pillar candle in the center. Tie the bundle at its midpoint with natural raffia wrapped 4 times and knotted. Avoid real flame candles inside dried wheat; wheat is tinder-dry fuel and the National Fire Protection Association’s 12-inch clearance rule cannot be met inside a ring, so LED only. Keep the tray at least 18 inches from the table edge where sleeves and elbows pass.
Dining rooms and harvest tables are the natural home for this one, especially under a low pendant where the wheat catches the light. Wheat sheds for the first few days, so assemble it over newspaper and give it a firm outdoor shake first. The honest limitation is lifespan: wheat is brittle by December and the stalks snap if the ring gets bumped, so treat it as a one-season piece. Store-bought wheat bundles vary in fullness, so buy one extra bundle and pick the 25 fullest stalks.
Glowing Pinecone Garland
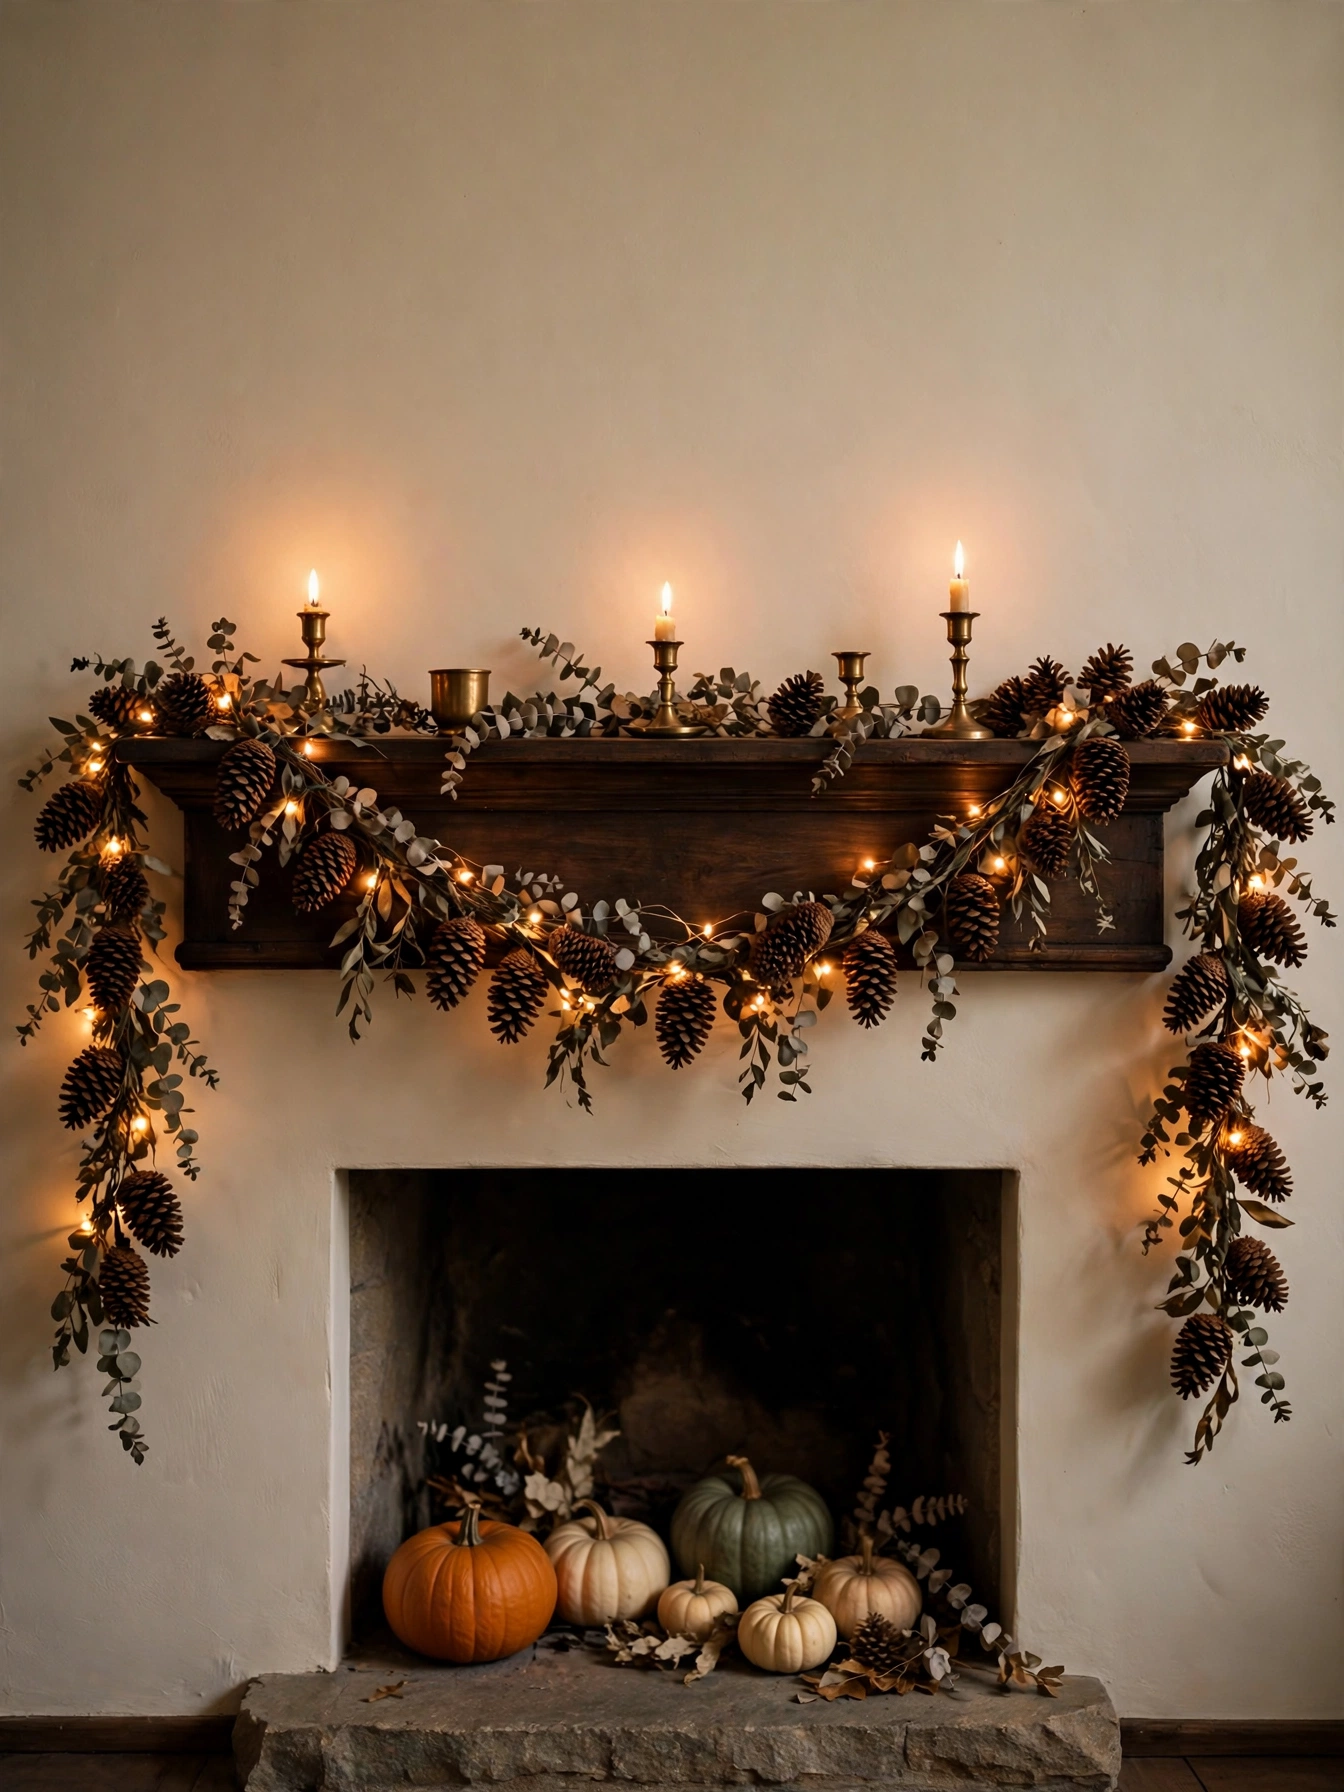
Why This Works:
- Pinecones wired (never glued) survive the whole season outdoors or in
- Warm-white fairy lights at 2700K make brown pinecones glow amber
- A 6-foot garland suits a standard 60 inch mantel with drape at both ends
- Total materials run 18 to 28 dollars, half the price of pre-made garlands
String pinecones 2 to 3 inches long on 18-gauge floral wire, spacing them 4 to 5 inches apart for a full 6-foot garland that drapes a 60 inch mantel with 6 inches of drop at each end. Thread one 20-foot strand of 2700K fairy lights through the wire, twisting every 12 inches so the strand cannot slide. Wire, do not hot-glue, the cones; glue bonds fail above 85 degrees near a working fireplace and cones drop off. Avoid hanging the garland closer than 12 inches above a firebox opening; radiant heat dries pinecones until the scales snap. Anchor each end with an adhesive hook rated for 3 pounds, since the finished garland weighs about 2.
This works on mantels, stair rails and console tables alike, anywhere a horizontal line needs warming. The mistake most people make is spacing cones evenly like beads; cluster them in groups of three with small gaps, which reads far more natural. Pinecones from the yard should bake at 200 degrees for 45 minutes first to kill insects and open the scales. One trade-off: wired garlands cannot be tossed in a bin for storage, so coil them loosely around a cardboard tube to avoid tangling the lights.
Gilded Pumpkin Cluster

Why This Works:
- Metallic paint turns 3-dollar foam pumpkins into boutique-looking decor
- A mirrored tray doubles the candlelight without extra candles
- Jewel-box colors (gold, bronze, copper) suit formal living rooms
- The cluster scales from coffee table to dining centerpiece
Pick foam pumpkins 4, 6 and 8 inches tall; foam takes paint evenly while real pumpkins need primer. Apply two thin coats of metallic acrylic craft paint with a 2 inch foam brush, letting each coat dry 2 hours; one 2-ounce bottle covers about 6 medium pumpkins. Arrange 5 to 7 pumpkins on a mirrored tray 16 to 20 inches across, tucking 2 inch amber glass votives with LED tea lights between them. Avoid one thick coat; it drips and dries tacky for days. Keep votives 2 inches from pumpkin sides so the LED glow reads as separate points of light rather than one blur.
Glam, transitional and traditional rooms love this look, especially where brass and gold already appear. The trade-off is durability: metallic paint chips if pumpkins knock together in storage, so wrap each in tissue before boxing. Foam pumpkins dent permanently if squeezed, so handle by the base. If anyone in the house dislikes shiny decor, mix in two matte cream pumpkins; the contrast actually makes the metallics look richer.
Cinnamon Stick Candle Cuffs
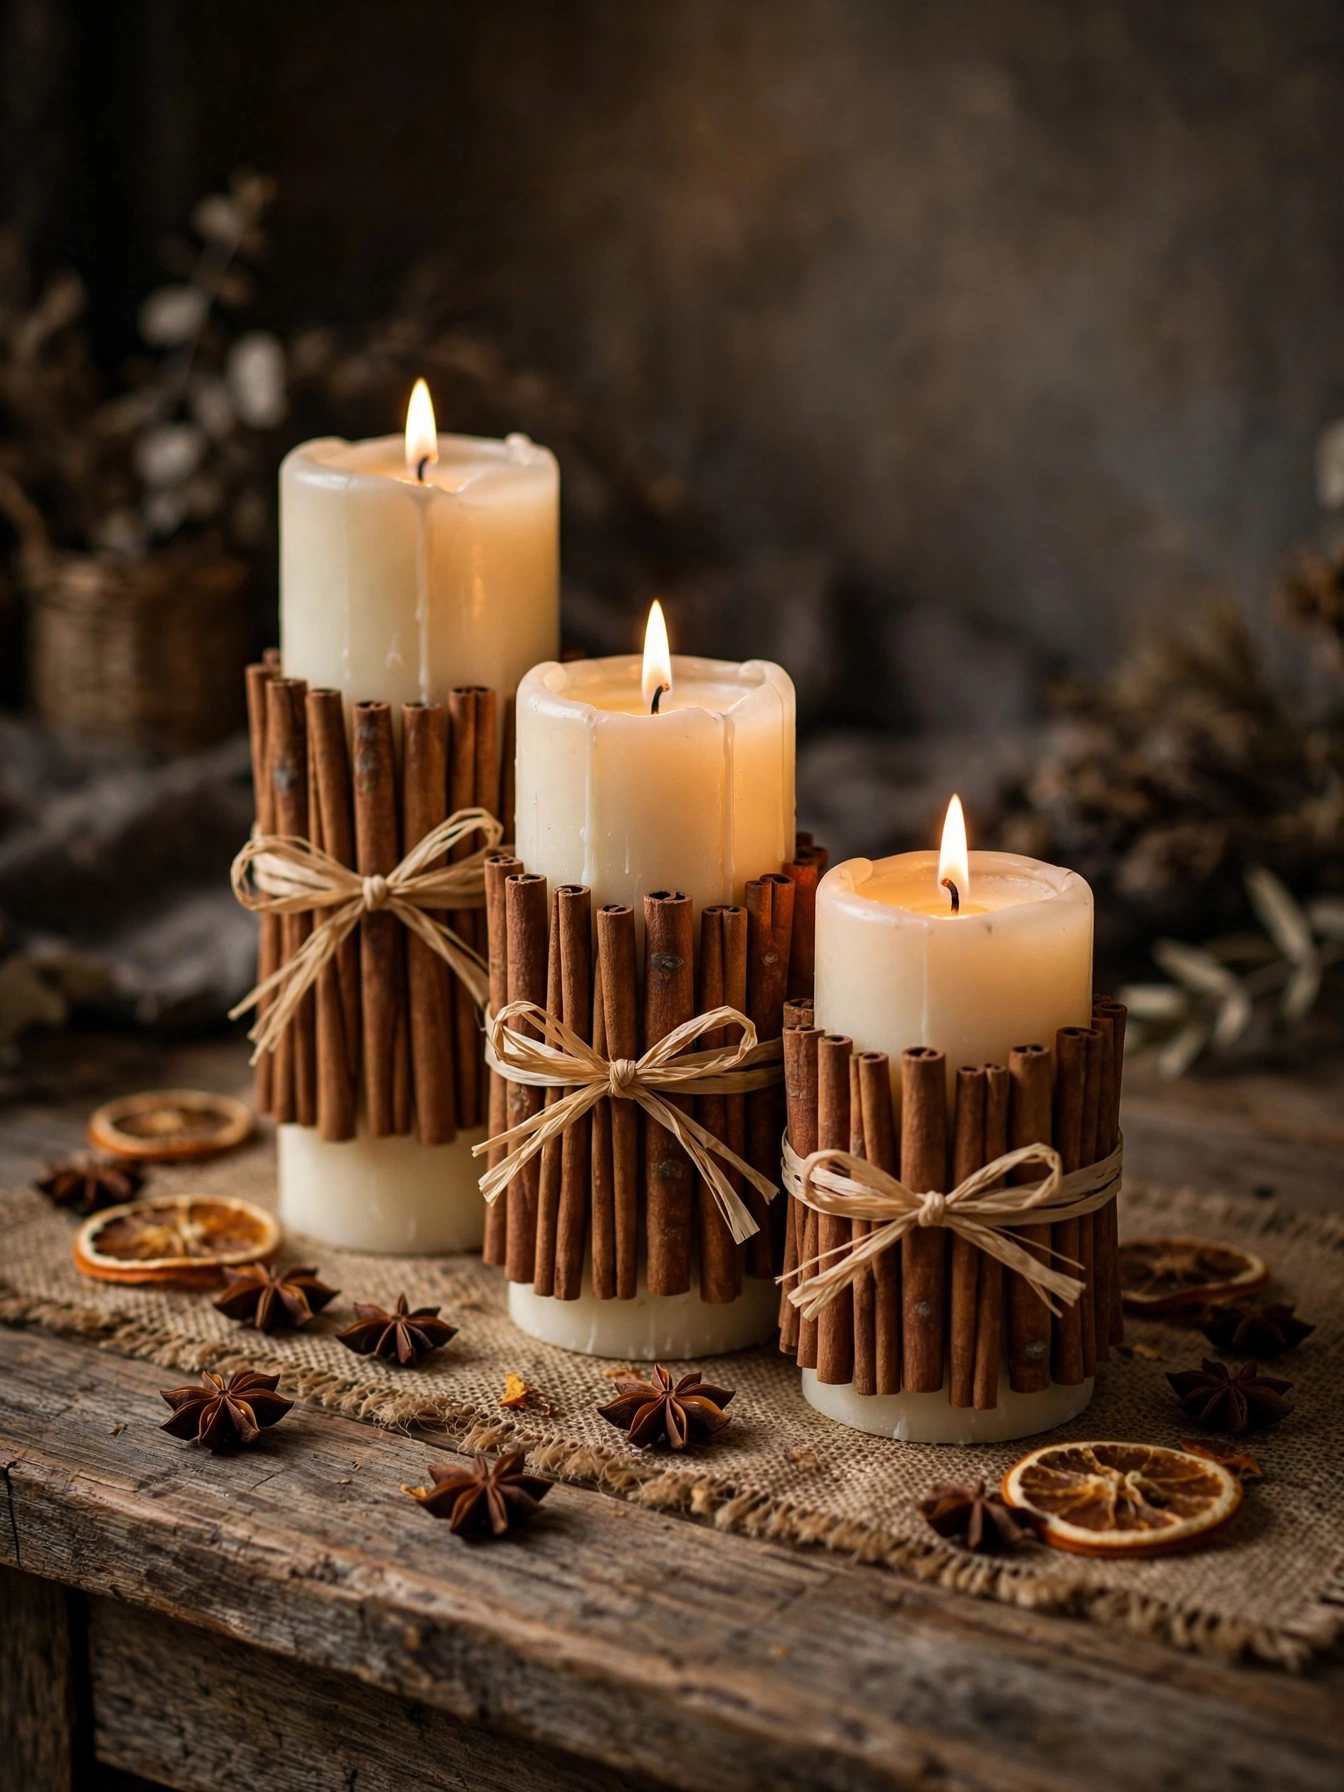
Why This Works:
- Cinnamon bundles add scent with no plug-in or spray
- The cuff technique works on any pillar 3 inches or wider
- Raffia ties cost pennies and look better than ribbon here
- A trio of cuffed candles fills a 24 inch table runner
Choose pillar candles 3 inches in diameter and 4 to 6 inches tall; LED pillars are safest, but if you use real wax, keep the cinnamon 1 inch below the flame line. Bundle 8 to 10 cinnamon sticks, each 4 inches long, vertically around the candle and tie with raffia at the top third and bottom third. A 1-pound bag of 4 inch cinnamon sticks costs 9 to 13 dollars and cuffs about 6 candles. Avoid rubber bands as ties; they perish and snap within weeks, dropping the bundle. Never leave real-flame cuffed candles unattended; the sticks are fuel, and the National Fire Protection Association warns against decorating candles with combustible materials.
Entry tables and powder rooms benefit most, since the scent greets people in small spaces. The scent peaks in the first 2 weeks and fades by week 6, so refresh the bundles mid-season rather than rebuilding. One caution: cinnamon oil can stain light wood and fabric, so set cuffed candles on a tray or coaster, never directly on a linen runner. Households with parrots or small birds should skip scented sticks entirely, since birds are sensitive to strong fragrances.
Amber Hurricanes with Dried Corn
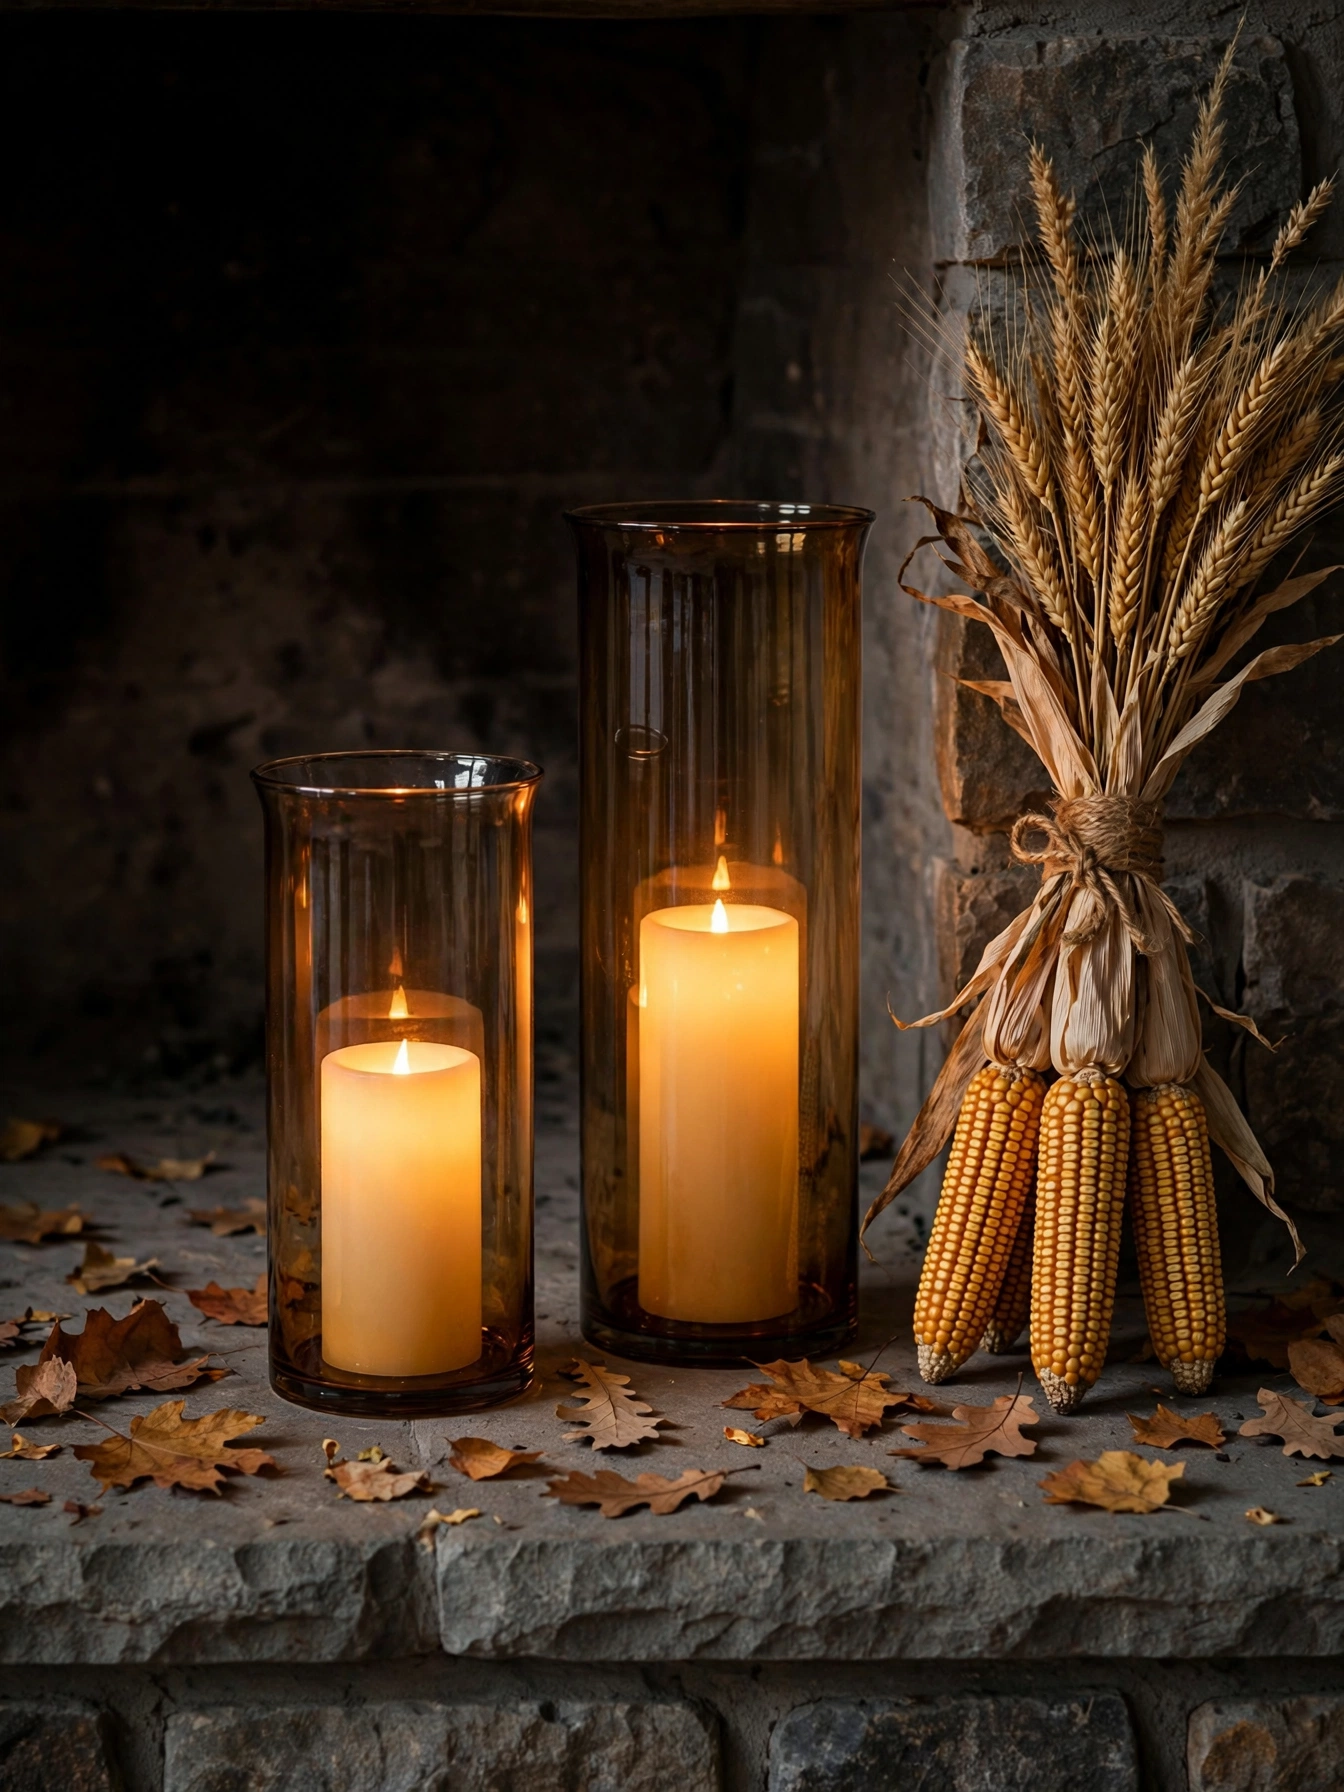
Why This Works:
- Amber glass flatters every skin tone and hides LED hardware
- Two hurricanes (14 and 18 inches) anchor a hearth symmetrically
- Dried corn adds height without the cost of tall branches
- The arrangement survives the whole season with zero watering
Use glass hurricanes 14 and 18 inches tall with a 5 to 6 inch opening, wide enough for a 3 inch LED pillar with 2 inches of clearance. Fill the base of each with 1 inch of dried corn kernels or sand to steady the candle, then set the LED pillar on top. Lean 3 dried corn cobs, each 8 to 10 inches long, against the outside of each hurricane, tied with jute. Avoid placing hurricanes where a door swings; an 18 inch glass vessel shatters badly on tile. Keep the pair 24 inches apart on the hearth for symmetry on a standard 48 to 60 inch fireplace.
Hearths, covered porches and entry floors suit this scale; tabletops make the tall hurricanes loom. The glass shows every fingerprint, so handle by the base after the final wipe with a microfiber cloth. Dried corn cobs attract pantry moths in warm houses, so freeze the cobs 48 hours before displaying to kill any larvae. If the hearth is a working fireplace, move the whole arrangement 36 inches clear before lighting a fire.
Harvest Floating Shelf Styling

Why This Works:
- Floating shelves turn dead wall space into a fall vignette
- Mini lanterns (6 to 8 inches) give glow without dominating the shelf
- The book-stack trick adds height for free
- Three shelves, each 24 to 36 inches, hold a full seasonal story
Mount shelves 10 to 12 inches deep; shallower shelves drop pumpkins, deeper ones swallow small decor. Space three 30 inch shelves 14 to 16 inches apart vertically, starting the lowest at 48 inches from the floor. Style each shelf with one glowing element (mini lantern or LED candle), one natural element (gourd or wheat) and one height element (stack of 2 to 3 books). Avoid exceeding the shelf’s rated load, typically 15 to 25 pounds per shelf; ceramics and books add up fast. Use a stud finder and 2.5 inch screws into studs, since drywall anchors alone creep under seasonal restyling.
Dining rooms and living rooms with blank walls between windows are ideal; shelves above a sofa need the bottom shelf at least 60 inches up to clear heads. The common error is styling all three shelves identically; vary the formula so the eye travels. Dust the shelves before styling, since warm light spotlights every speck. One limitation: styled shelves in kitchens collect grease film, so keep food-free decor shelves at least 6 feet from the stove.
Dried Orange Slice Lantern
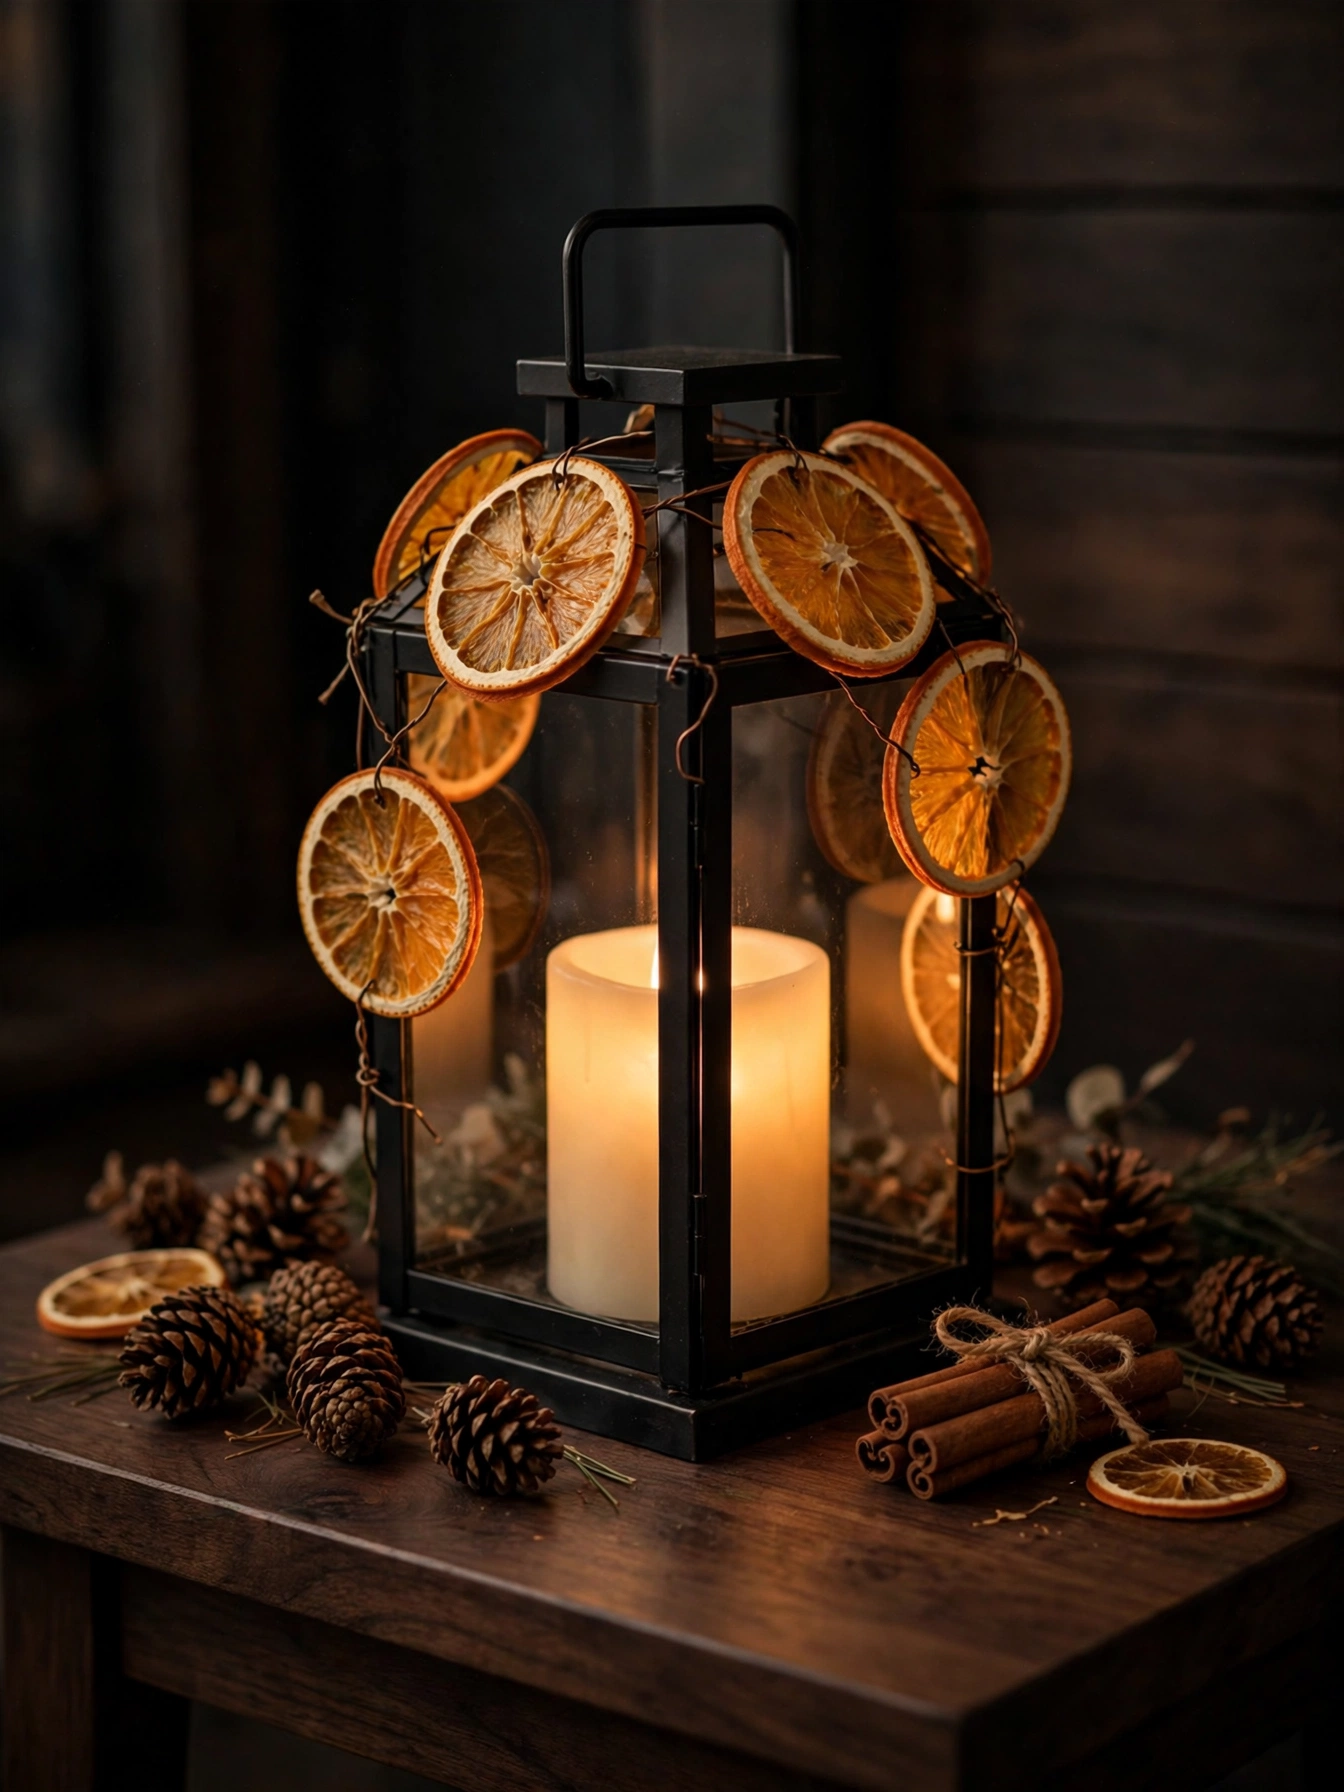
Why This Works:
- Dried citrus glows translucent, like little stained-glass panels
- One bag of oranges (about 4 pounds) yields slices for two lanterns
- The faint citrus scent lasts 3 to 4 weeks
- Total cost: under 12 dollars per lantern
Slice navel oranges 1/4 inch thick; thinner slices curl, thicker ones take too long to dry. Dry at 200 degrees Fahrenheit for 2.5 to 3 hours, flipping once at the halfway mark, until the centers are leathery but not browned. Wire 10 to 12 slices around a glass panel lantern 10 to 12 inches tall using 24-gauge wire through the rind edge. Avoid hot glue on glass; it pops off with temperature swings, while wire holds all season. Place one LED pillar inside; real flame behind dried fruit is a fire risk that standard clearance guidance rules out.
Kitchens and breakfast nooks love this one, where the citrus scent belongs. The slices darken over 4 to 6 weeks, shifting from bright orange to deep amber, which honestly looks more autumnal. Humidity is the enemy; in damp climates the slices can spot with mold, so this is a dry-room project. If a slice cracks during wiring, use it anyway on the back panel where nobody looks closely.
Plaid Throw Ladder Display
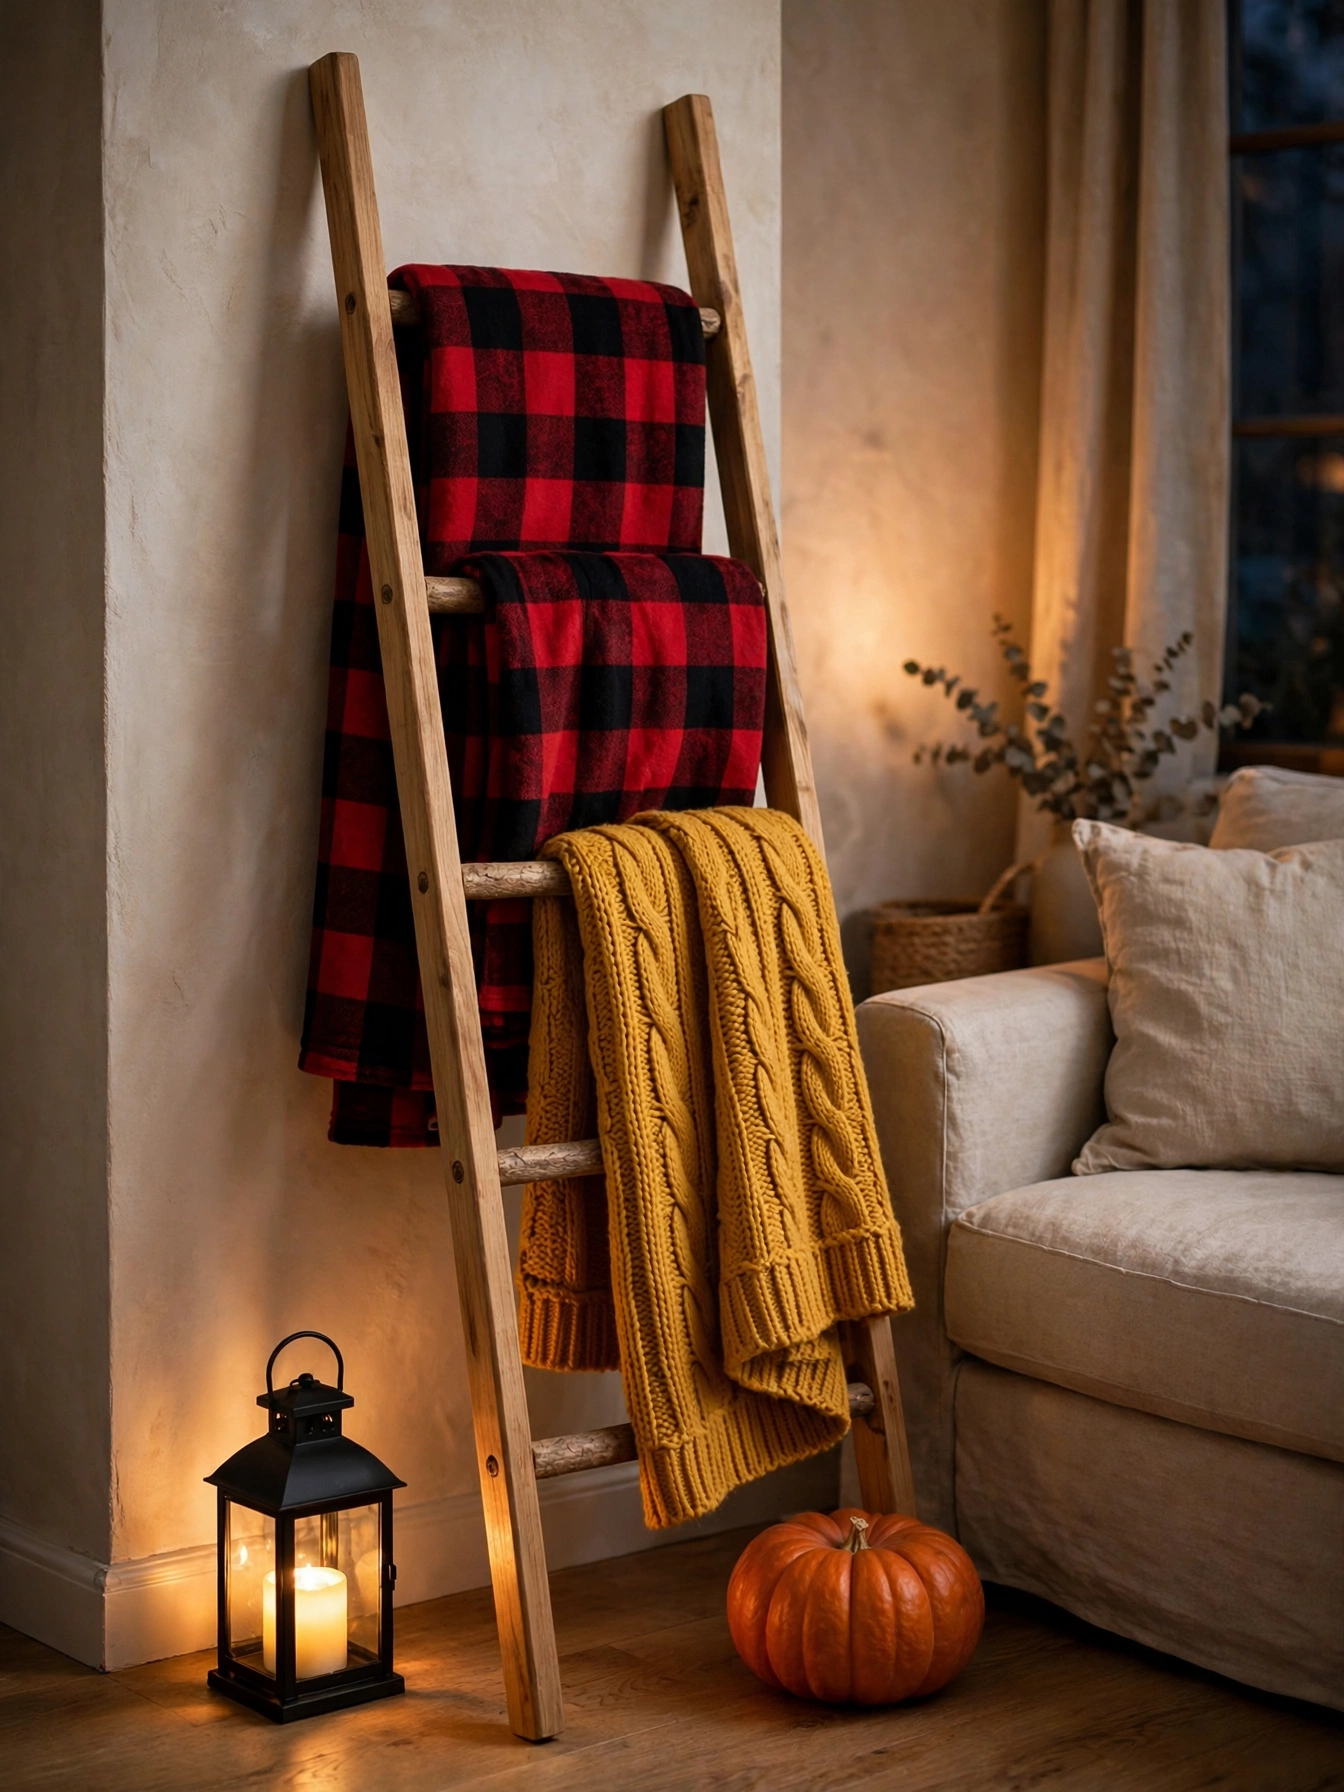
Why This Works:
- A ladder display stores throws and decorates at the same time
- Two throws (one plaid, one knit) are enough; more looks cluttered
- A 5-foot ladder fits beside most sofas without blocking walkways
- The whole project costs 30 to 50 dollars, ladder included
Use a blanket ladder 60 inches tall and 20 to 24 inches wide, leaning at 75 to 80 degrees against the wall with rubber feet grips. Drape one buffalo plaid throw (50 by 60 inches) folded in thirds over the second rung, and one chunky knit throw over the fourth, so the patterns do not touch. Anchor the top to the wall with a small L-bracket if toddlers or large dogs live in the house; a leaning ladder tips with 15 pounds of sideways pull. Avoid placing the ladder where it blocks a doorway swing or vent; 12 inches of clearance on each side keeps it safe.
Living rooms and bedrooms both take this well, anywhere throws pile up anyway. The trick is restraint: three throws maximum, or the ladder reads as laundry. Wash throws before the season so the display smells fresh; wool and acrylic hold summer storage odors. One downside: the bottom rung collects dust bunnies, so vacuum behind the ladder monthly. If the wall is freshly painted, add felt pads where the ladder rails touch.
Rustic DIY Fall Decor Ideas for Autumn 2026
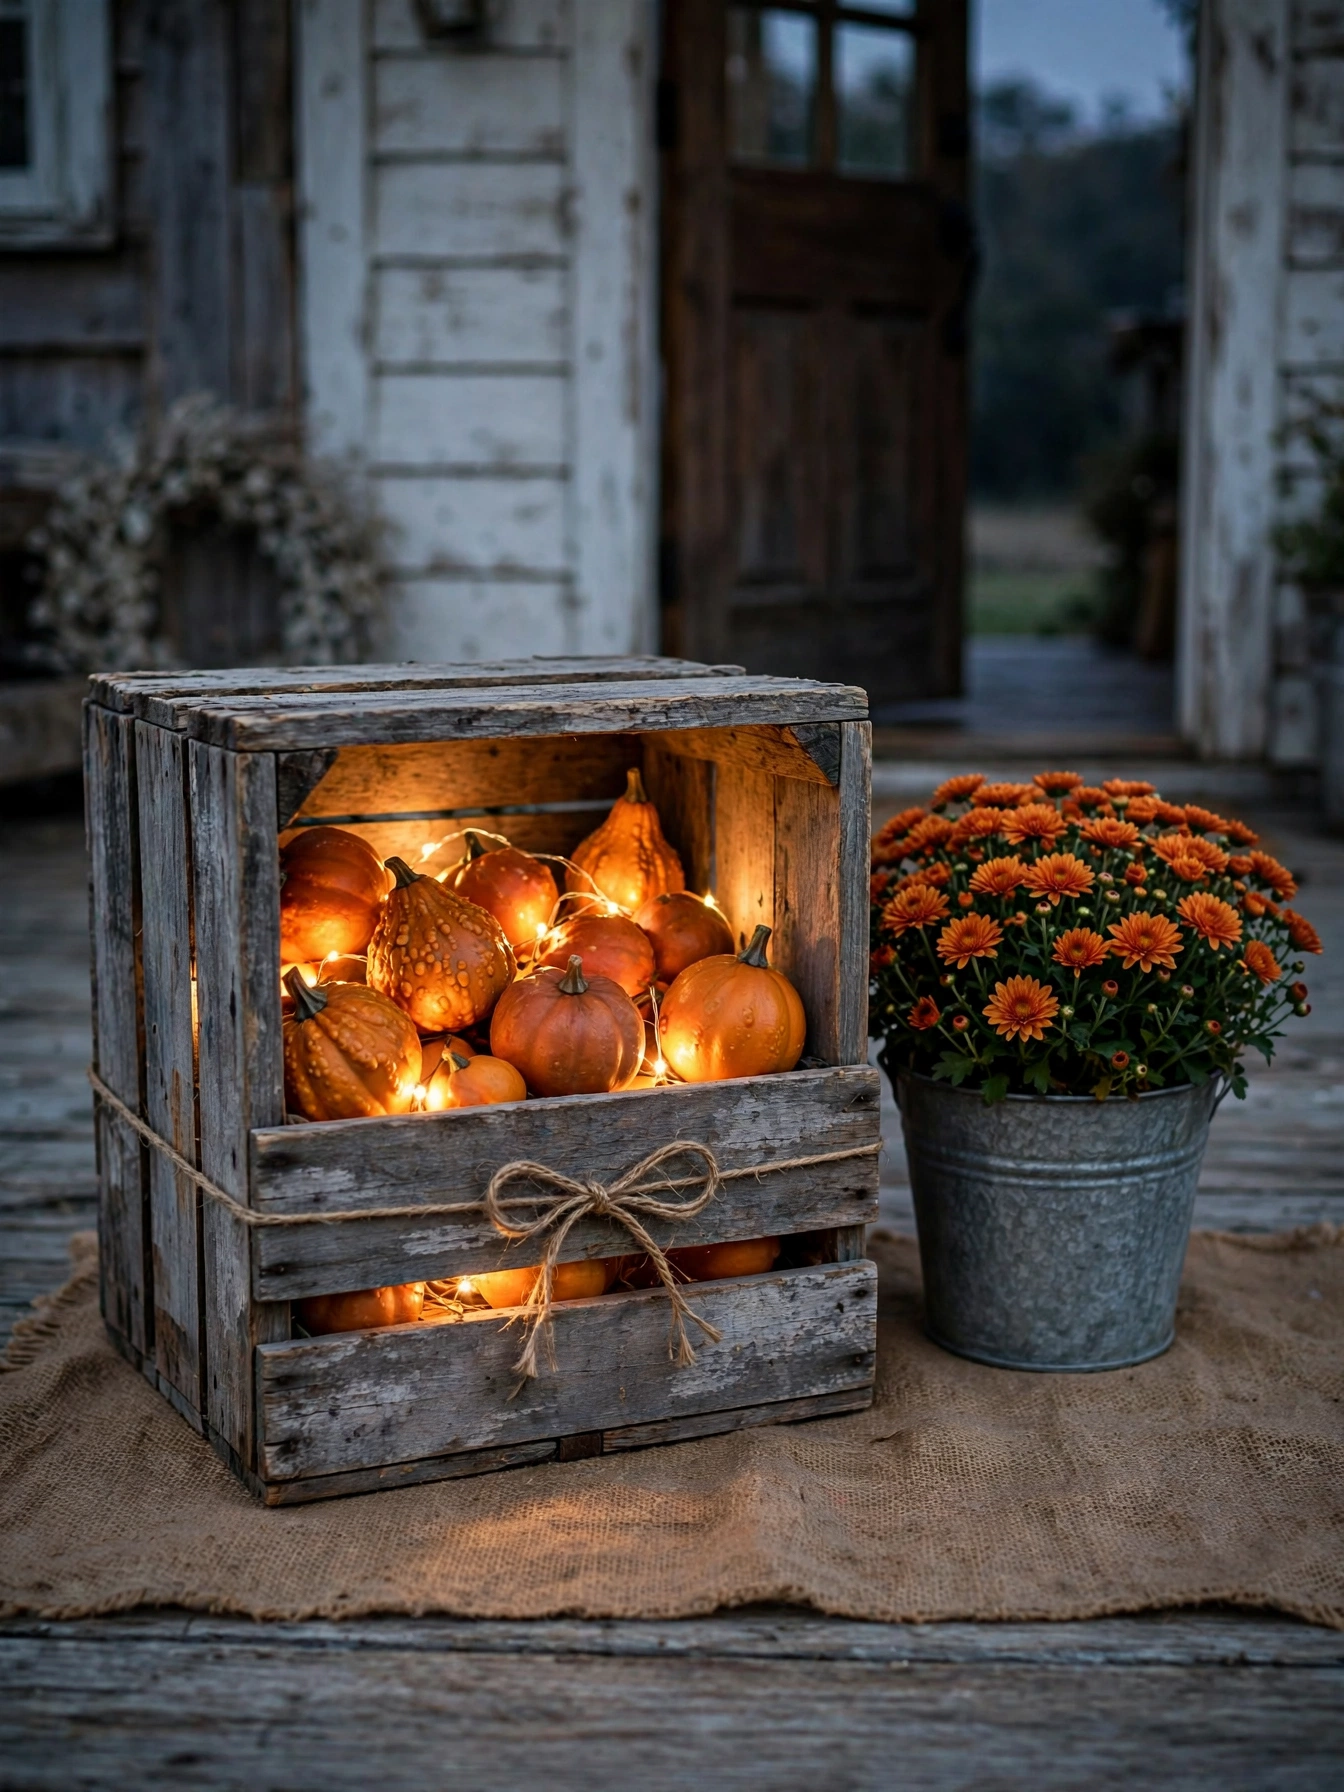
Why This Works:
- A wooden crate corrals small gourds into one intentional display
- String lights inside the crate make the whole thing glow from within
- The 18 inch cube size works on porches, hearths and entry floors
- Weathered wood needs zero finishing, which keeps the cost at 15 to 25 dollars
Use a wood crate 16 to 18 inches square and 12 inches deep; deeper crates swallow the glow, shallower ones spill gourds. Line the bottom with a 20-light warm-white string (battery operated, 2700K), coiling it loosely so no two bulbs touch wood directly. Fill with 8 to 12 small gourds and mini pumpkins, 2 to 4 inches each, nestling them around the lights. Avoid incandescent strings inside a wood crate; even mini bulbs reach surface temperatures that scorch wood over hours, so LED only. Set the crate on a burlap runner to protect floors from wood splinters and moisture rings.
Farmhouse porches, mudrooms and rustic entries are the natural setting. The crate is heavy once filled, about 12 to 15 pounds, so place it before loading the gourds. One honest limitation: the battery box needs swapping every 3 to 4 weeks with nightly use, so position it at the crate’s front edge for easy access. If the porch gets rain, drill three 1/4 inch drainage holes in the crate bottom so water never pools around the lights.
Corn Husk Candle Sleeves
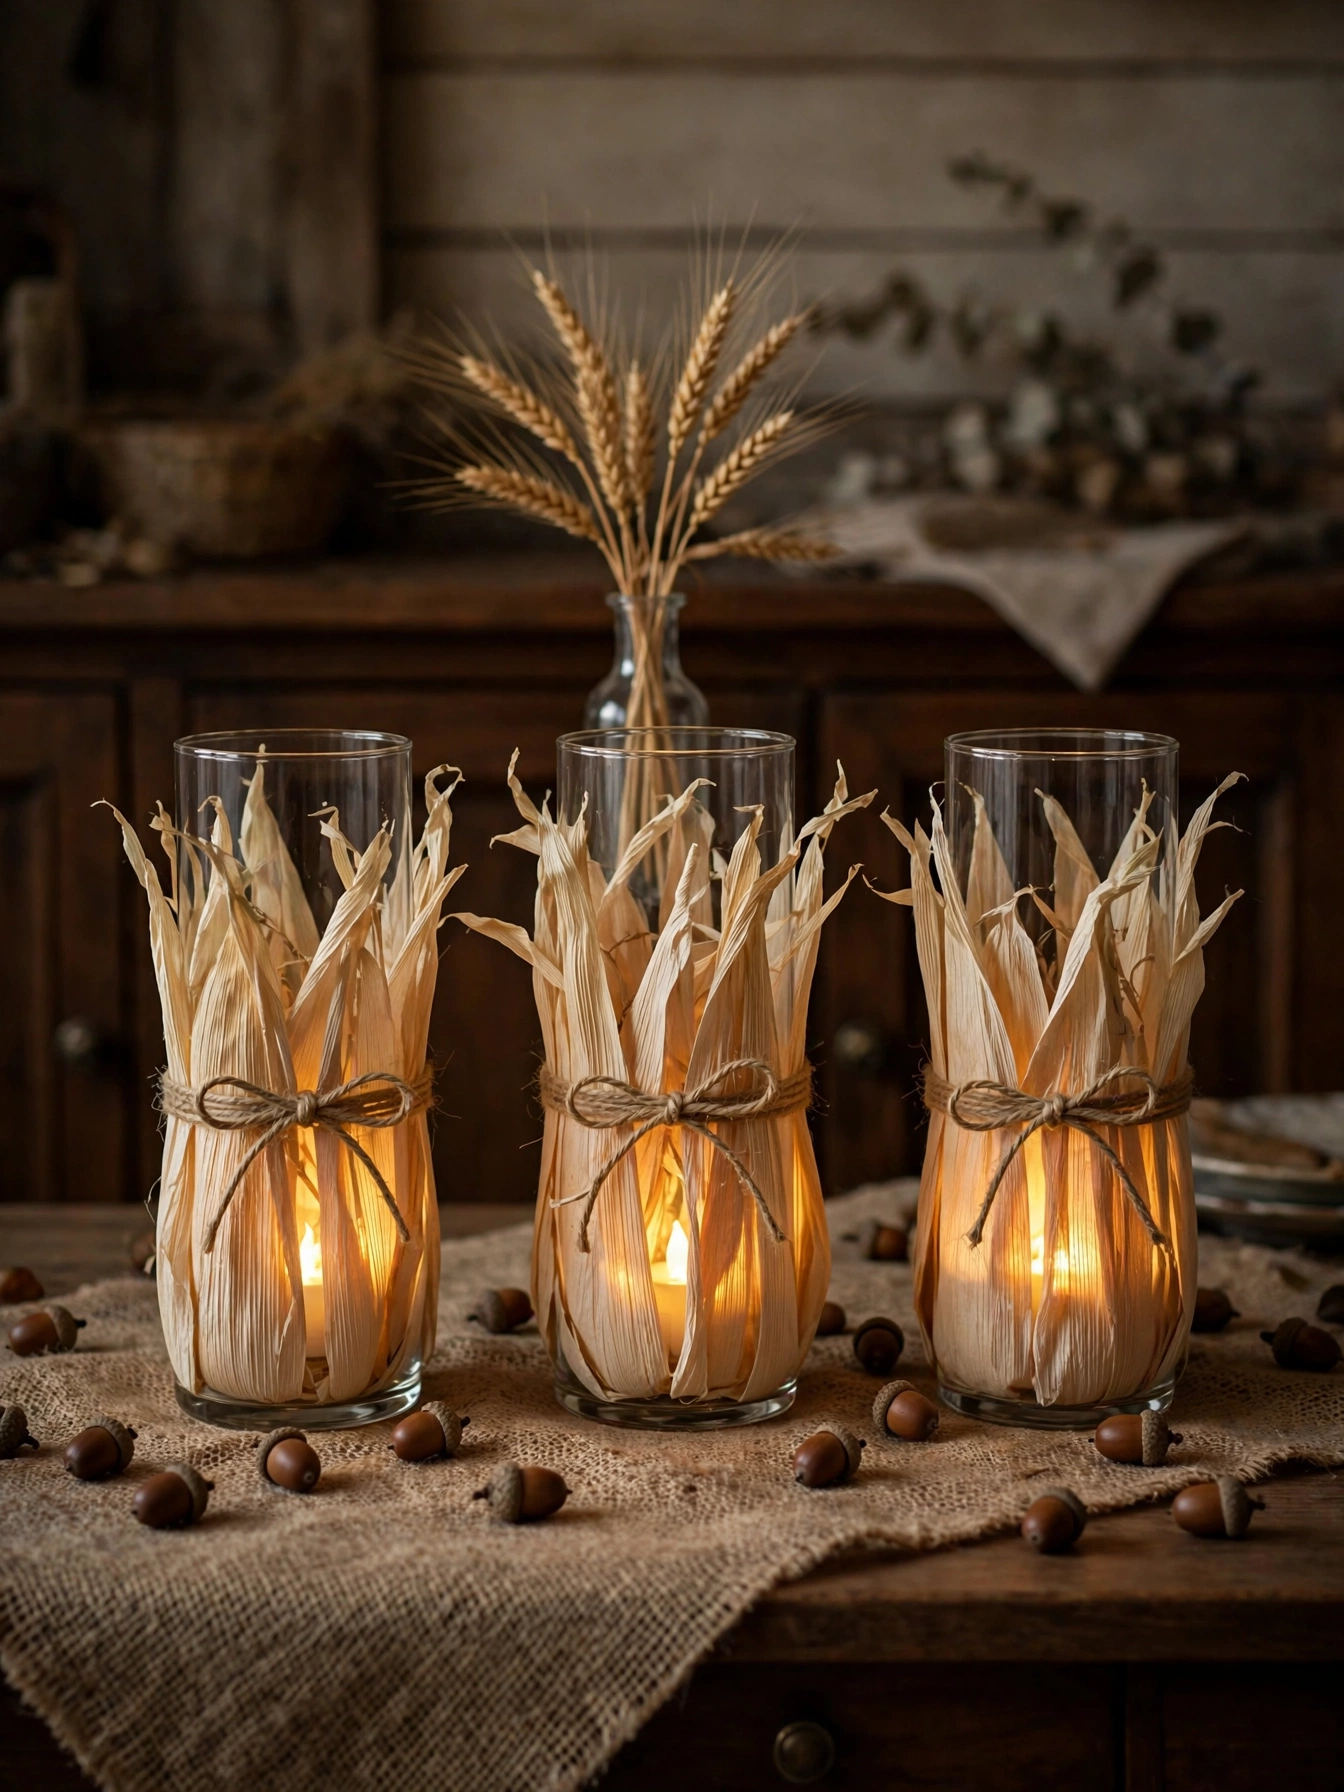
Why This Works:
- Corn husks add farmhouse texture for about 6 dollars a bag
- The sleeve technique fits any straight-sided glass 4 to 8 inches tall
- Tea lights inside make the husks glow like parchment
- A row of three sleeves fills a 30 inch table runner
Soak dried corn husks in warm water for 20 minutes until pliable, then pat dry; dry husks crack when wrapped. Wrap each 6 inch glass cylinder with 3 overlapping husks and tie top and bottom with jute twine. Let the sleeves dry on the glass for 24 hours so they shrink to fit. Avoid wrapping husks around real-flame candles; dried husks ignite easily, so LED tea lights only, per standard fire-safety guidance for combustible decor. Space the three sleeves 4 inches apart on the runner so each glow reads separately.
Dining tables and sideboards suit this texture best, where guests see it up close. The husks lighten as they dry, shifting from amber to pale gold over two weeks, which is part of the charm. One fragility note: the sleeves crush if gripped hard, so lift by the glass base. In humid dining rooms near a frequently used kitchen, the husks can soften; a light coat of clear matte sealer on the outside helps.
Velvet Pumpkin Glow Bowl

Why This Works:
- Velvet pumpkins read luxe at 4 to 8 dollars each, a fraction of boutique prices
- A hammered brass bowl bounces light in every direction
- Jewel tones (emerald, plum, mustard) suit formal rooms
- The bowl centerpiece assembles in 10 minutes flat
Choose a low bowl 12 to 14 inches across and 4 to 5 inches deep; shallow bowls show the pumpkins, deep ones hide them. Nestle 7 to 9 velvet pumpkins, 3 to 5 inches each, stem-up, then tuck a 10-light fairy strand between them with the battery box under the center pumpkin. Velvet pumpkins in the 4 inch size cost 4 to 8 dollars each at craft stores, so the fill runs 35 to 60 dollars. Avoid washing velvet pumpkins; water mats the pile permanently, so dust with a soft brush only. Keep the bowl 12 inches from table edges where elbows strike.
Formal living rooms and dining rooms carry the jewel tones best; farmhouse rooms may prefer the same project in burlap and cream. The velvet shows pet hair relentlessly, so this is a low-pet or high-lint-roller household project. One advantage: unlike real pumpkins, these never rot, so the bowl stays out from September through Thanksgiving with zero maintenance. If the brass bowl tarnishes, the patina actually suits the season, so skip the polishing.
Twig String-Light Branches
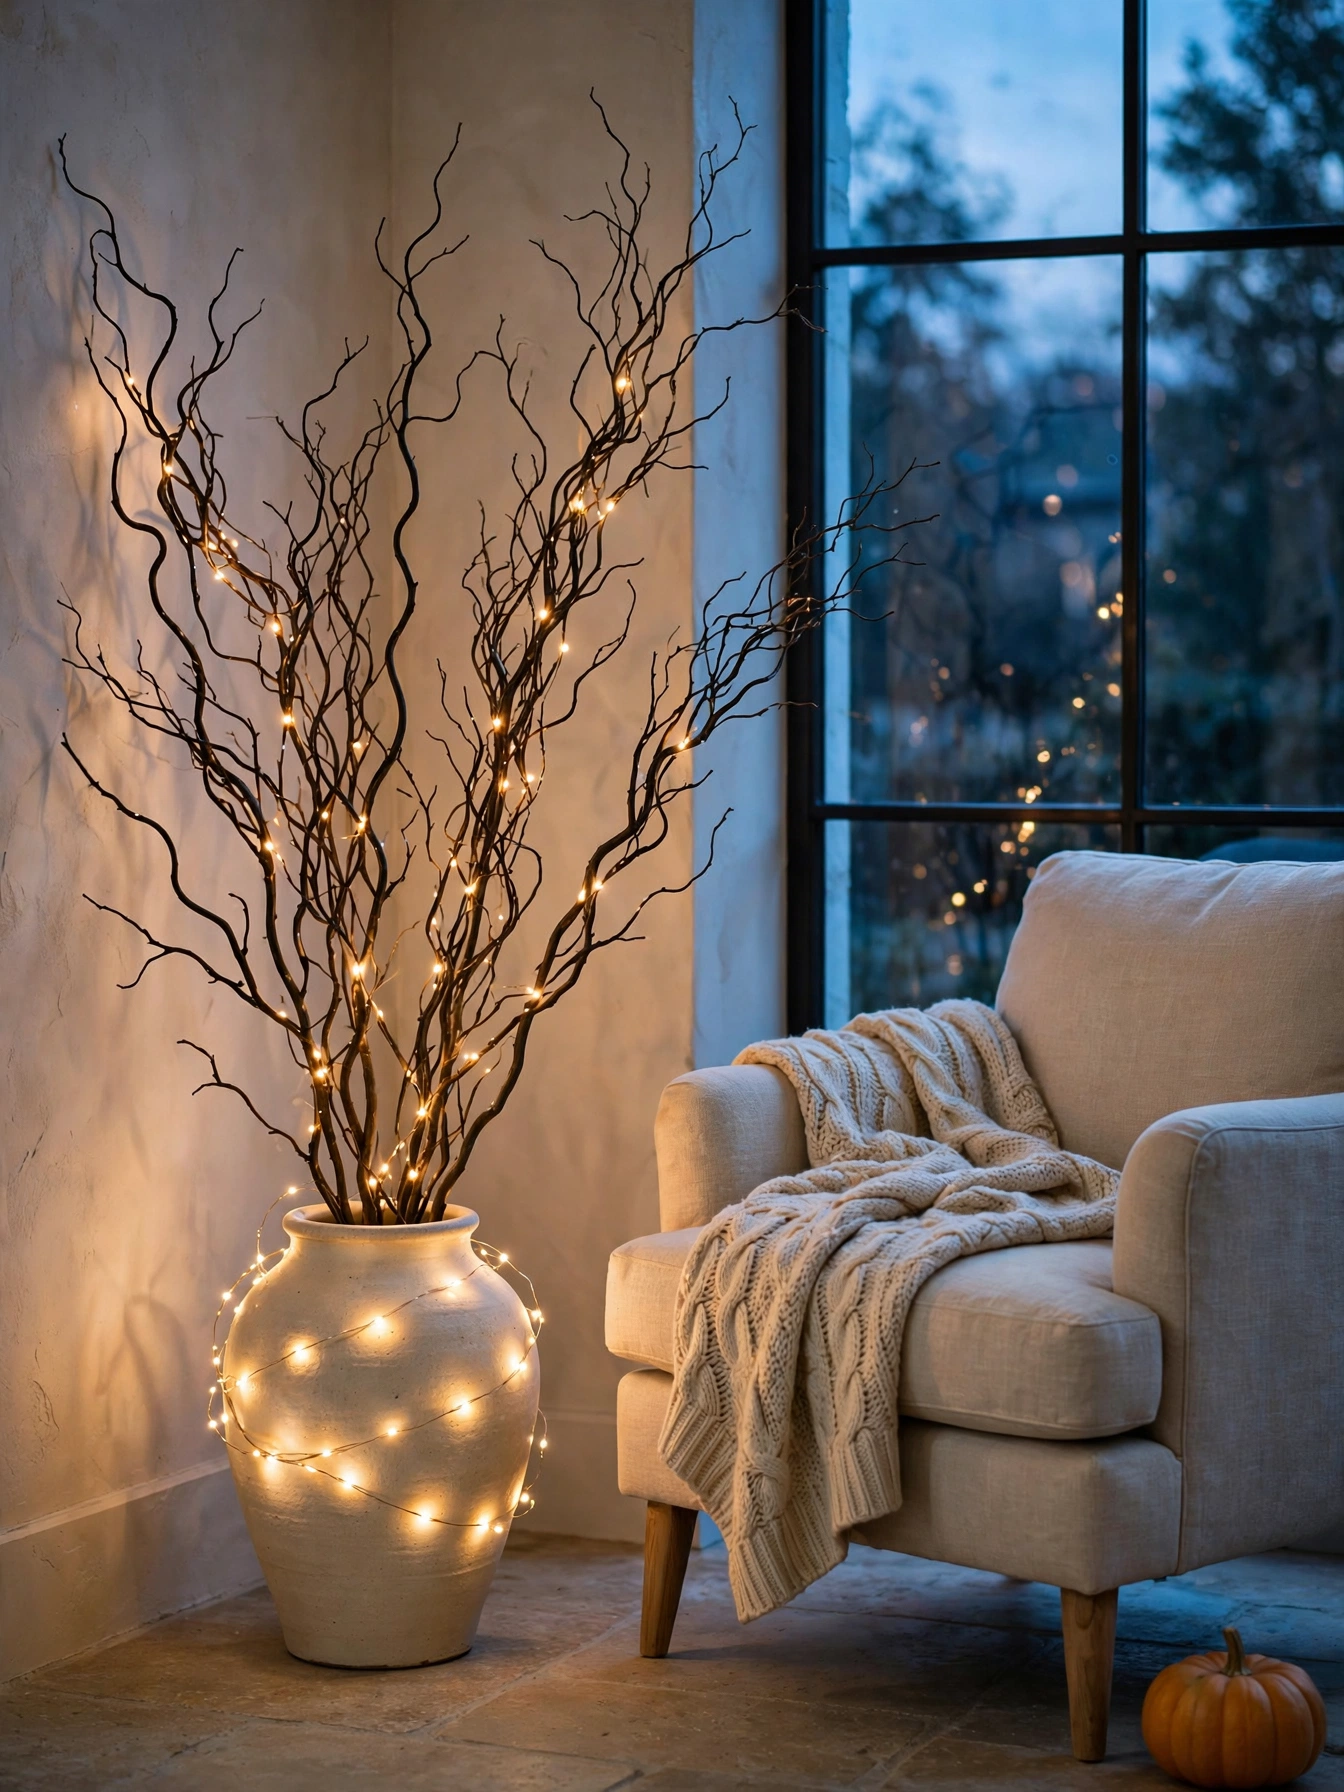
Why This Works:
- Bare branches are free yard material with sculptural impact
- Warm fairy lights turn twigs into a glowing focal point
- A 36 to 48 inch branch arrangement fills an empty corner
- The whole project costs under 20 dollars
Cut branches 36 to 48 inches tall and 1/2 to 1 inch thick at the base; thicker branches stand straighter in the vase. Use a floor vase 16 to 20 inches tall with a 6 inch opening, filling the bottom third with sand or pebbles for stability. Wrap two 33-foot warm-white fairy strands from base to tip, spacing wraps 3 inches apart. Avoid top-heavy arrangements; if the vase wobbles with a gentle push, add more ballast until it stands firm. Keep the arrangement 24 inches from walkways, since branch tips at eye level scratch.
Empty corners and flanking fireplaces are where this earns its keep. Yard branches should dry indoors for a week before styling; fresh-cut branches weep sap onto floors. The honest trade-off is shedding: even dried branches drop small twigs for the first month, so this is not a white-rug-corner project. Check branches for insects before bringing them in; a 200-degree oven bake for 30 minutes handles anything hiding in the bark.
Copper Wire Pumpkin Lights

Why This Works:
- Wire pumpkins read modern where solid pumpkins read traditional
- Edison-style LED bulbs give vintage warmth at 2200K
- The open wire form never blocks sightlines on a console
- Three wire pumpkins cost 25 to 40 dollars to make
Form pumpkins from 12-gauge copper wire wrapped around a 6 to 10 inch balloon as a mold, creating 8 to 10 ribs per pumpkin, then pop the balloon. Fit each with one Edison-style LED bulb (2200K, 40-watt equivalent) on a 6-foot cord with an inline switch; LED Edisons run cool, unlike real filament bulbs that reach 200-plus degrees. Space three pumpkins 8 inches apart on the console, cords routed behind. Avoid real Edison bulbs in wire pumpkins; the exposed hot glass is a burn risk and the heat discolors copper. Keep cords 12 inches from the console edge and use a cord cover if the console floats in the room.
Modern and industrial living rooms finally get a pumpkin that matches the aesthetic. The wire form is the limitation: it dents if knocked, so this is a low-traffic console project, not a coffee table one. Copper tarnishes to a brown patina within a season; seal with clear lacquer if you want the bright copper to last. If wiring feels intimidating, pre-made wire pumpkin frames sell for 8 to 12 dollars and just need the bulb added.
Harvest Coffee Table Tray
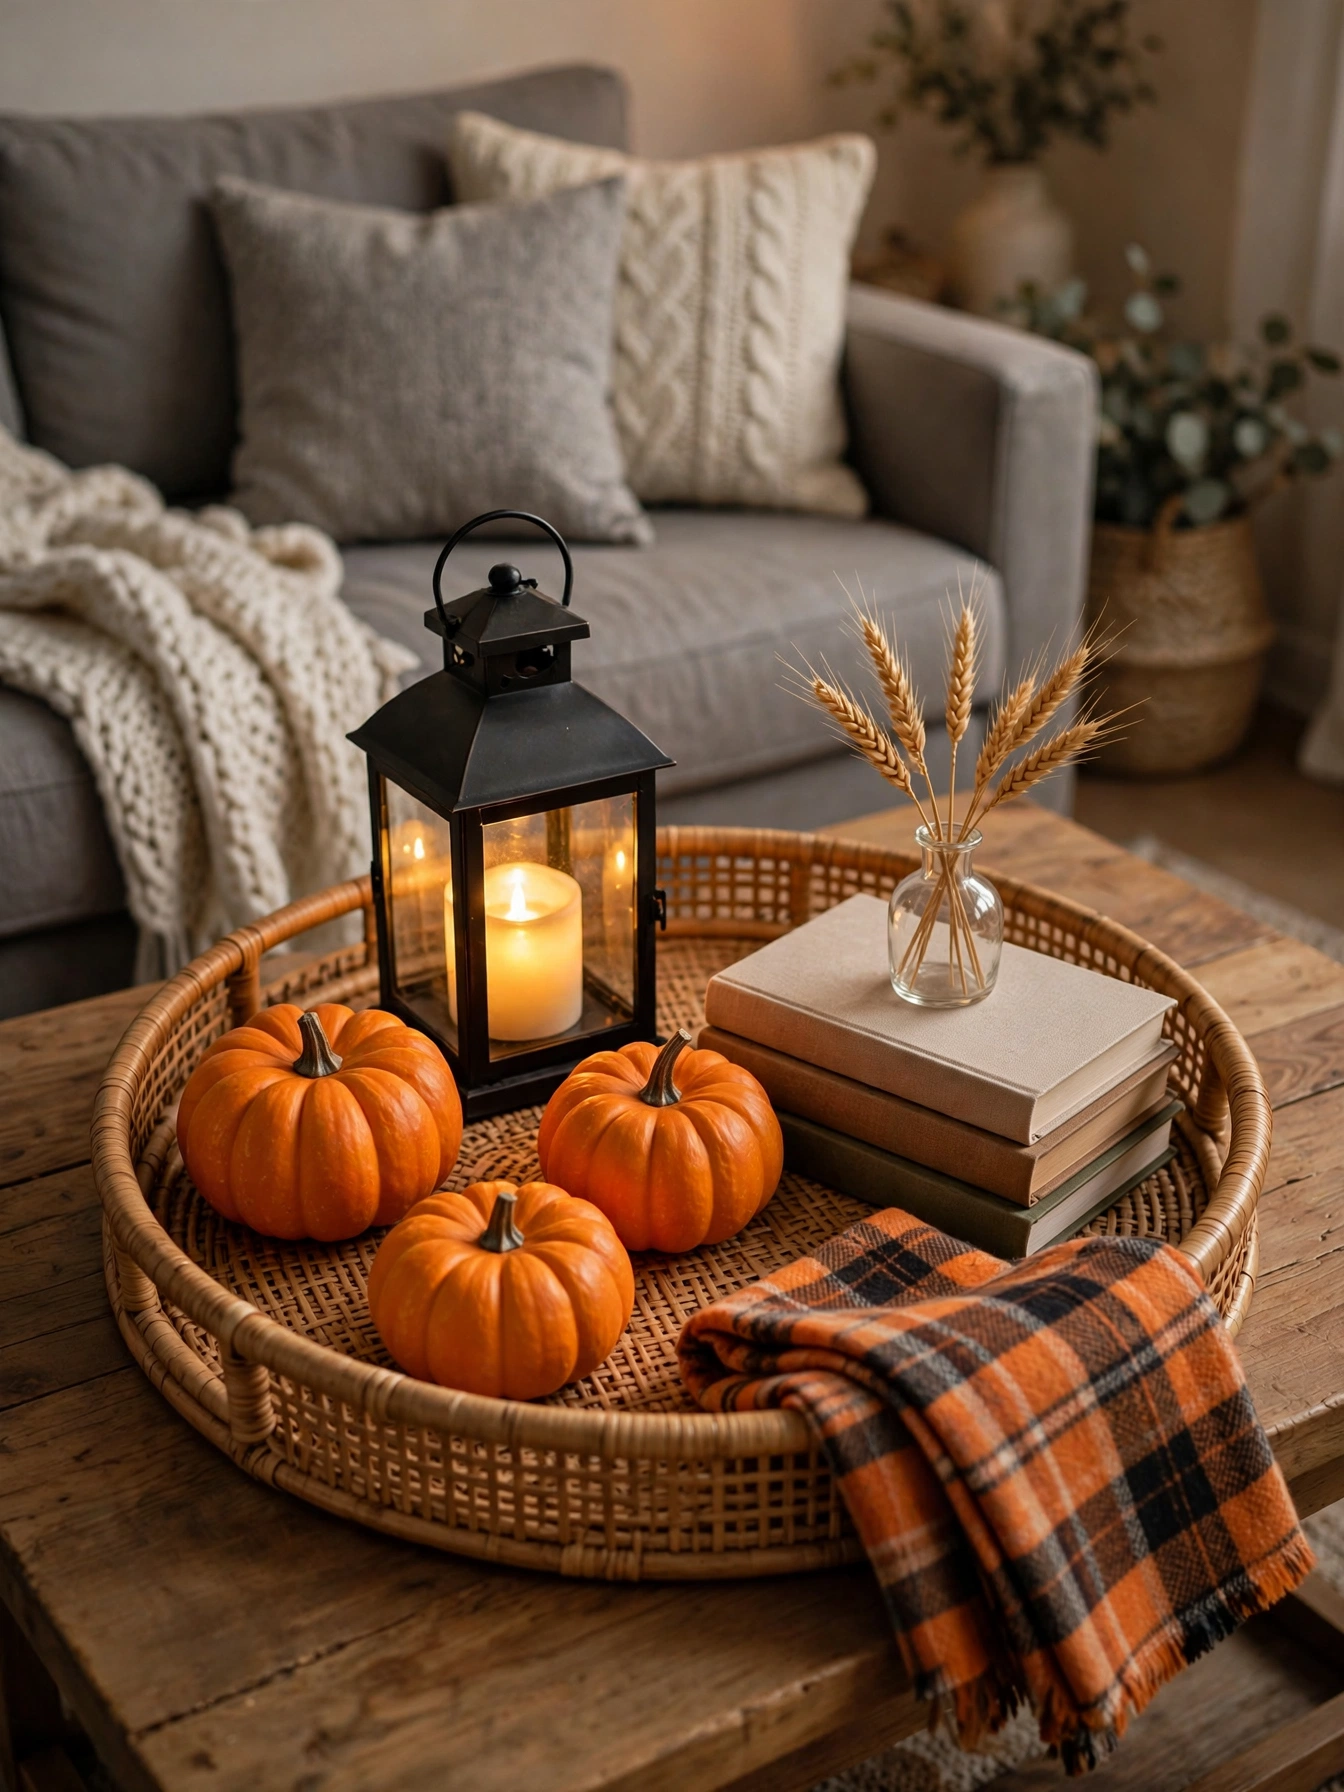
Why This Works:
- A tray corrals decor so the table stays usable
- The 18 inch round size suits standard 48 inch coffee tables
- Everything lifts off in one move for game night
- Styling follows a simple formula: light, nature, height, texture
Use a round tray 16 to 18 inches across with a 2 inch lip; the lip keeps pumpkins from rolling when the table gets bumped. Style with four elements: one glowing lantern (8 to 10 inches), three mini pumpkins (2 to 3 inches), one stack of two books, and one folded textile corner. Keep the total height under 14 inches so sightlines across the sofa stay open. Avoid trays without handles if you move it often; a loaded tray weighs 6 to 8 pounds and handle-less trays slip. Leave 12 inches of clear table on at least two sides for mugs and remotes.
This is the highest-impact 20 minutes in the whole list, since the coffee table anchors the room. The mistake to avoid is overfilling; if you cannot set down a coffee mug, remove one item. Rotate the tray 180 degrees weekly so the lantern side does not fade facing the window. One trade-off: rattan trays stain from wet mug rings, so coasters stay mandatory even with the tray.
Mini Hay Bale Vignette
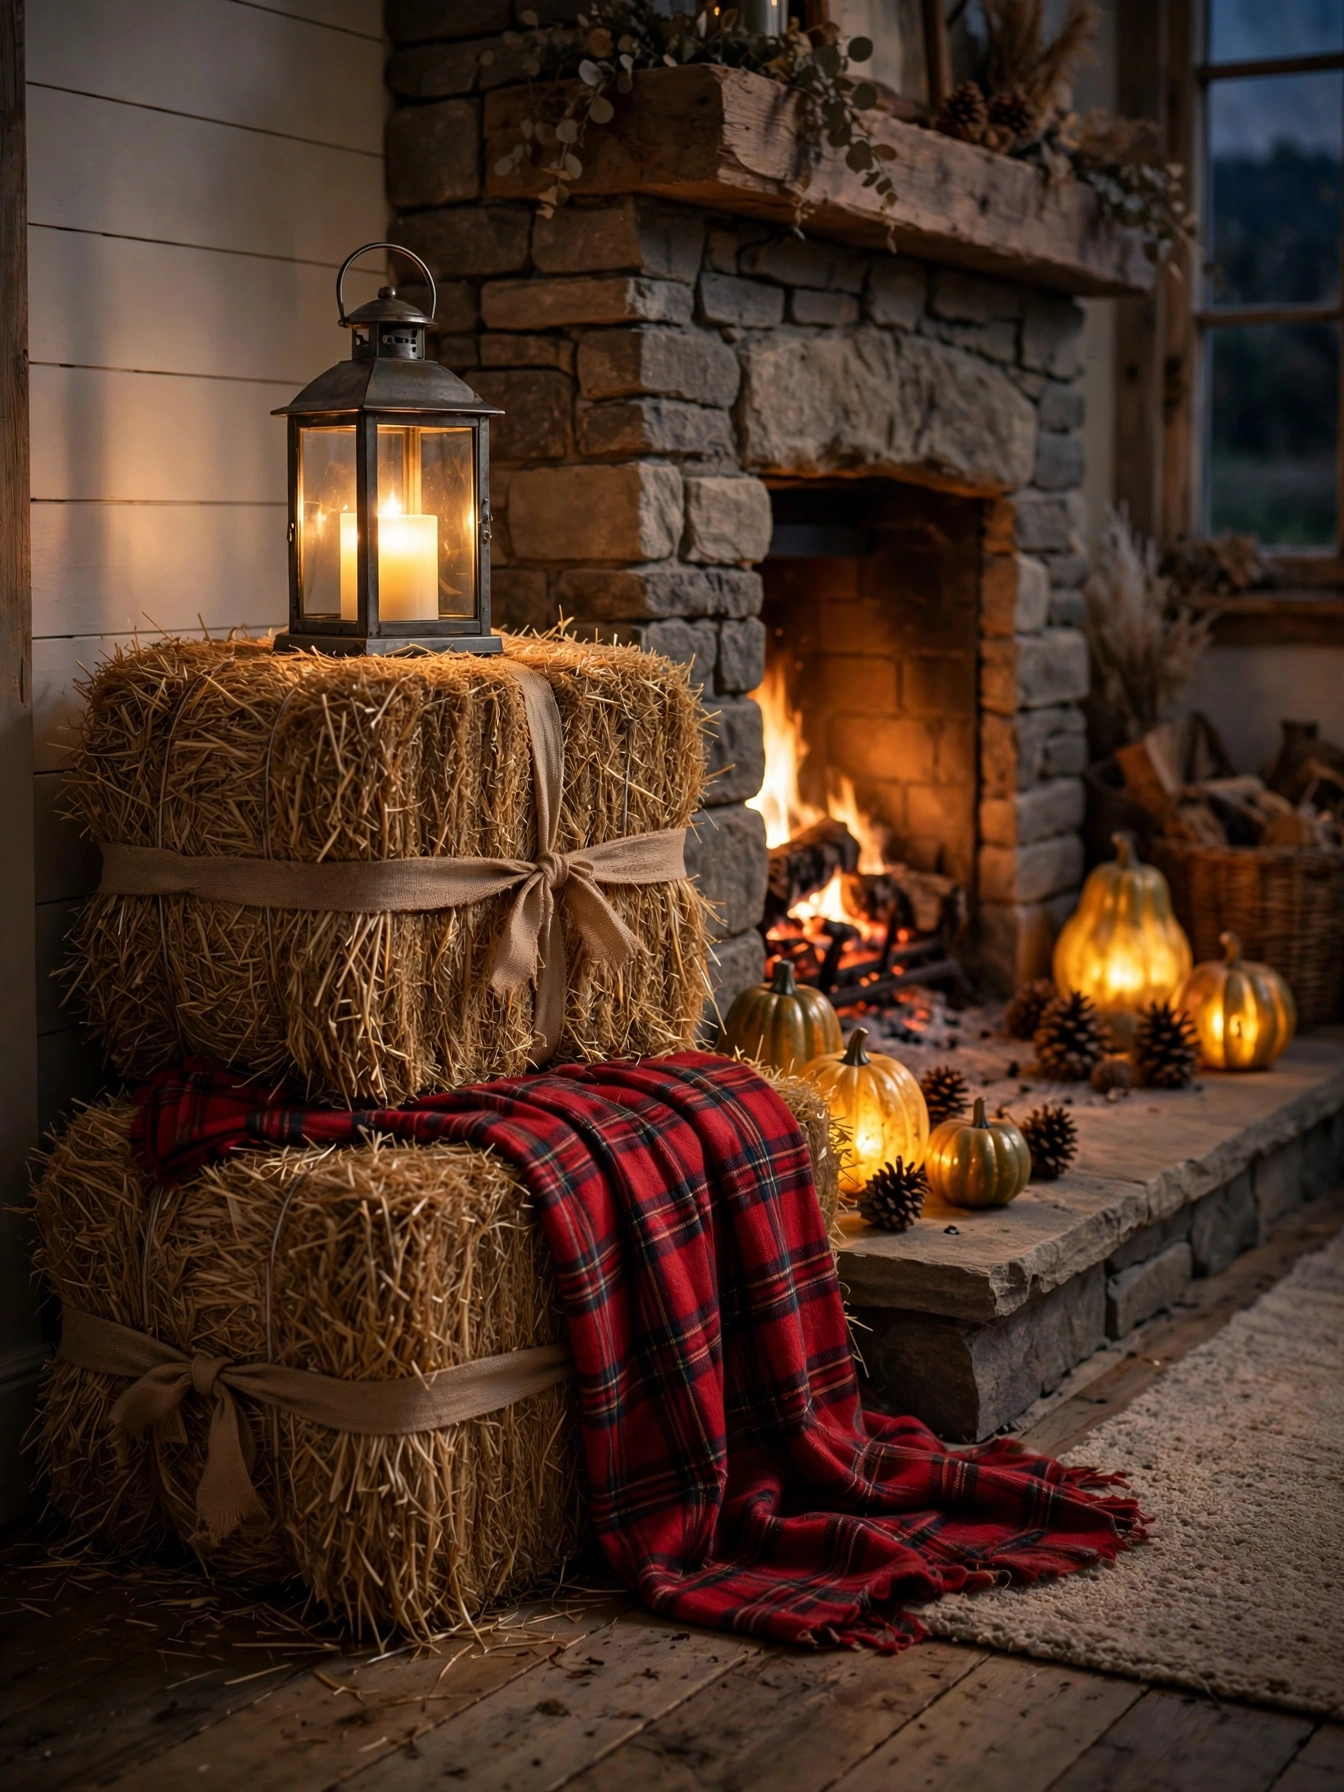
Why This Works:
- Mini hay bales (about 8 inches) bring the farm indoors safely
- Two bales stacked make an instant side table for a lantern
- The whole vignette costs 20 to 30 dollars
- Everything composts or stores flat at season end
Use decorative mini bales 8 by 10 by 14 inches, sold in craft stores for 6 to 10 dollars each; real field bales are too large and shed excessively indoors. Stack two bales beside the hearth, topping the stack with a glowing lantern no taller than 10 inches. Drape a 50 by 60 inch plaid throw over the lower bale, tucked at the back. Avoid placing hay within 36 inches of a working firebox; hay is extremely flammable and embers travel. Keep the vignette 18 inches from the walkway so the scratchy bales do not snag clothing.
Farmhouse hearths and covered porches are the right setting; formal rooms fight the hay. Hay dust is the real consideration: shake bales outdoors before bringing them in, and skip this if anyone has grass allergies. The bales compress over the season, so fluff the binding strings monthly to keep the shape. At season end, the bales compost fully, which beats storing bulky decor.
Leaf Curtain Fairy Lights

Why This Works:
- Fairy lights behind sheer curtains create a glowing fall backdrop
- Faux leaf garlands (6 feet) cost 8 to 12 dollars per strand
- The window becomes the room’s evening focal point
- Installation needs only removable hooks, so renters can do it
Hang two 6-foot faux leaf garlands across the curtain rod with 2 inch S-hooks, letting them drape 8 to 10 inches below the rod. Weave one 33-foot warm-white fairy strand through the leaves, clipping every 18 inches with tiny clear clips so the strand cannot slide down. Use removable adhesive hooks rated for 3 pounds on each side if the rod cannot hold more weight. Avoid real leaves for this; they dry, crumble and drop debris on the sill within 2 weeks. Keep light strands 6 inches from the glass to prevent condensation from reaching the battery box.
Living rooms with a street-facing window get double value: glow inside, curb appeal outside. The garlands need fluffing; out of the package they look flat, so bend each leaf outward for 10 minutes before hanging. One limitation: the effect only lands after dark, so daytime the window reads as simple leaf garland, which is still pleasant. If the window gets direct sun, faux leaves fade by late November; rotate the garland end to end mid-season.
Preserved Grass Floor Vase
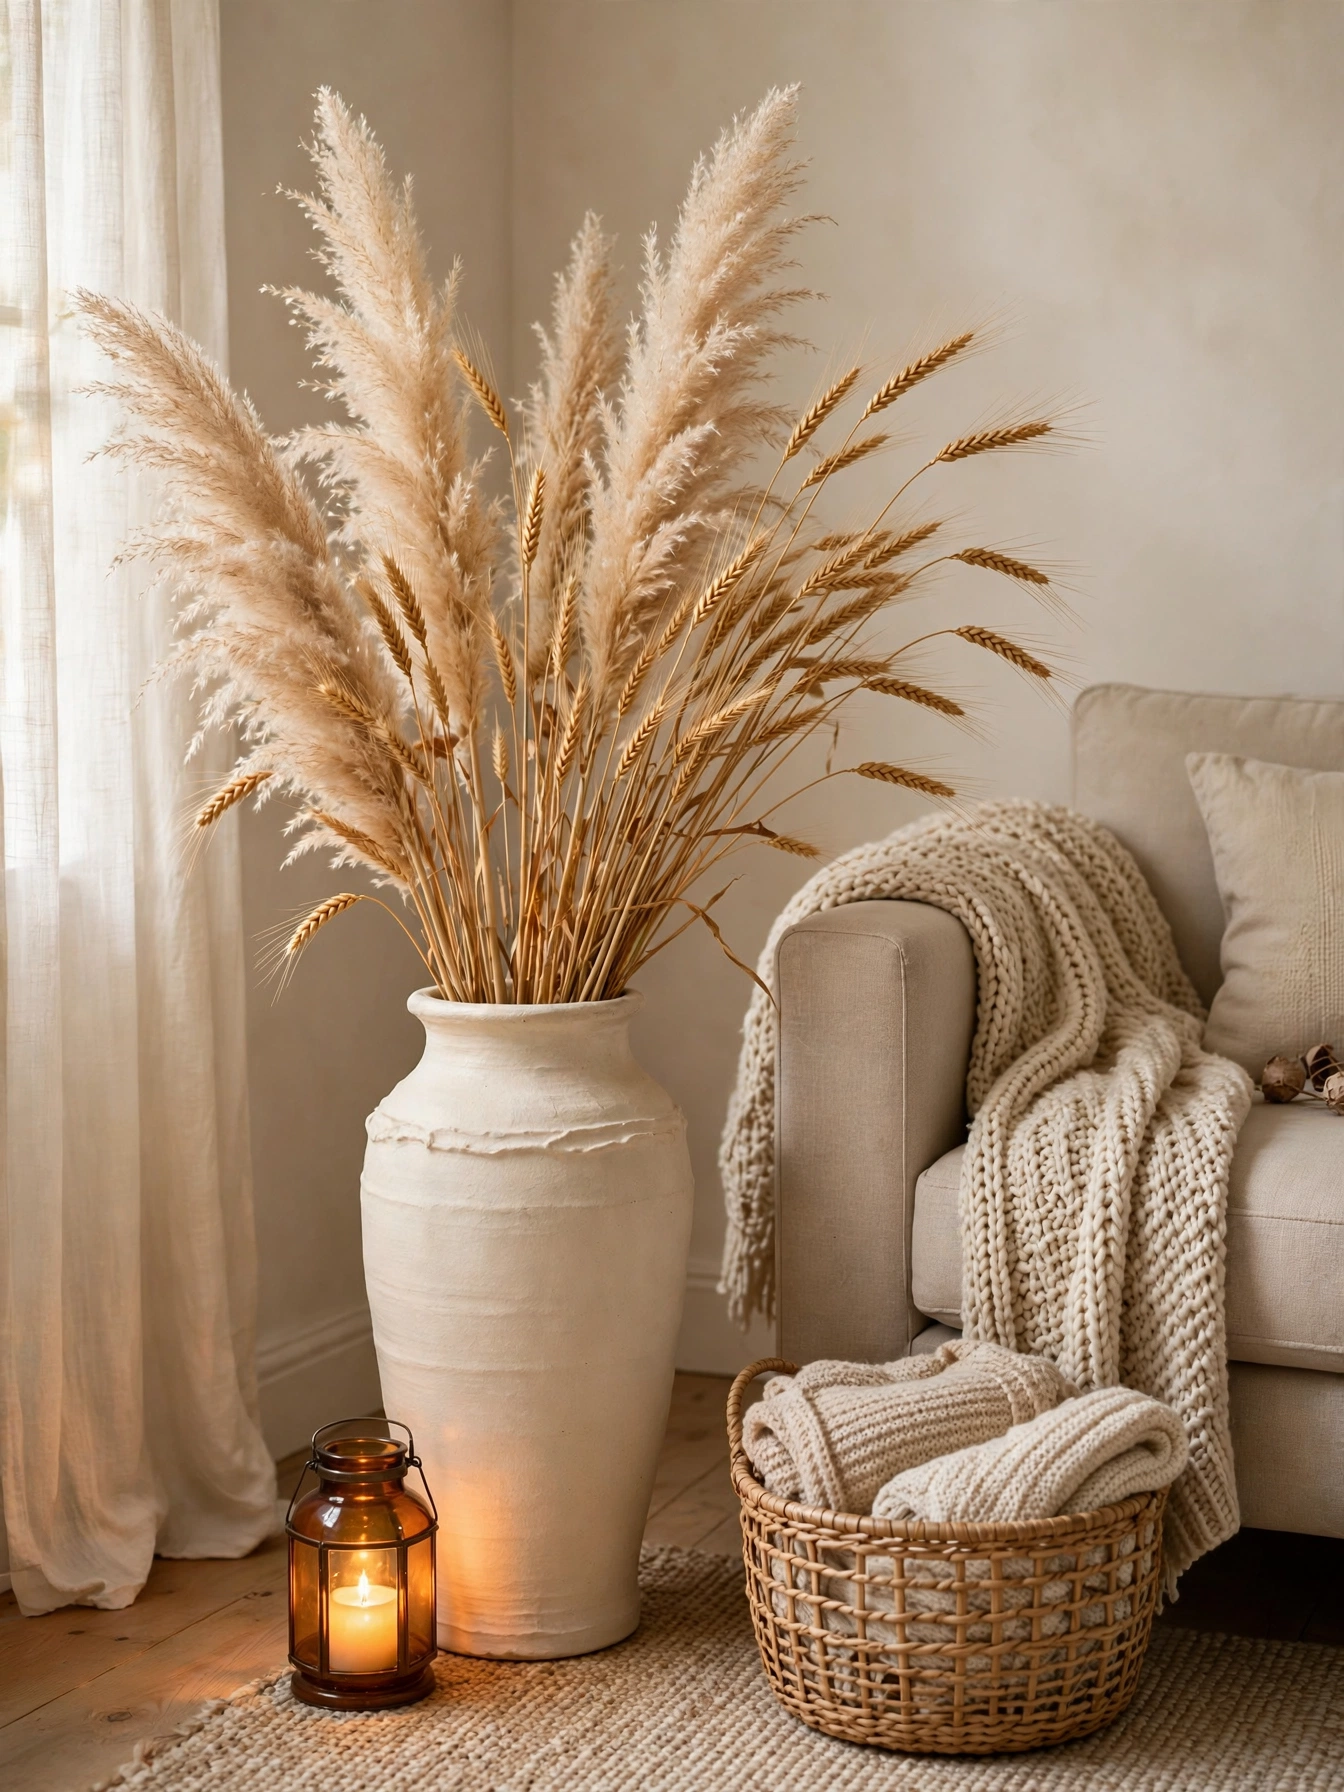
Why This Works:
- One tall arrangement fills a corner that furniture cannot
- Preserved grasses last 2 to 3 years, making the 30 to 50 dollar cost a bargain
- A 36 inch vase-plus-grass height suits 8-foot ceilings
- Zero water, zero light needs, zero maintenance
Choose a floor vase 20 to 24 inches tall with a weighted base; top-heavy arrangements tip, and 8-foot ceilings need at least 36 inches of total height to register. Fill with 10 to 15 stems of preserved pampas and wheat, each 36 to 48 inches long, fanning them in all directions. Set a small amber lantern with an LED candle at the vase base to ground the arrangement with light. Avoid placing the vase where doors swing or dogs wag; one good knock shatters ceramic and scatters 4-foot stems. Keep the arrangement 12 inches from walls so the plumes do not rub paint.
Dead corners beside sofas and flanking entry consoles are where this shines. The plumes shed for the first week; a light hairspray mist from 12 inches away cuts it dramatically. Real pampas versus preserved matters: real drops seeds for months, preserved stays put for years. One caution: keep dried grasses 12 inches from any real-flame candle, since plumes ignite fast.
Glowing Wall Sconce Craft
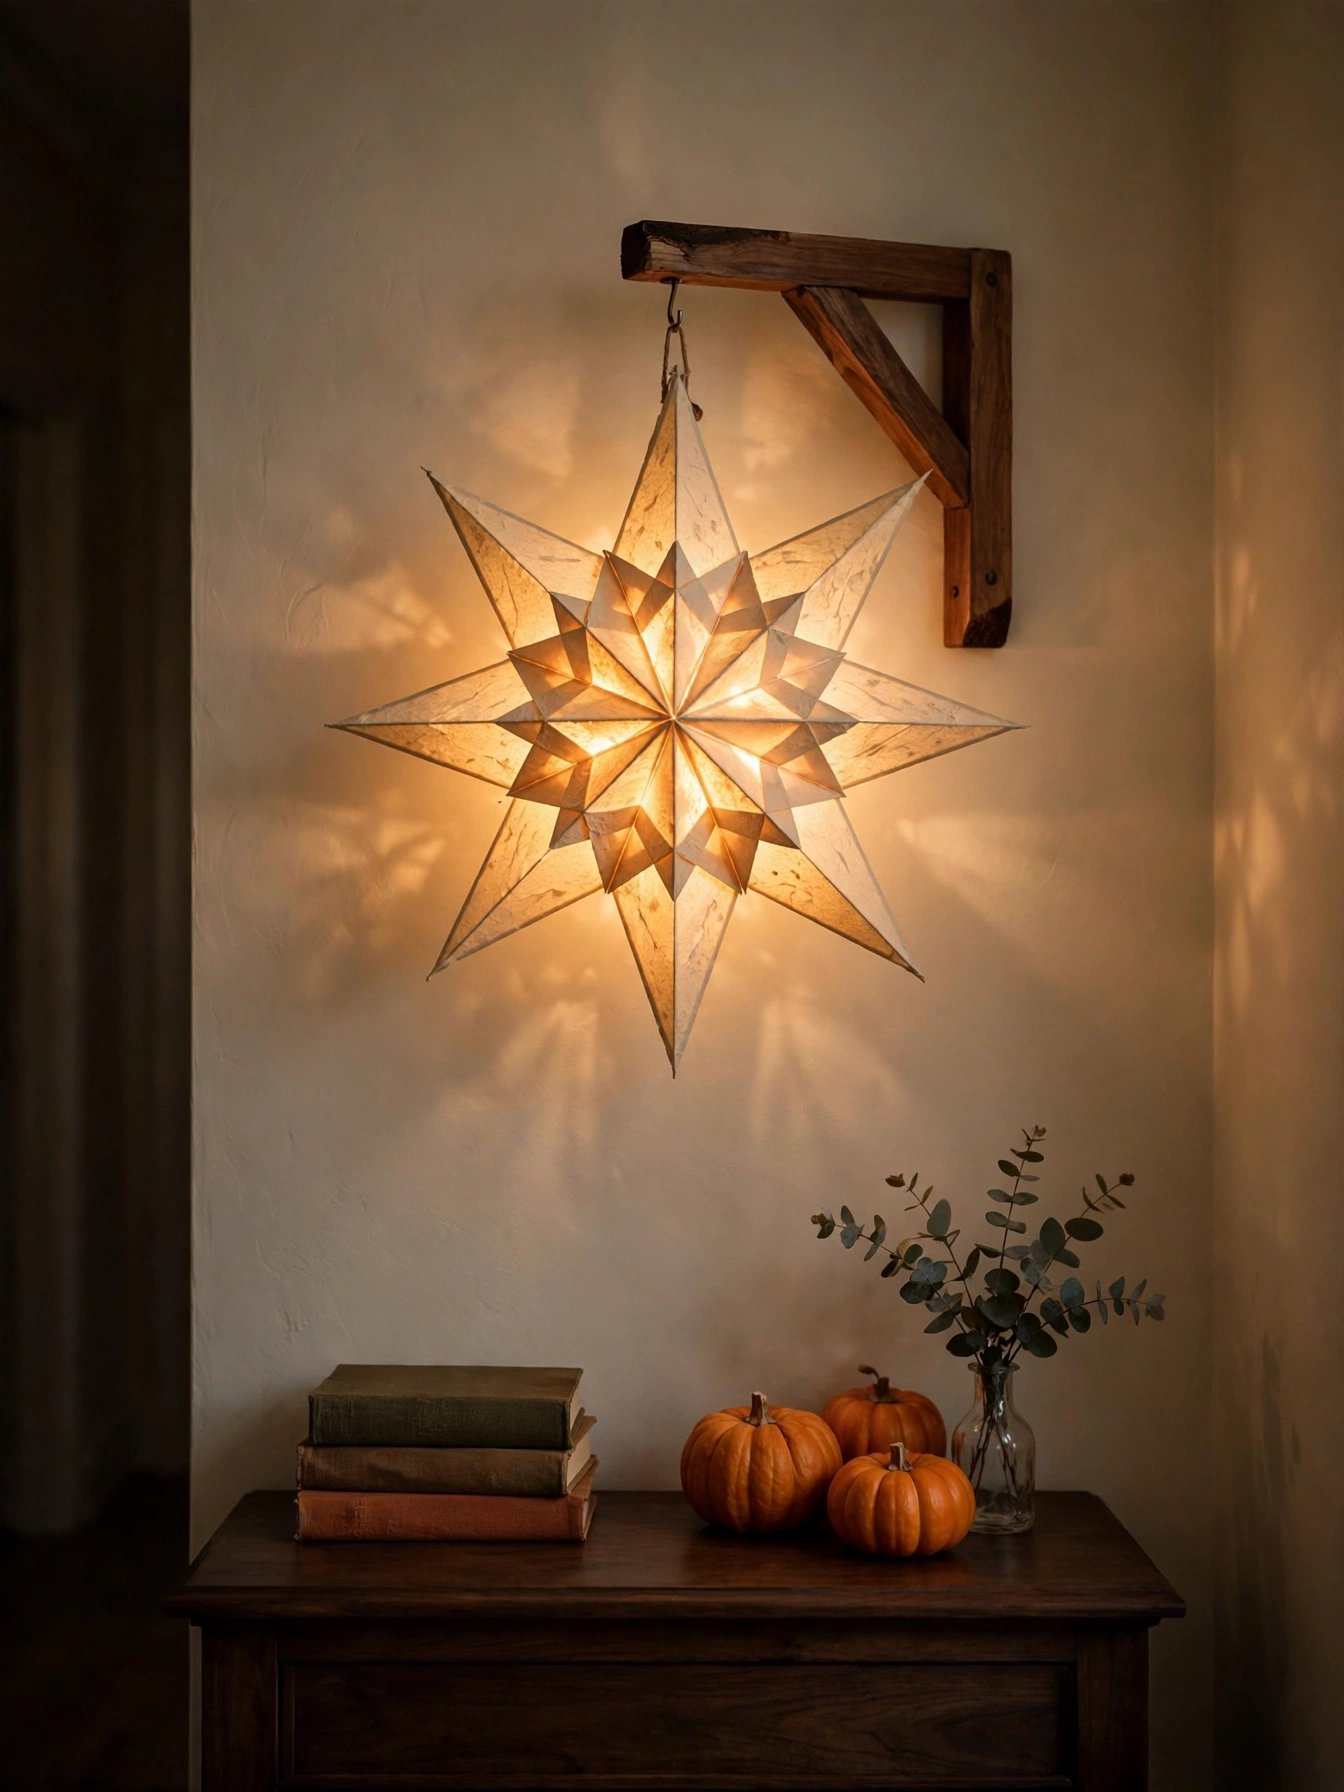
Why This Works:
- A paper star lantern costs under 10 dollars and glows like a boutique fixture
- Battery LEDs mean no electrician and no wiring
- The star shape throws patterned light on the wall
- One sconce transforms a dark hallway
Build the star from a pre-cut paper lantern kit (12 inch diameter kits cost 7 to 12 dollars) mounted on a 10 inch wood wall bracket. Power it with a battery LED puck light (3 inches across) stuck inside with adhesive; puck lights cost 8 to 12 dollars for a 3-pack with remote. Mount the bracket 60 to 66 inches from the floor, centered over the console. Avoid real candles in paper lanterns entirely; paper ignites in seconds and no clearance makes it safe. If you want a wired version instead of battery, hire a licensed electrician rather than tapping existing wiring yourself.
Dark hallways and entry nooks are where one glowing sconce does the most work. The paper fades in direct sun, so interior walls only. Remote-controlled pucks are worth the extra 3 dollars; reaching inside a mounted star to click a button gets old by week two. One limitation: the glow is ambient, not task light, so keep it decorative and keep real lighting for reading corners.
Modern DIY Fall Decor Ideas for Autumn 2026
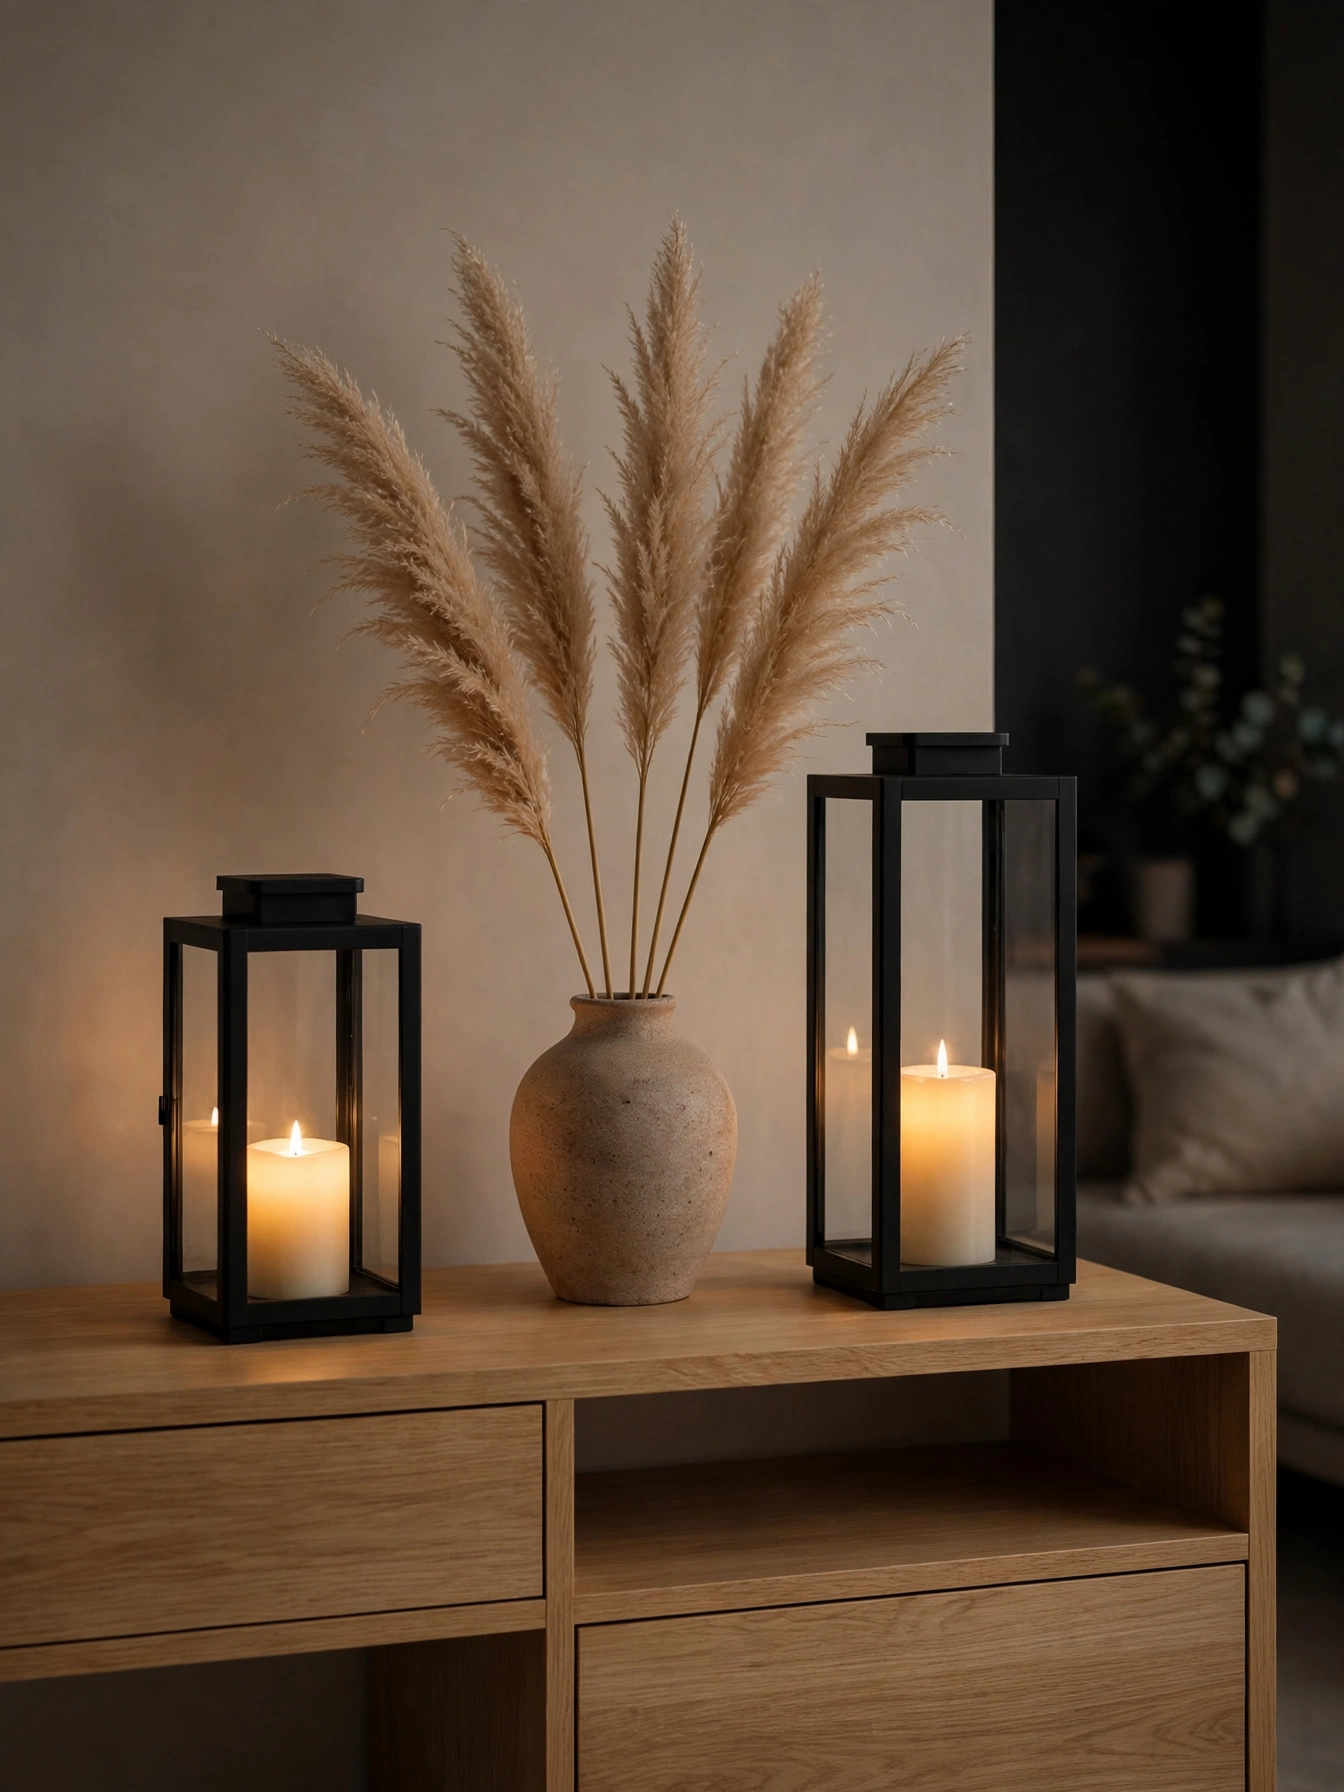
Why This Works:
- Matte black lanterns suit modern rooms that reject rustic textures
- Negative space is the design: five stems and two lanterns, nothing more
- The oak console keeps the look warm, not stark
- Under 60 dollars total for a designer-looking vignette
Use two matte black metal lanterns, 12 and 15 inches tall, spaced 24 inches apart on a 60 inch light-oak console. Place a stoneware vase of 5 pampas stems, 30 to 36 inches long, centered between them. Fit each lantern with a 3 by 4 inch LED pillar on a 4-hour timer. Avoid overfilling the modern vignette; the style depends on restraint, and each added object weakens it. Keep the console top 70 percent clear; the empty wood is part of the composition.
Modern, Scandinavian and transitional homes are where this restraint reads as intentional rather than unfinished. The risk is sterility: if the room feels cold, swap one black lantern for a brass one to warm the metals mix. Pampas sheds, so the hairspray trick from earlier applies here too. Households that love maximalist fall may find this sparse; it is a style commitment, not a starter project.
Painted Acorn Wreath

Why This Works:
- Real acorns cost nothing to gather, and a 14 inch grapevine base runs about 8 dollars at craft stores
- Metallic craft paint in gold, copper and burgundy catches afternoon light without looking gaudy
- The finished wreath weighs under 2 pounds, so a standard over-door hook holds it with no hardware
- Sealed with clear matte spray, the paint survives light rain through the full 8 week fall season
Gather 60 to 80 acorns with their caps intact, rinse them in warm soapy water and bake at 200 degrees for 45 minutes to kill any weevils hiding inside. Paint the nut bodies in alternating shades of antique gold, burnished copper and deep burgundy, leaving the caps natural for contrast, and let each coat dry 30 minutes before handling. Hot glue the acorns onto a 14 inch grapevine wreath base in tight clusters of 5 to 7, working around the circle so no bare vine shows through. Budget about 12 dollars total: 8 for the wreath form and 4 for three small bottles of acrylic craft paint. Avoid painting on humid days, because the paint stays tacky and picks up dust.
This wreath suits front doors, interior doors and above-mantel hooks, anywhere you want harvest texture without the bulk of a full floral wreath. The most common mistake is spacing the acorns too far apart, which makes the wreath look sparse instead of lush, so pack them tighter than feels natural. Skip this project if you cannot find acorns with intact caps, since capless acorns look unfinished no matter how nice the paint job. Keep it under a covered porch rather than fully exposed, because driving rain will eventually soften the hot glue bonds.
Pro Tip: Dab a tiny dot of dark brown paint on each acorn tip before the metallic coat dries to mimic natural shading and make the colors look richer.
FAQs
What are the easiest diy fall decor ideas for autumn 2026 for beginners?
Start with the velvet pumpkin glow bowl or the harvest coffee table tray; both assemble in under 20 minutes with no tools beyond scissors. Budget 25 to 40 dollars for your first project. Better Homes and Gardens notes that grouping decor in odd numbers creates the most pleasing arrangements.
How much should I budget for a full harvest glow vignette?
A complete console or mantel vignette runs 40 to 90 dollars: 12 to 20 dollars for LED lights with timers, 15 to 35 dollars for pumpkins, and 10 to 25 dollars for ribbon or filler. Buying LED sets after Halloween at 50 percent off halves next year’s lighting cost.
How do I keep DIY candle crafts safe around kids and pets?
Use LED candles in any craft within 48 inches of the floor, covering curious toddlers and wagging tails. The National Fire Protection Association advises keeping real flames at least 12 inches from anything that can burn. Anchor lanterns with museum putty so a bump cannot topple them.
How long do diy fall decor ideas for autumn 2026 last on a covered porch?
On a covered porch, LED-based crafts last the full 8 to 10 week season: faux pumpkins and pinecones indefinitely, dried wheat and corn 6 to 8 weeks before brittleness sets in. Bring velvet and paper pieces inside during driving rain, and expect burlap to fade after 6 weeks of sun.
Are LED candles really cheaper than real ones over a season?
Yes. A 12-dollar set of 3 LED pillars runs 1,000 hours per set of batteries, covering 3 seasons of nightly use. Energy Star notes LEDs use 75 percent less energy than incandescents. Three pillars the same size cost 18 to 30 dollars and burn out in weeks.
Conclusion
These 22 diy fall decor ideas for autumn 2026 prove that harvest glow comes from light, not spending: pick one surface, add a glowing focal point, and build around it with natural materials. Measure first, choose LED over real flame near anything dried, and let warm 2700K light do the decorating.
Your first action is simple: choose the idea that fits the spot you see when you walk in tonight, gather the materials tomorrow, and build it this weekend. Follow HomelyCrafter on Pinterest for more seasonal craft ideas. Save this to your Pinterest boards so you can refer back to it!

Muhammad Israr is a home decor enthusiast and the writer behind Homely Crafter. He spends his days researching paint colors, layouts and budget-friendly styling ideas, then breaks them down into practical, easy-to-follow guides so you can decorate with confidence.
4 thoughts on “22 Delightful Harvest Glow DIY Fall Decor Ideas 2026”