
A craft-store showpiece front door costs less than two movie tickets and one Saturday afternoon, if you build it yourself. These 20 DIY Halloween door decor ideas 2026 prove that a handmade look beats store-bought, as long as you know the right materials, measurements, and weatherproofing tricks.
Every project below is a real craft you build yourself, with a full materials list, honest cost range, step-by-step instructions, and outdoor durability advice. Most supplies come from dollar stores, craft chains, or your garage, keeping these DIY Halloween door decor ideas 2026 genuinely affordable, and every finished piece survives at least the full October season with the right sealant, which is what makes these DIY Halloween door decor ideas 2026 genuinely outdoor-ready.
Expect exact numbers throughout: paint codes, yardage, drying times, and hanging weights, so you can plan each weekend project with confidence.
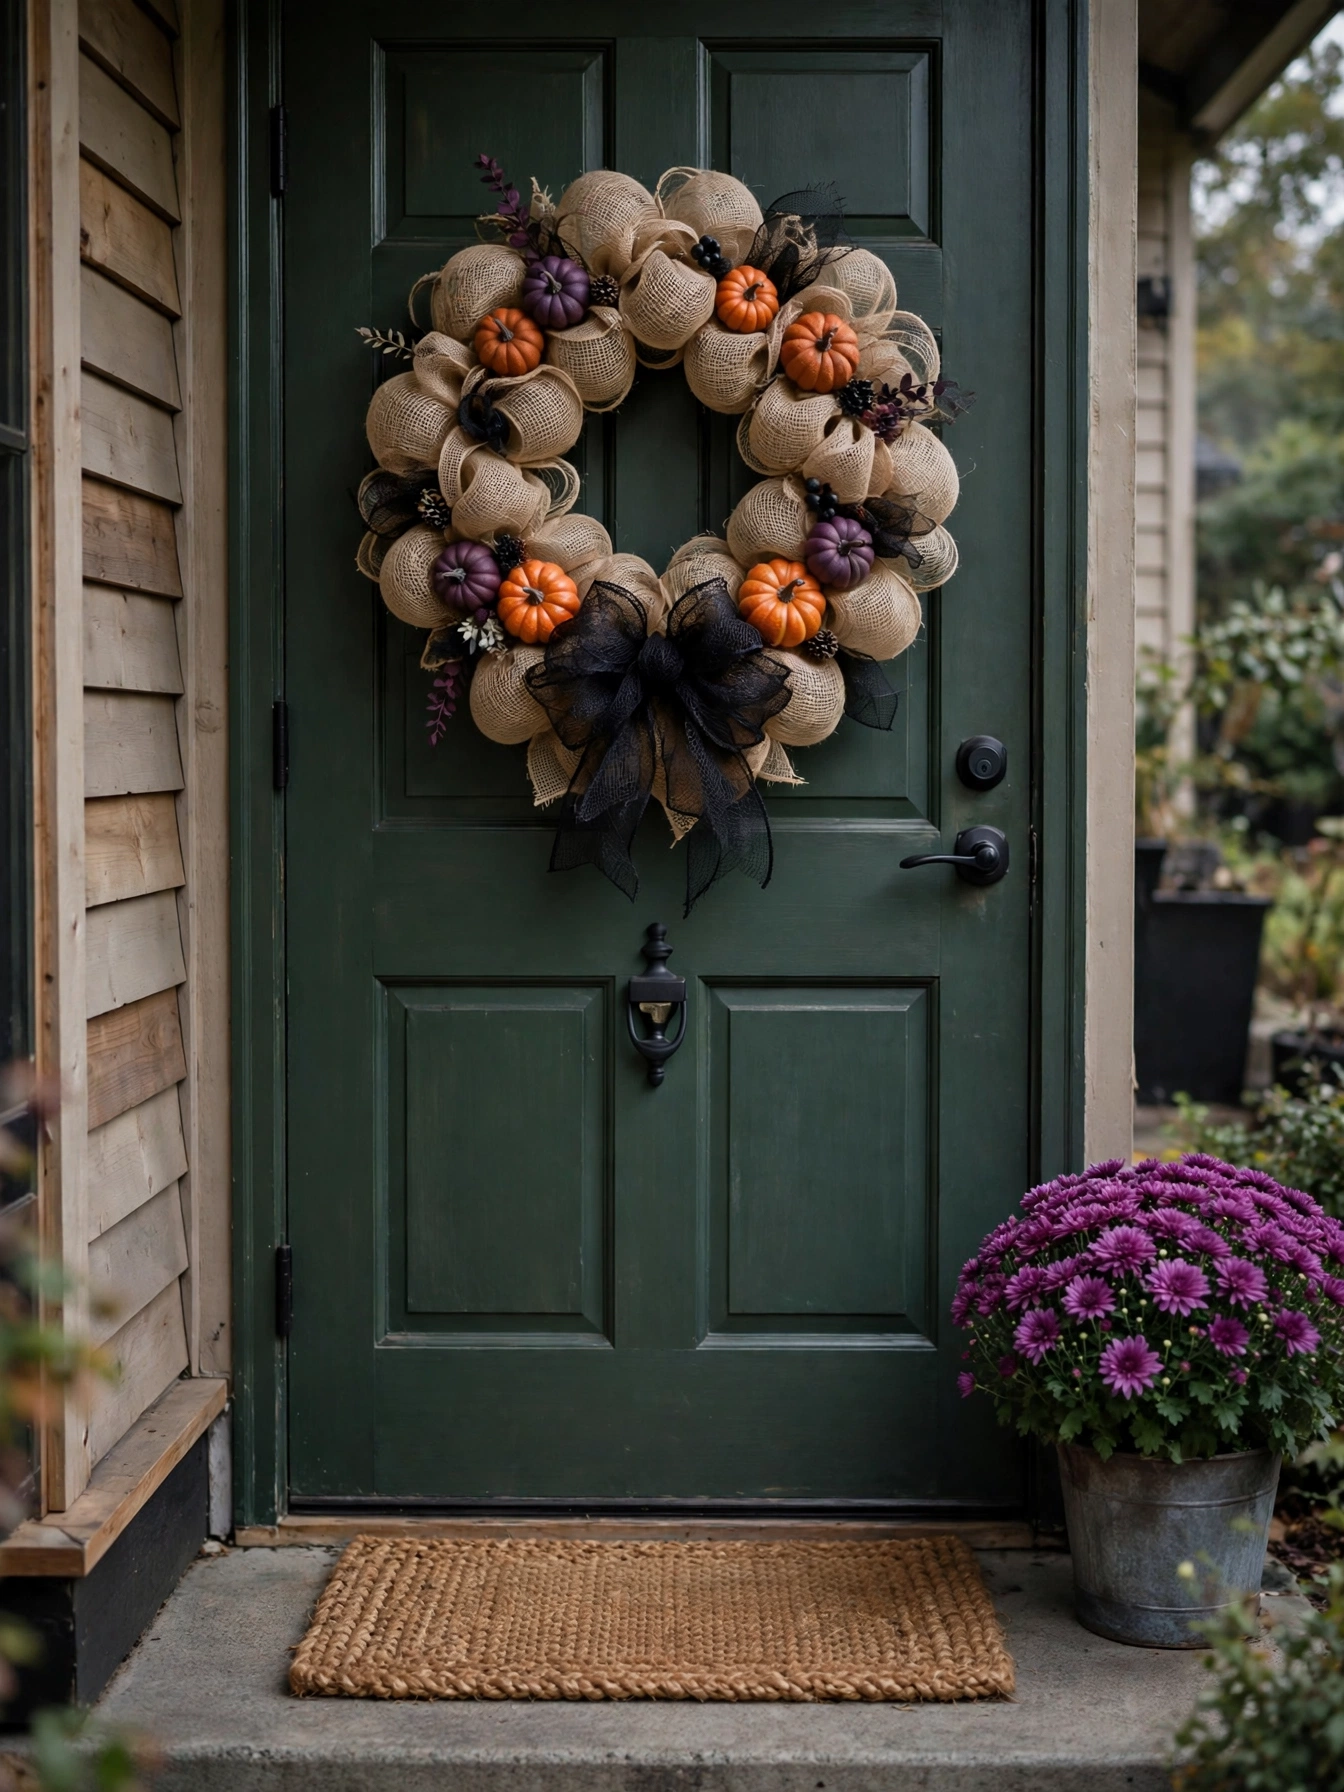
Burlap Bubble Wreath
Why This Works:
- The bubble technique gives a full 6 inch deep wreath from only 30 yards of mesh
- Natural burlap texture hides uneven gathering, which makes it beginner friendly
- Matte black and burnt orange accents read clearly from 30 feet away
- The whole project costs under 20 dollars and finishes in about 90 minutes
A standard 12 inch wire wreath frame needs 3 rolls of 10 yard burlap mesh ribbon, each 5 inches wide, to build a full bubble pattern. Cut the mesh into 10 inch lengths and pinch each length through every other ring of the frame with a black pipe cleaner, working clockwise until all 4 rings are filled. Add a 6 inch bow from 2.5 inch black wired ribbon at the top and hot glue 3 small faux pumpkins (2.5 inch diameter) into the lower third. Avoid natural untreated burlap outdoors because it sheds fibers and mildews within 2 weeks in damp weather. According to The Spruce, mesh ribbon with a polypropylene blend holds its shape outdoors far longer than pure jute styles. Homeowners who have tried this find that pre-cutting all 36 mesh squares before assembly cuts build time in half.
This wreath suits renters and first-time crafters because it hangs from a single over-the-door hook rated for 5 pounds, with no drilling and no permanent marks. A real-world limitation is wind: the deep bubble shape catches gusts, so on exposed porches wire the frame to the hook with two 8 inch zip ties behind the mesh. Spray the finished wreath with two coats of Krylon UV-Resistant Clear Coating, letting each coat dry 2 hours, to stop the orange dye from fading in direct sun. Total cost runs 15 to 19 dollars depending on whether the faux pumpkins come from a dollar store or a craft chain.
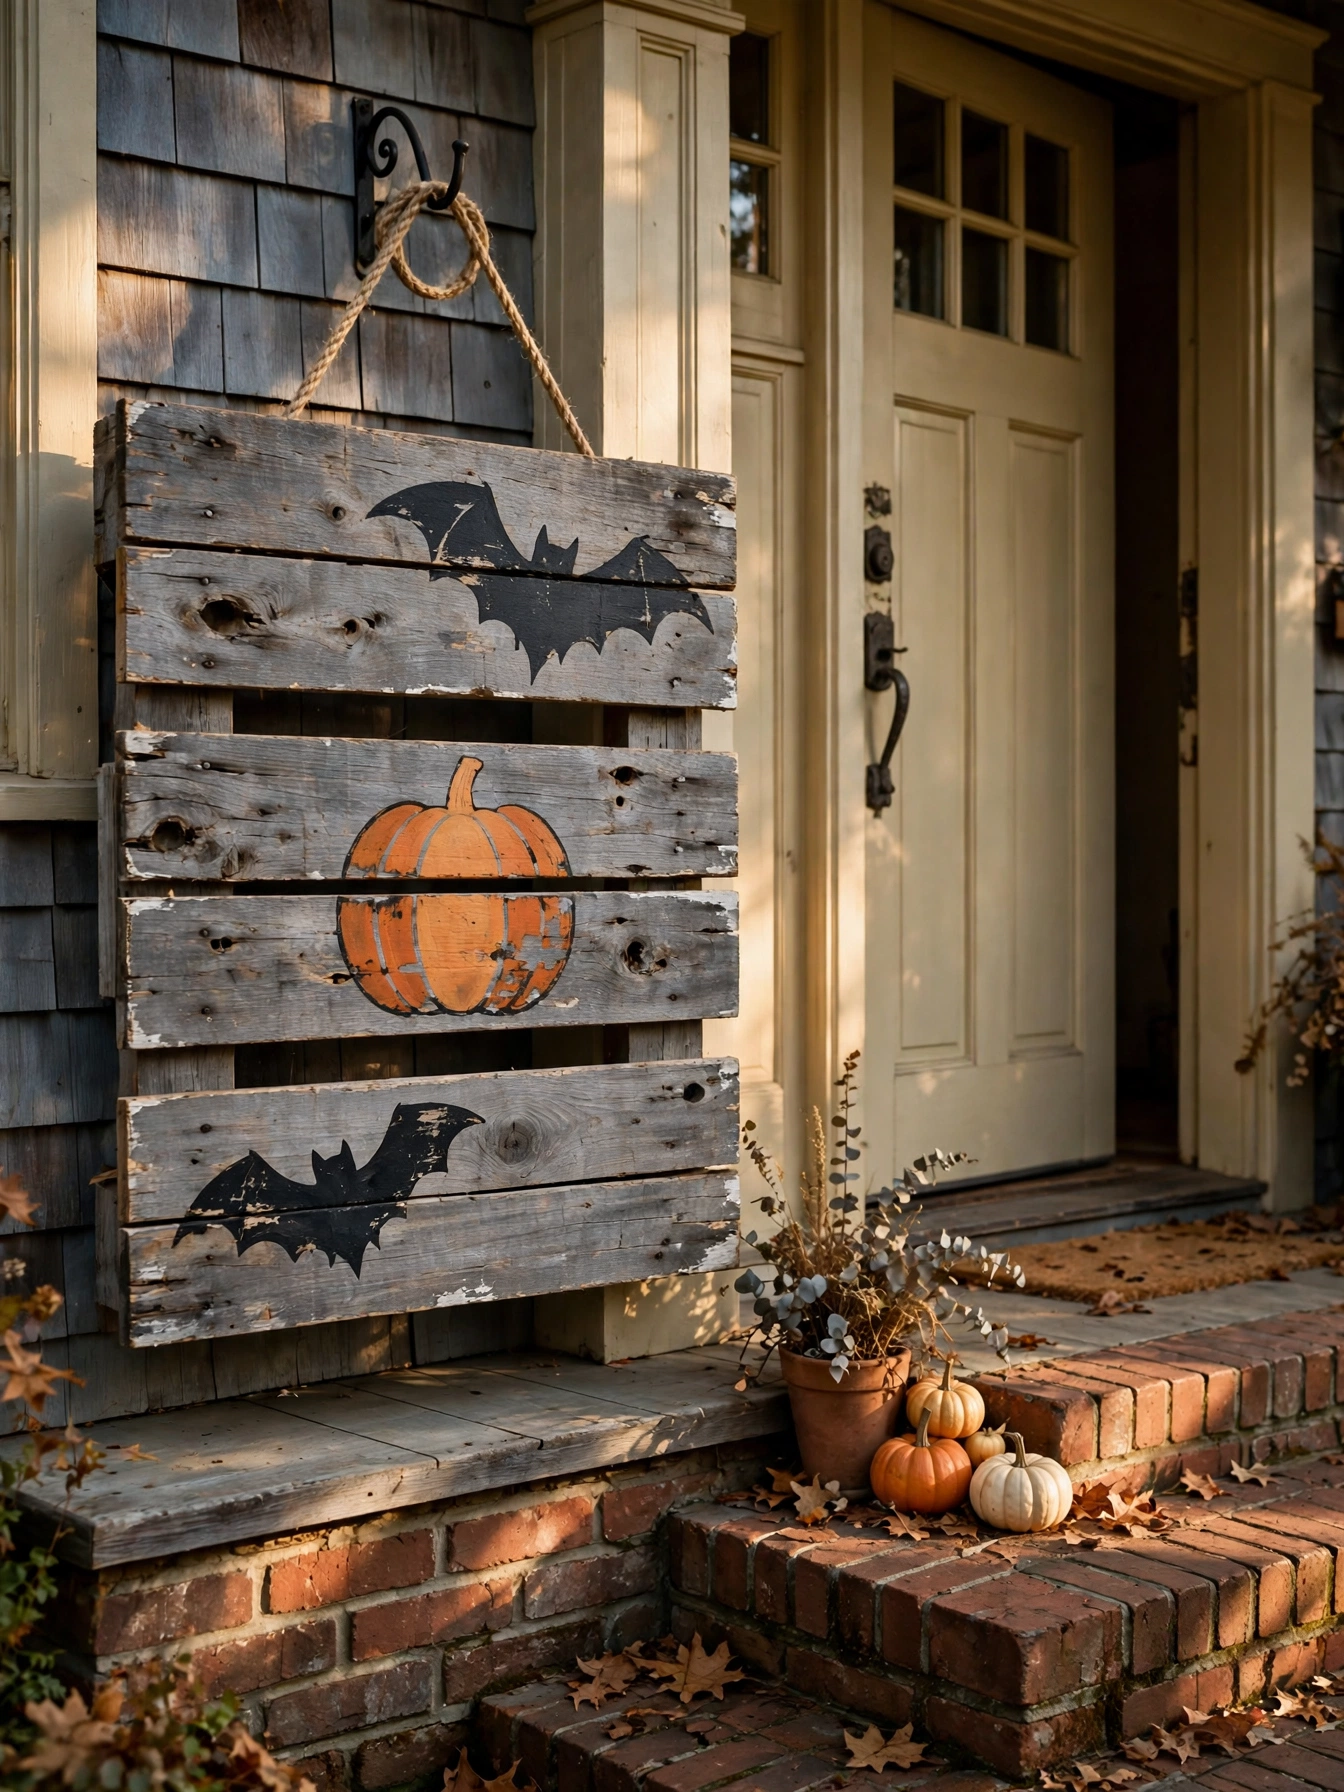
Pallet Trick-or-Treat Sign
Why This Works:
- Three 24 inch pallet slats make a sign big enough to read from the sidewalk
- Chalk paint grips rough reclaimed wood without sanding or priming
- The distressed finish looks intentional, so imperfect brushwork disappears
- Total cost stays under 15 dollars when the pallet wood is free
Use three pallet slats or 1 by 6 inch pine boards, each cut to 24 inches long, screwed to two 12 inch vertical backers with 1.25 inch exterior screws. Brush on two coats of orange chalk paint (a close match to Benjamin Moore 2169-10 Orange Blossom), sanding lightly with 120 grit paper between coats after a 1 hour dry time. Stencil or freehand simple shapes like bats and moons in charcoal black craft paint, then seal with 2 coats of water-based outdoor polyurethane. Avoid hanging the sign with plain twine because untreated jute stretches up to 15 percent when wet and the sign will tilt within a week. The usual trap during installation is skipping the backer boards, which lets the slats warp apart after the first rain. Hang with a braided nylon rope rated for 25 pounds instead.
Among DIY Halloween door decor ideas 2026, this project suits anyone with a drill and a free Saturday, and it works on doors, porch posts, and garage walls alike. The honest trade-off is weight: a 3 slat sign with backers weighs 6 to 8 pounds, so adhesive hooks will fail on textured siding or brick. If you are mounting a sign heavier than 10 pounds over a doorway into brick or masonry, hire a professional handyman to set proper masonry anchors rather than trusting adhesive strips or nails in mortar joints. Otherwise two 2 inch exterior screws into a wooden door frame or porch post hold it securely for the whole season.
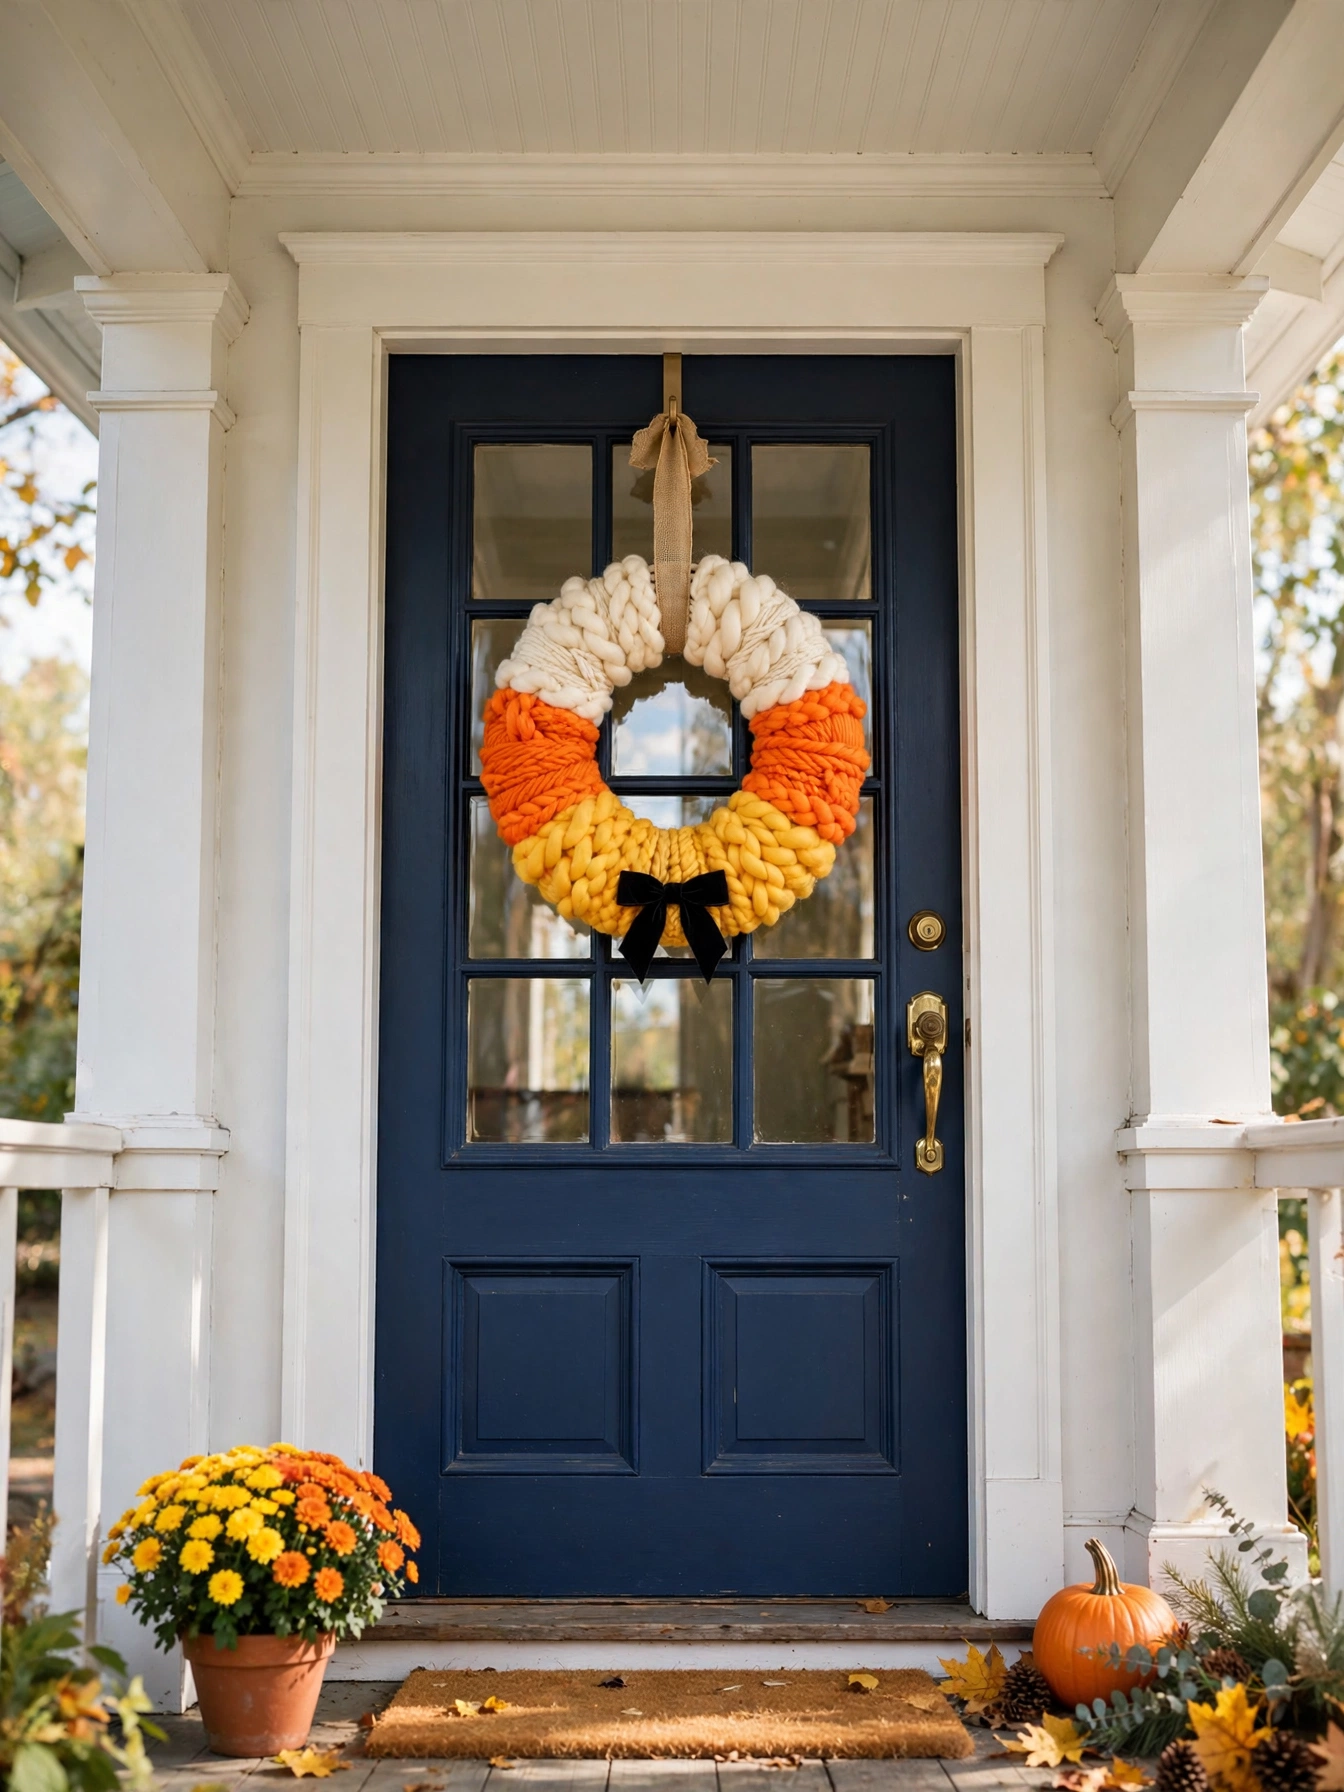
Candy Corn Yarn Wreath
Why This Works:
- The candy corn color blocking is instantly recognizable from the street
- Yarn wrapping uses no sewing, cutting is limited to the yarn itself
- A 14 inch foam form keeps the finished wreath light at under 2 pounds
- Materials cost about 12 dollars, and the yarn never needs weather sealing on a covered porch
Start with a 14 inch white foam wreath form and three skeins of medium-weight acrylic yarn in white, orange, and golden yellow. Wrap the white section first around the top third of the form, securing the start and end with a dab of hot glue, then wrap the orange middle band and the yellow bottom band the same way. Each color band needs roughly 60 to 80 yards of yarn, and tight, edge-to-edge wrapping prevents foam from showing through after a week of temperature swings. Avoid cotton yarn for outdoor wreaths because it absorbs up to 7 percent of its weight in water and sags noticeably after one rainy night. Acrylic yarn costs about 4 dollars per skein and sheds water well enough for a covered porch. Hot glue bonds to foam best when applied at high temperature and the yarn is pressed in immediately.
This wreath is ideal for apartments and covered entries where rain never touches it directly. The limitation is sun exposure: bright yellow yarn fades fastest, losing noticeable color after about 3 weeks of direct afternoon sun, so hang it on a north or east facing door when possible. The wreath slips onto a standard over-door hook, and a 4 inch black grosgrain ribbon looped through the top keeps it centered. If any yarn end works loose, a single dot of hot glue fixes it in seconds.
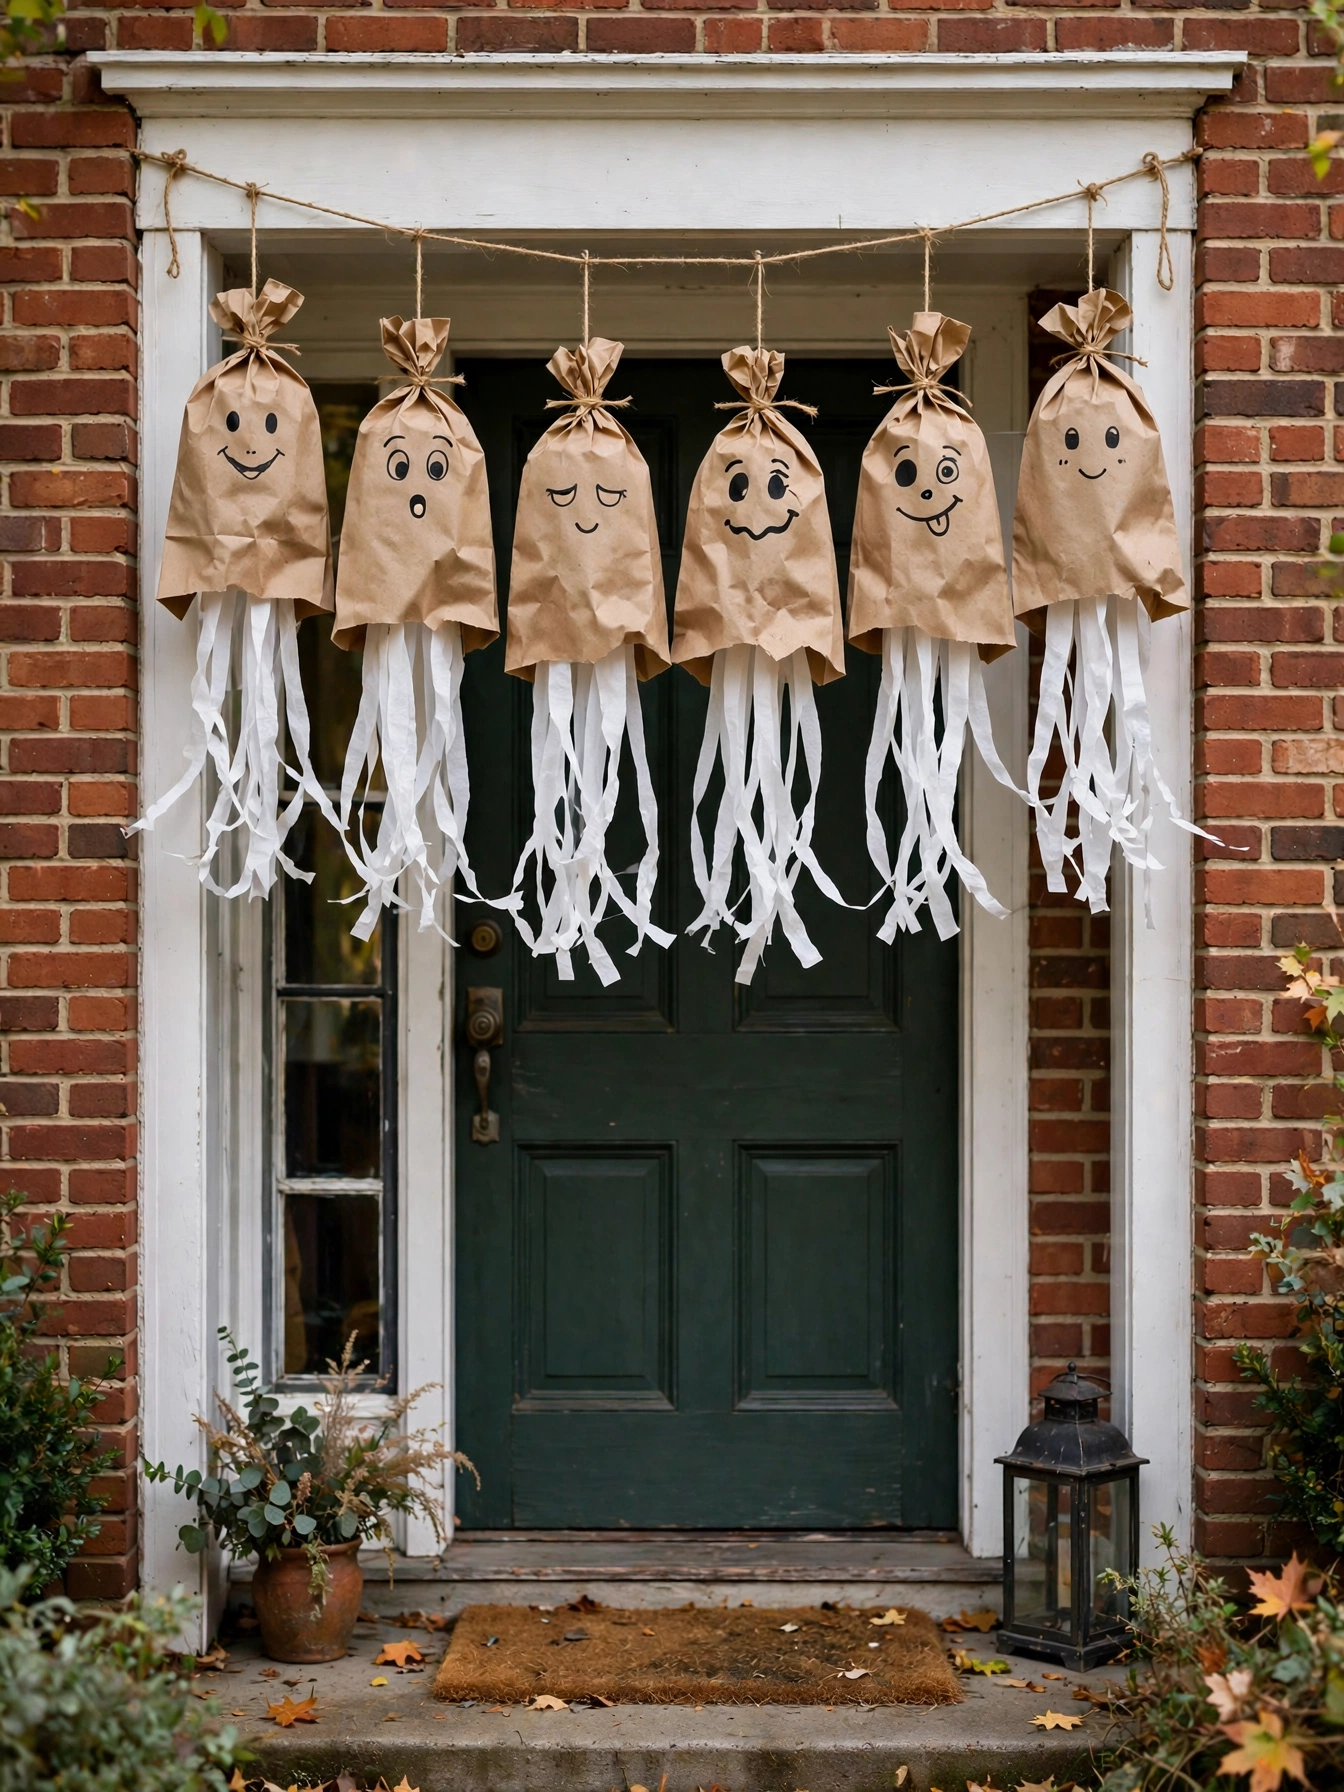
Paper Bag Ghost Drape
Why This Works:
- Eight paper bag ghosts fill a 36 inch door frame for under 6 dollars
- Kids can draw the faces, which makes it a genuine family craft
- The drape installs in 20 minutes with no tools at all
- Crepe paper streamers add movement that catches the eye from the sidewalk
You need 8 brown kraft lunch bags (standard 5 by 3 by 11 inch size), a roll of white crepe paper streamers, black permanent marker, and 4 feet of jute twine. Stuff each bag with one sheet of crumpled newspaper so the ghost body holds a round 4 inch shape, draw a simple face with the marker, and staple a 12 inch crepe paper tail to the bottom of each bag. String the bags 4 inches apart along the twine and hang the twine across the door frame with two removable adhesive hooks rated for 1 pound each. Avoid placing paper ghosts where sprinklers or roof drip lines hit them, because uncoated kraft paper disintegrates after about 30 minutes of direct water contact. In real homes, this project works best on covered porches where the bags stay dry for the full 31 days of October.
This is the cheapest project in the collection and the best one for crafting with children under 10. The honest limitation is durability: even with care, expect to replace 2 or 3 bags per season if October brings wind, since the crepe tails tear at about 15 miles per hour of gust. Store leftover bags and streamers in a zip bag so repairs take 5 minutes. For a longer-lasting version, spray each finished ghost with two light coats of clear acrylic sealer, which adds roughly 3 dollars to the cost but doubles the outdoor life.
Cheesecloth Door Ghosts
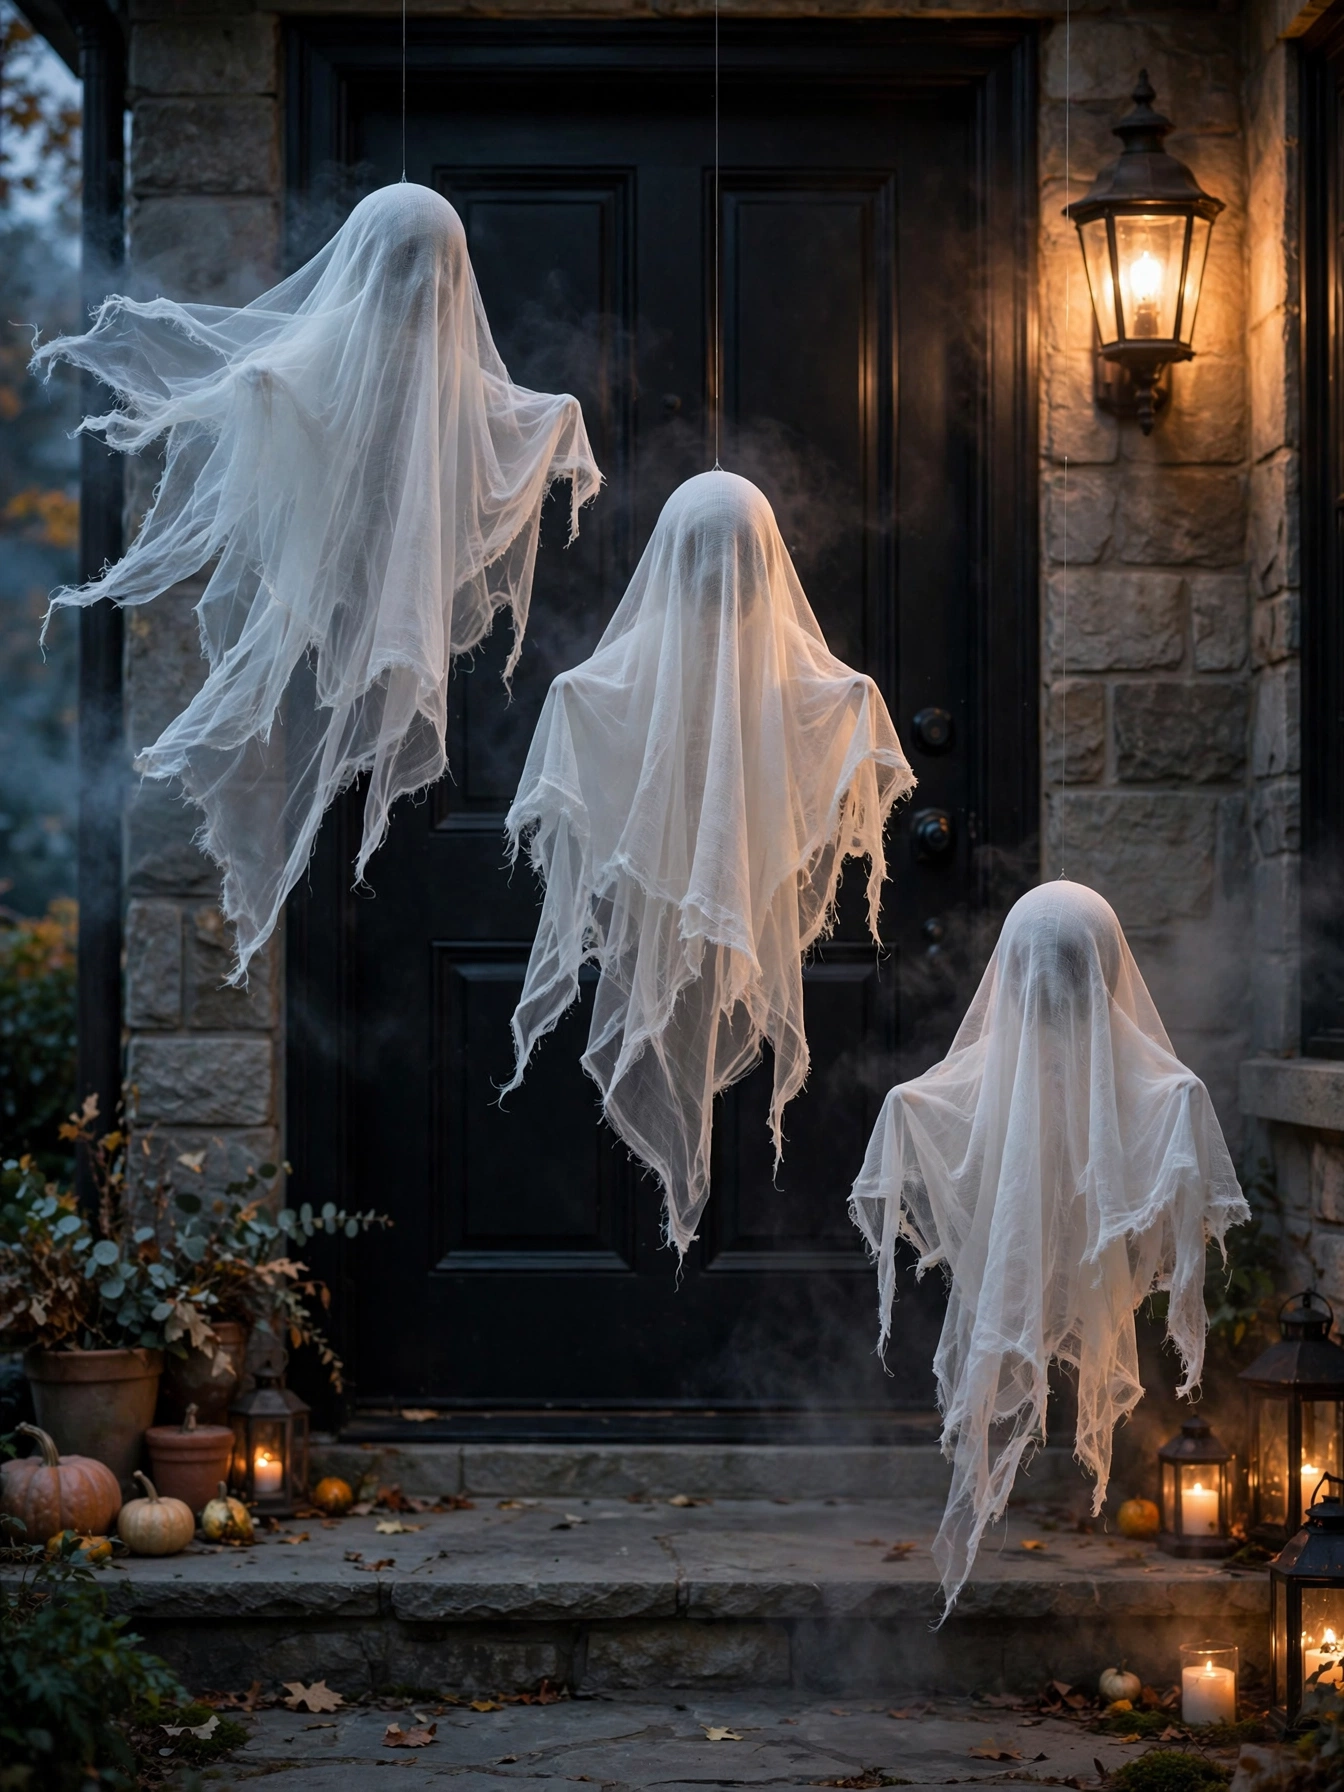
Why This Works:
- Liquid starch makes cheesecloth hold a floating shape for the whole season
- Fishing line makes the ghosts look genuinely suspended in midair
- Three ghosts at staggered heights fill a doorway for about 10 dollars
- The translucent fabric glows beautifully when backlit by a porch light
Drape two 36 by 36 inch squares of cheesecloth over an 8 inch foam ball or inflated balloon to form each ghost, then saturate the fabric with liquid starch from a 64 ounce bottle (about 4 dollars) until it drips. Let the ghost dry for 12 hours on a protected surface, pop or remove the form, and hang the shell from the porch ceiling or door frame with 12 pound test clear fishing line cut to 18, 24, and 30 inch lengths. Avoid fabric softener in the process because it coats the fibers and prevents the starch from setting, which leaves the ghost limp within 2 days. Where people go wrong is using only one layer of cheesecloth, which tears at the crown under its own weight after a week. Two layers add 4 dollars to the cost but hold their shape for 6 weeks or more.
These ghosts suit covered porches and entryways where they hang protected from direct rain, and they delight trick-or-treaters of every age. The limitation is humidity: in very damp climates the starch softens, so bring the ghosts indoors during multi-day rain and re-starch them once if needed. Each ghost weighs under 4 ounces, so even the lightest removable ceiling hook holds one safely. Position them 8 to 12 inches in front of the door so the door still opens freely and the ghosts drift slightly in the breeze.
Haunted House Cutout
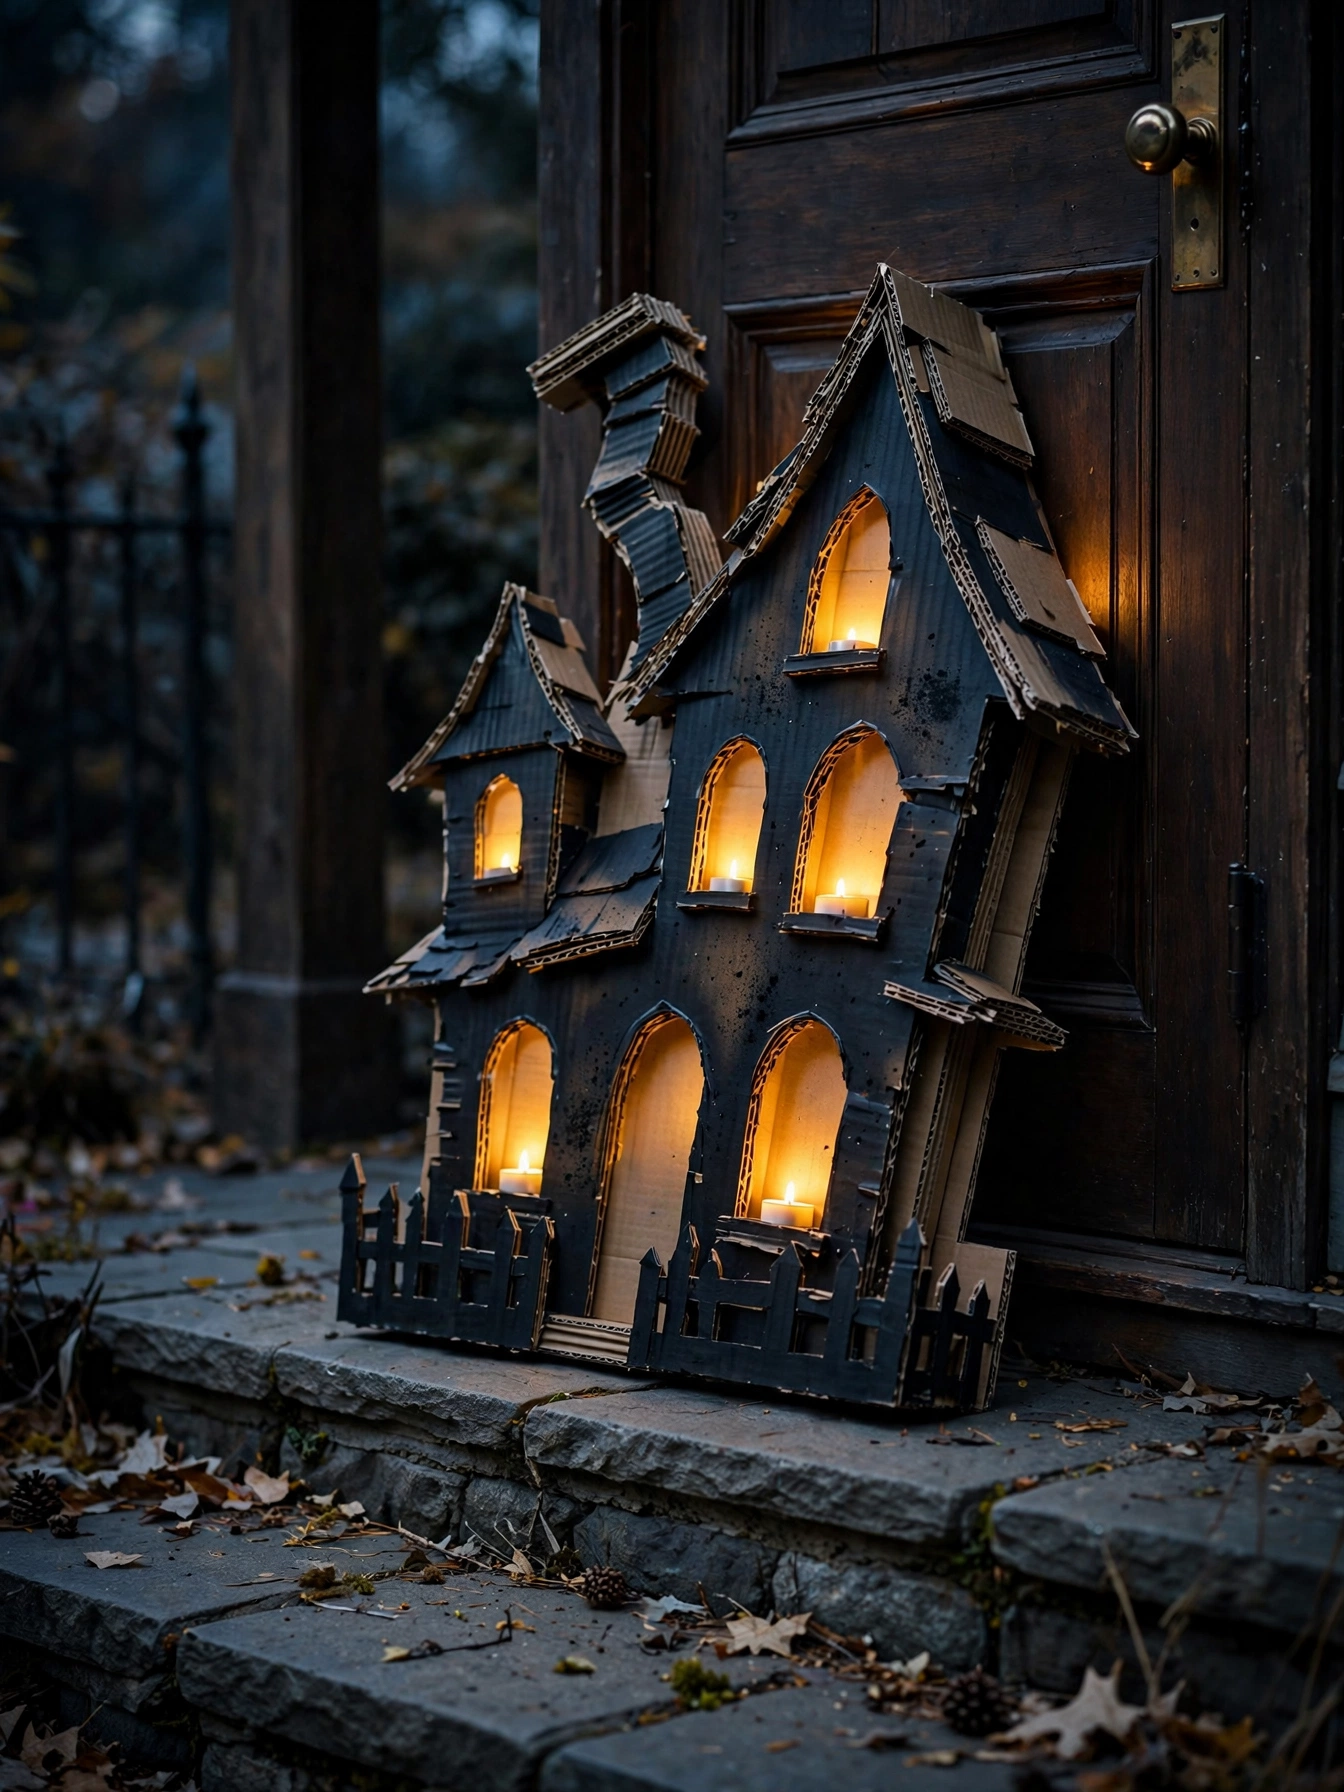
Why This Works:
- Three layers of cardboard create real depth for about 8 dollars
- Cut-out windows with tea lights behind them glow after dark
- A 30 inch tall silhouette fills the space beside any standard door
- The whole build needs only a box cutter, paint, and glue
Tape two large 24 by 36 inch cardboard box panels together with packing tape and sketch a haunted house shape 30 inches tall by 20 inches wide, including a crooked chimney and 6 arched windows. Cut the windows out with a sharp box cutter on a cutting mat, spray the whole piece with 2 coats of matte black spray paint (one 12 ounce can covers about 20 square feet), and tape 6 battery tea lights behind the window openings with masking tape. Avoid single-layer cardboard because it warps into a curve after one humid night; laminating two panels back to back keeps the cutout flat for the full season. Before calling it done, test the stability by standing the cutout on your porch and checking it in a light breeze, then add a 12 inch cardboard foot glued at a right angle to the base if it wobbles. Seal the finished piece with a clear matte spray to resist morning dew.
This cutout works best beside the door rather than on it, leaning against the wall or staked into a planter with two 12 inch wooden dowels. The honest trade-off is that cardboard is a one-season material even with sealer, so expect to rebuild it next October. Store it flat between two pieces of plywood if you want to reuse it, and keep it 3 feet from any open flame or real candle. Total cost is 7 to 9 dollars, with the tea lights being the only part you will buy again next year.
DIY Halloween Pumpkin Hanger
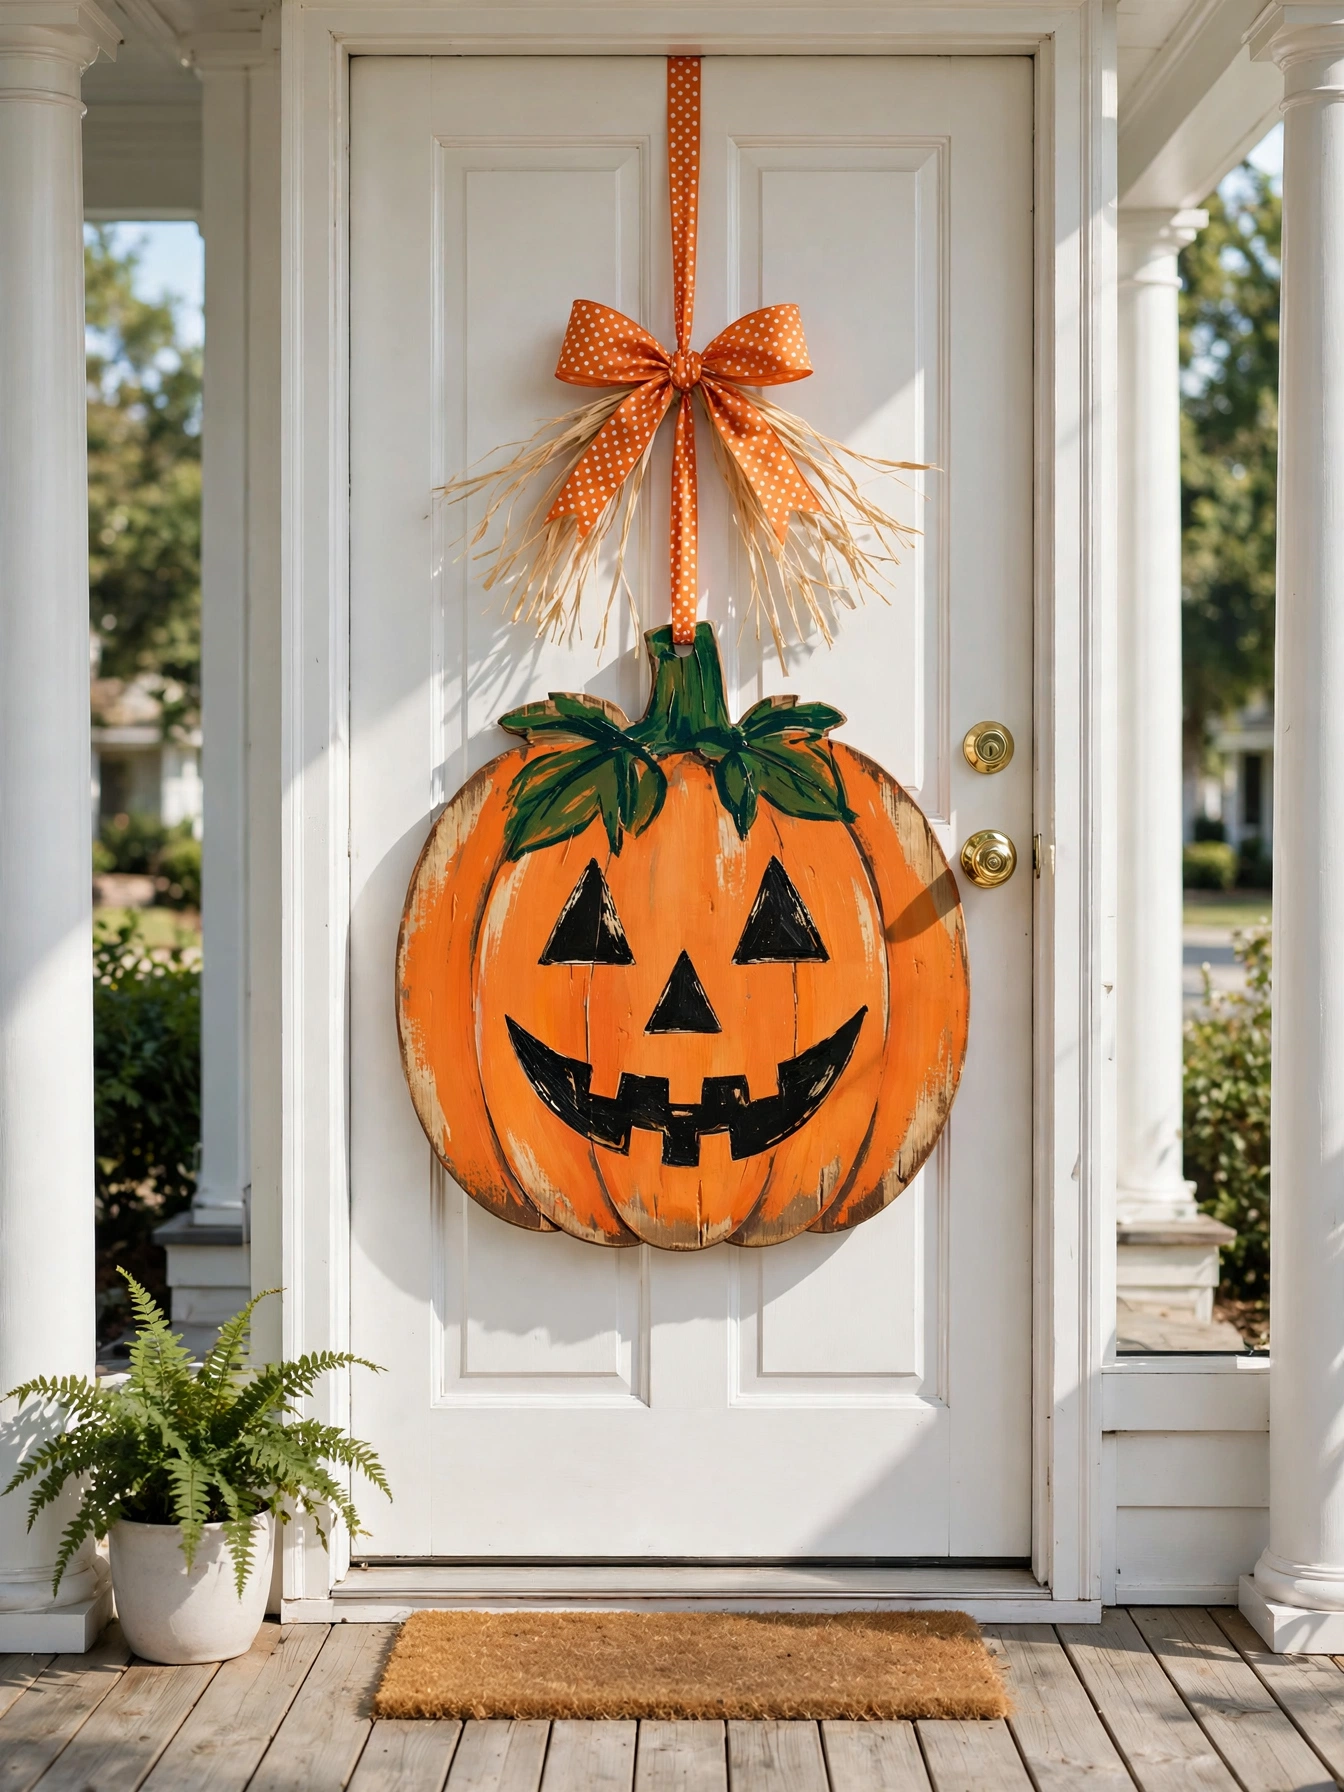
Why This Works:
- An 18 inch plywood pumpkin reads clearly from 40 feet away
- Acrylic craft paint in 2 ounce bottles costs about 1 dollar per color
- The ribbon hanger lets it swing gently without scratching the door
- One board of plywood yields two pumpkins, so the second is nearly free
Cut an 18 by 18 inch pumpkin shape from half inch exterior-grade plywood with a jigsaw, or buy a precut unfinished pumpkin from a craft store for about 6 dollars to skip the cutting. Sand the edges with 120 grit paper, paint two coats of pumpkin orange acrylic (close to Sherwin-Williams 6646 Copper Harbor), and add a simple jack-o-lantern face or polka dot pattern in black. Drill a quarter inch hole 1 inch from the top, thread a 24 inch length of 2.5 inch wired ribbon through it, and seal the whole piece with 3 coats of outdoor polyurethane, sanding lightly after the first coat. Avoid interior-grade plywood because the layers delaminate after 2 weeks of outdoor moisture; exterior-grade costs only 2 dollars more per sheet. According to HGTV, sealing painted wood with at least two coats of exterior polyurethane extends outdoor life from weeks to full seasons.
This hanger suits any door type and weighs just 3 pounds, so a basic wreath hook holds it with room to spare. The limitation is the paint: even sealed acrylic chips where the ribbon rubs the top hole, so wrap the ribbon through a small metal grommet set with a 5 dollar grommet tool to stop the wear. Touch up chips with the leftover paint in seconds. The project takes about 3 hours including drying time, and the pumpkin looks great flanked by real pumpkins on the doorstep.
Moss and Twig Wreath
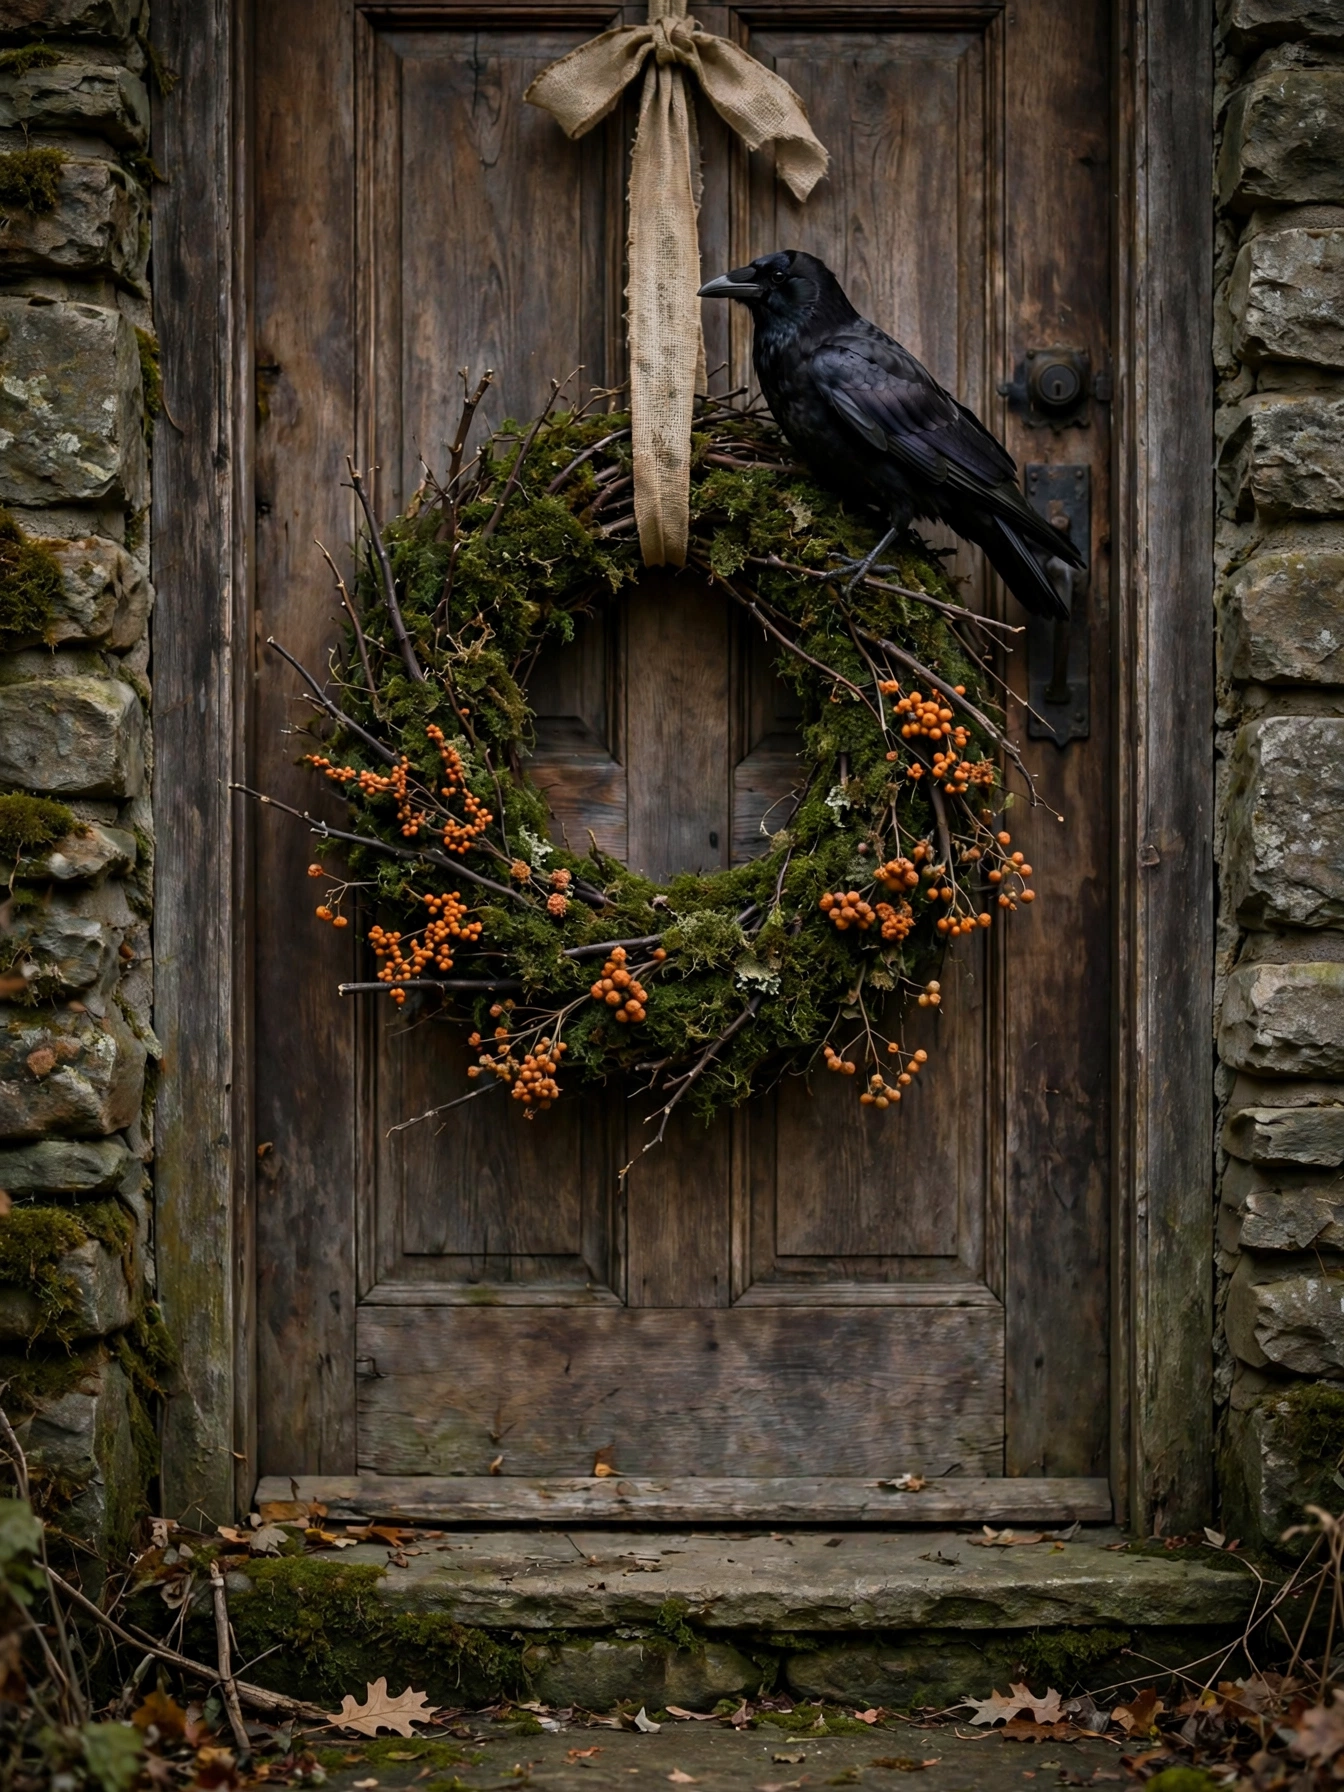
Why This Works:
- Preserved sheet moss needs no watering and never wilts
- An 18 inch twig base gives a wild, woodland look for about 18 dollars
- The crow and berries add Halloween character without any carving
- The wreath transitions to Thanksgiving by swapping the crow for a bow
Start with an 18 inch natural twig wreath base (about 8 dollars) and hot glue 2 bags of preserved sheet moss (8 by 16 inch sheets, about 5 dollars each) into the gaps between the twigs, pressing firmly for 5 seconds per section. Tuck in 3 dried orange berry sprigs and perch a 6 inch faux crow on the upper right quadrant, securing each with a 4 inch floral wire pushed into the twig base. Avoid fresh moss from the yard because it dries out, turns brown, and sheds within 10 days indoors or out. Preserved moss is treated with glycerin and holds its green color for 12 months or more. In real homes, this wreath works best on covered porches, since sheet moss can absorb 3 times its weight in water during a direct downpour and drip for hours afterward.
The woodland style suits craftsman and cottage homes better than modern glass doors, where the rustic texture clashes. The honest limitation is shedding: expect a light dusting of moss particles on the doorstep for the first week until the loose bits fall off. Shake the wreath gently outdoors before hanging to remove 90 percent of the loose material. Hang it from a wrought iron wreath hanger rated for 10 pounds, since the moss adds 2 to 3 pounds to the base weight.
Felt Leaf Garland
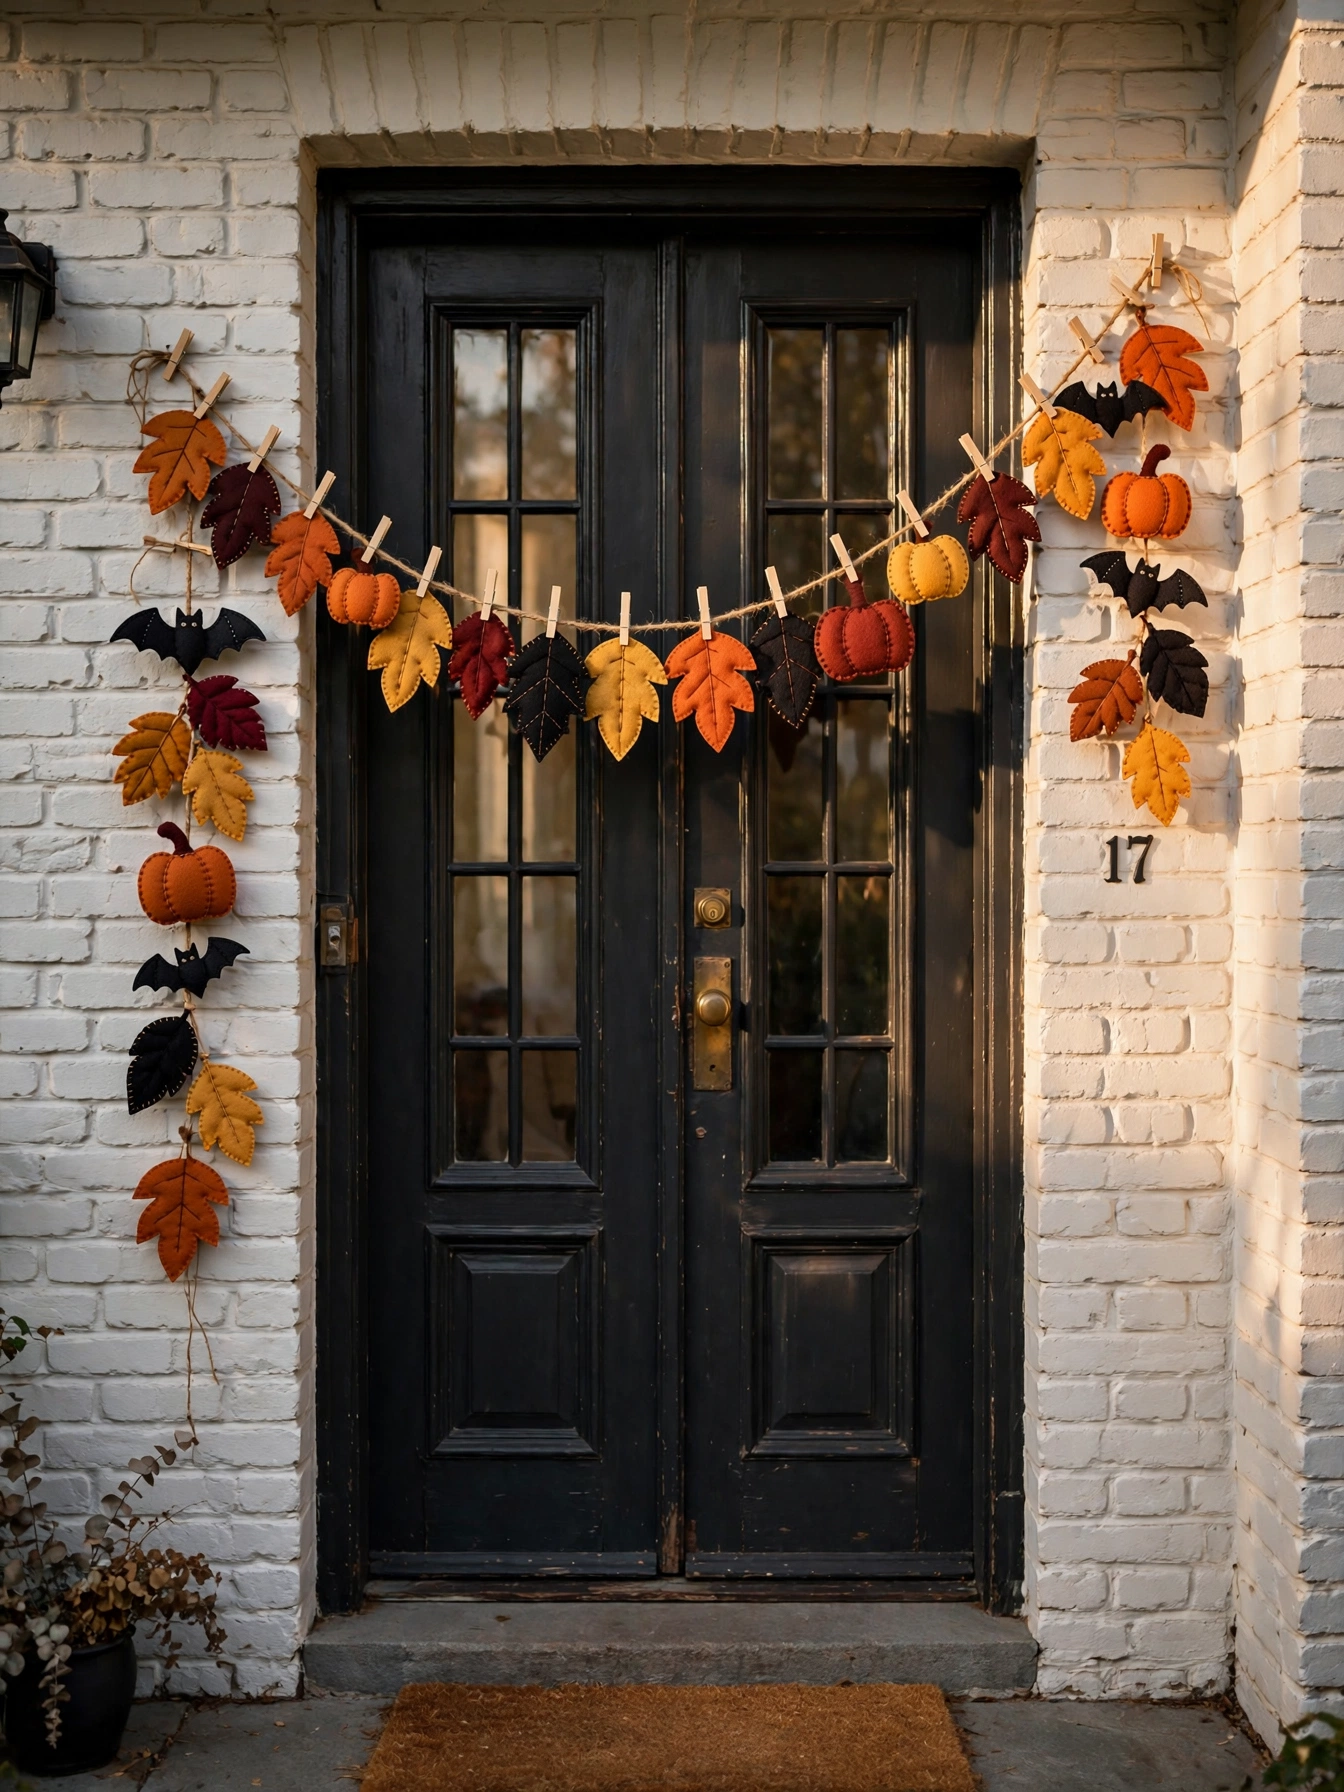
Why This Works:
- Felt never frays, so no hemming or sealing is needed
- A 6 foot garland uses one 9 by 12 inch felt sheet per color, about 9 dollars total
- Wooden clothespins make the shapes rearrangeable year after year
- The garland drapes over any door width from 30 to 36 inches
Cut 24 leaf shapes (about 4 inches long) from felt sheets in burnt orange, mustard, and burgundy using a printed template, then cut 8 small accent shapes like bats and mini pumpkins from black and orange felt. Clip the leaves to a 7 foot length of jute twine with 1.25 inch wooden clothespins, spacing them 3 inches apart, and clip the accent shapes between every third leaf. Avoid thin craft felt under 1 millimeter thick because it curls at the edges after 2 weeks outdoors; premium 3 millimeter wool-blend felt costs 1 dollar more per sheet and stays flat all season. Check the label before buying the felt thickness label, since the cheap thin sheets look identical in the package. Hang the garland with two small removable hooks at the top corners of the door frame.
This garland is the best pick for households with toddlers, because every piece is soft, lightweight, and impossible to break. The limitation is rain: felt absorbs water and the colors can bleed onto light-colored doors, so keep it on covered porches only. Total weight is under 1 pound, so even the weakest adhesive hooks hold it. When October ends, unclip the Halloween shapes, and the leaf garland works straight through Thanksgiving.
Chalkboard Door Sign
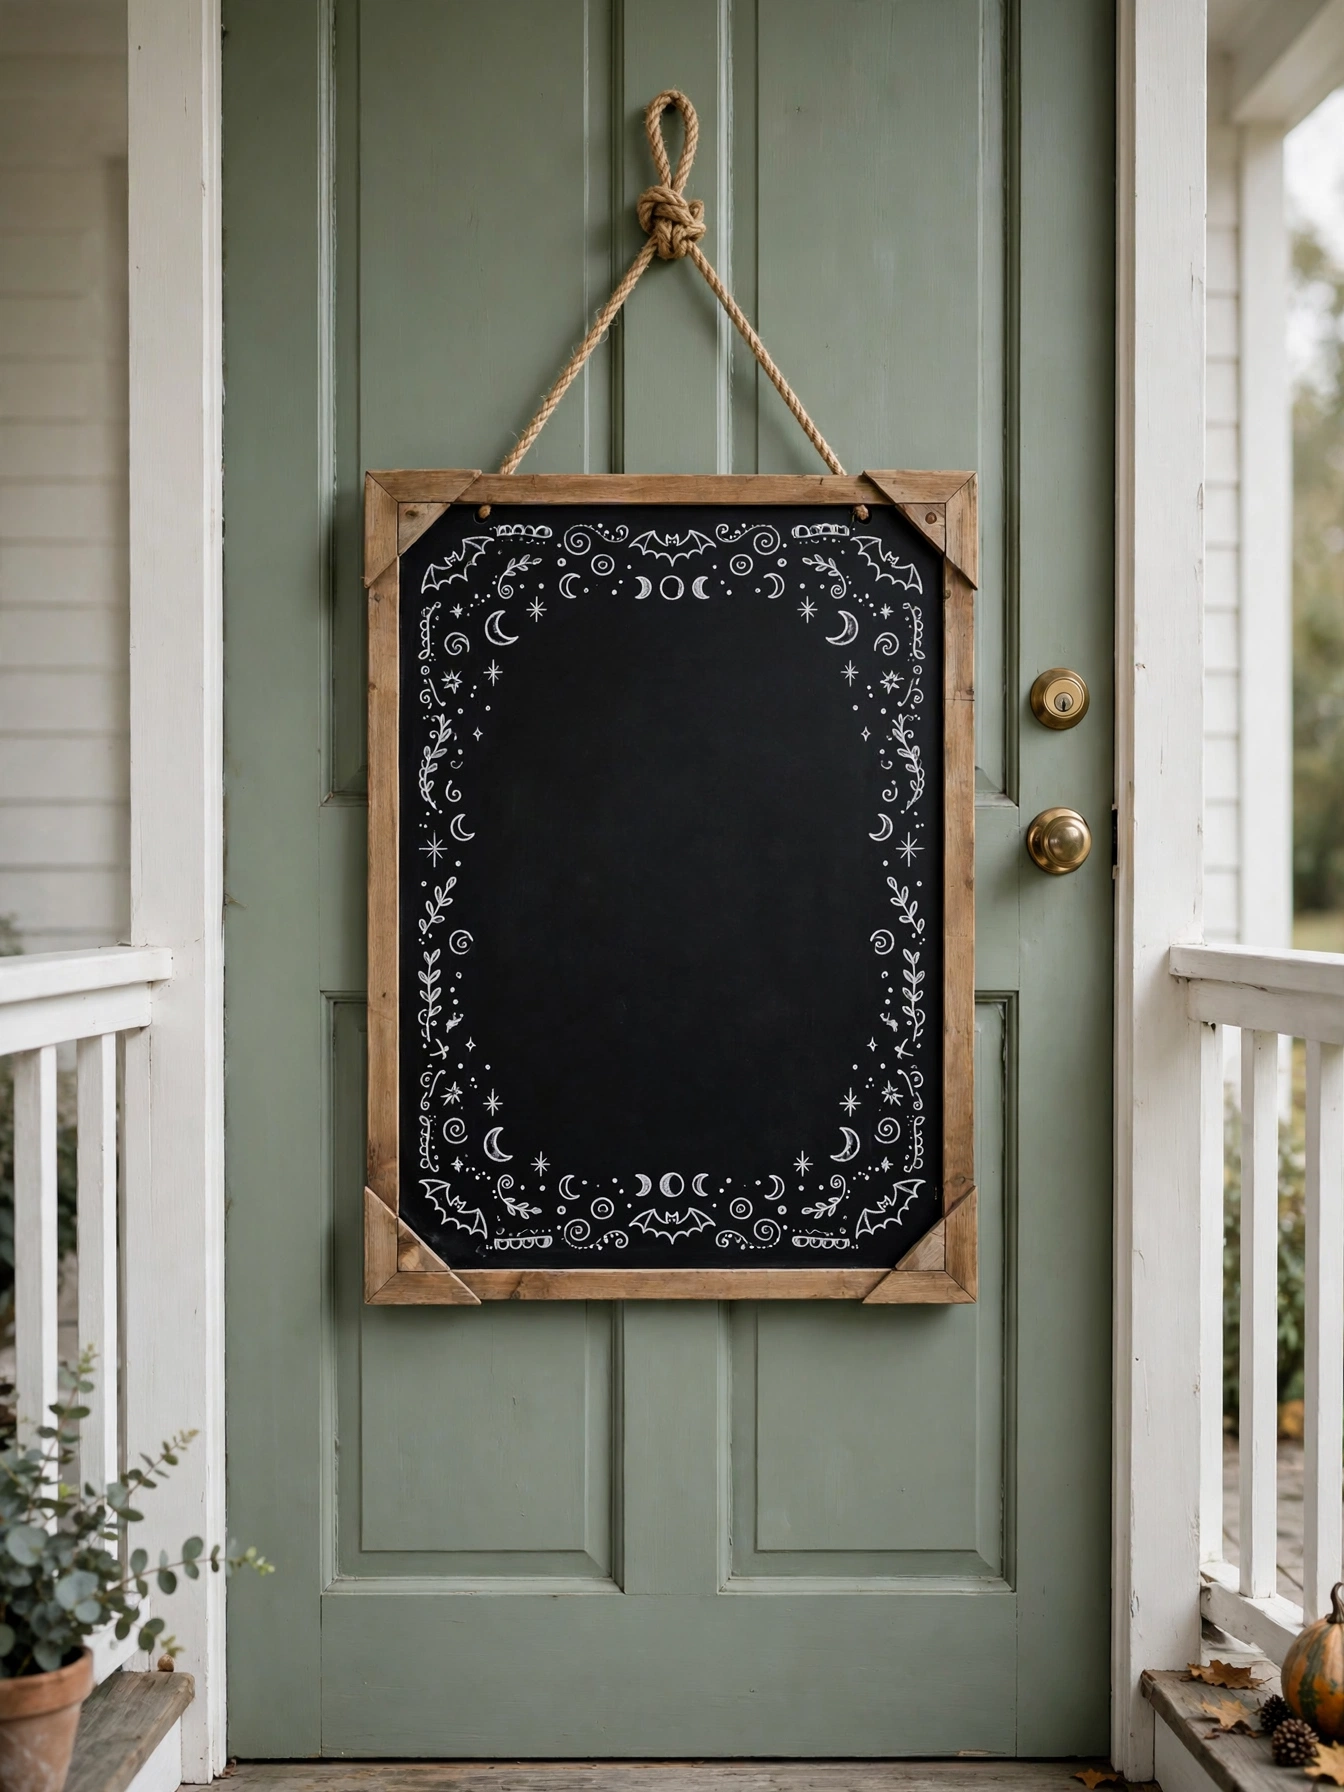
Why This Works:
- A 12 by 16 inch sign costs about 11 dollars and is reusable every year
- Chalk markers wipe off with a damp cloth, so the message changes in minutes
- The wood frame gives a finished look that plain chalkboards lack
- It doubles as a welcome sign, a countdown board, or a candy bowl note
Cut a 12 by 16 inch board from quarter inch MDF or plywood and frame it with four 1 by 2 inch pine strips mitered at 45 degrees, attached with wood glue and 1 inch brad nails. Apply 3 thin coats of chalkboard paint, letting each coat dry 4 hours and curing the surface for 3 full days before the first chalk use. Season the board by rubbing white chalk over the whole surface and wiping it off, which prevents ghosting of your first design. Avoid skipping the cure time because chalk applied to uncured paint bonds permanently and never wipes clean. According to The Spruce, oil-based chalkboard paint resists outdoor moisture about 40 percent better than water-based formulas, so choose oil-based for porch use. Hang with jute rope through two eye screws set 1 inch from the top corners.
This sign suits families who like changing their message through the month, from a welcome note to a trick-or-treat countdown. The honest limitation is chalk in rain: even on a covered porch, windblown mist smudges chalk marker designs within hours, so keep a damp cloth and the markers by the door for 2 minute touch-ups. For a permanent design, seal the finished artwork with a matte clear spray and it will last the season, though it will no longer wipe clean.
Ribbon Pumpkin Swag
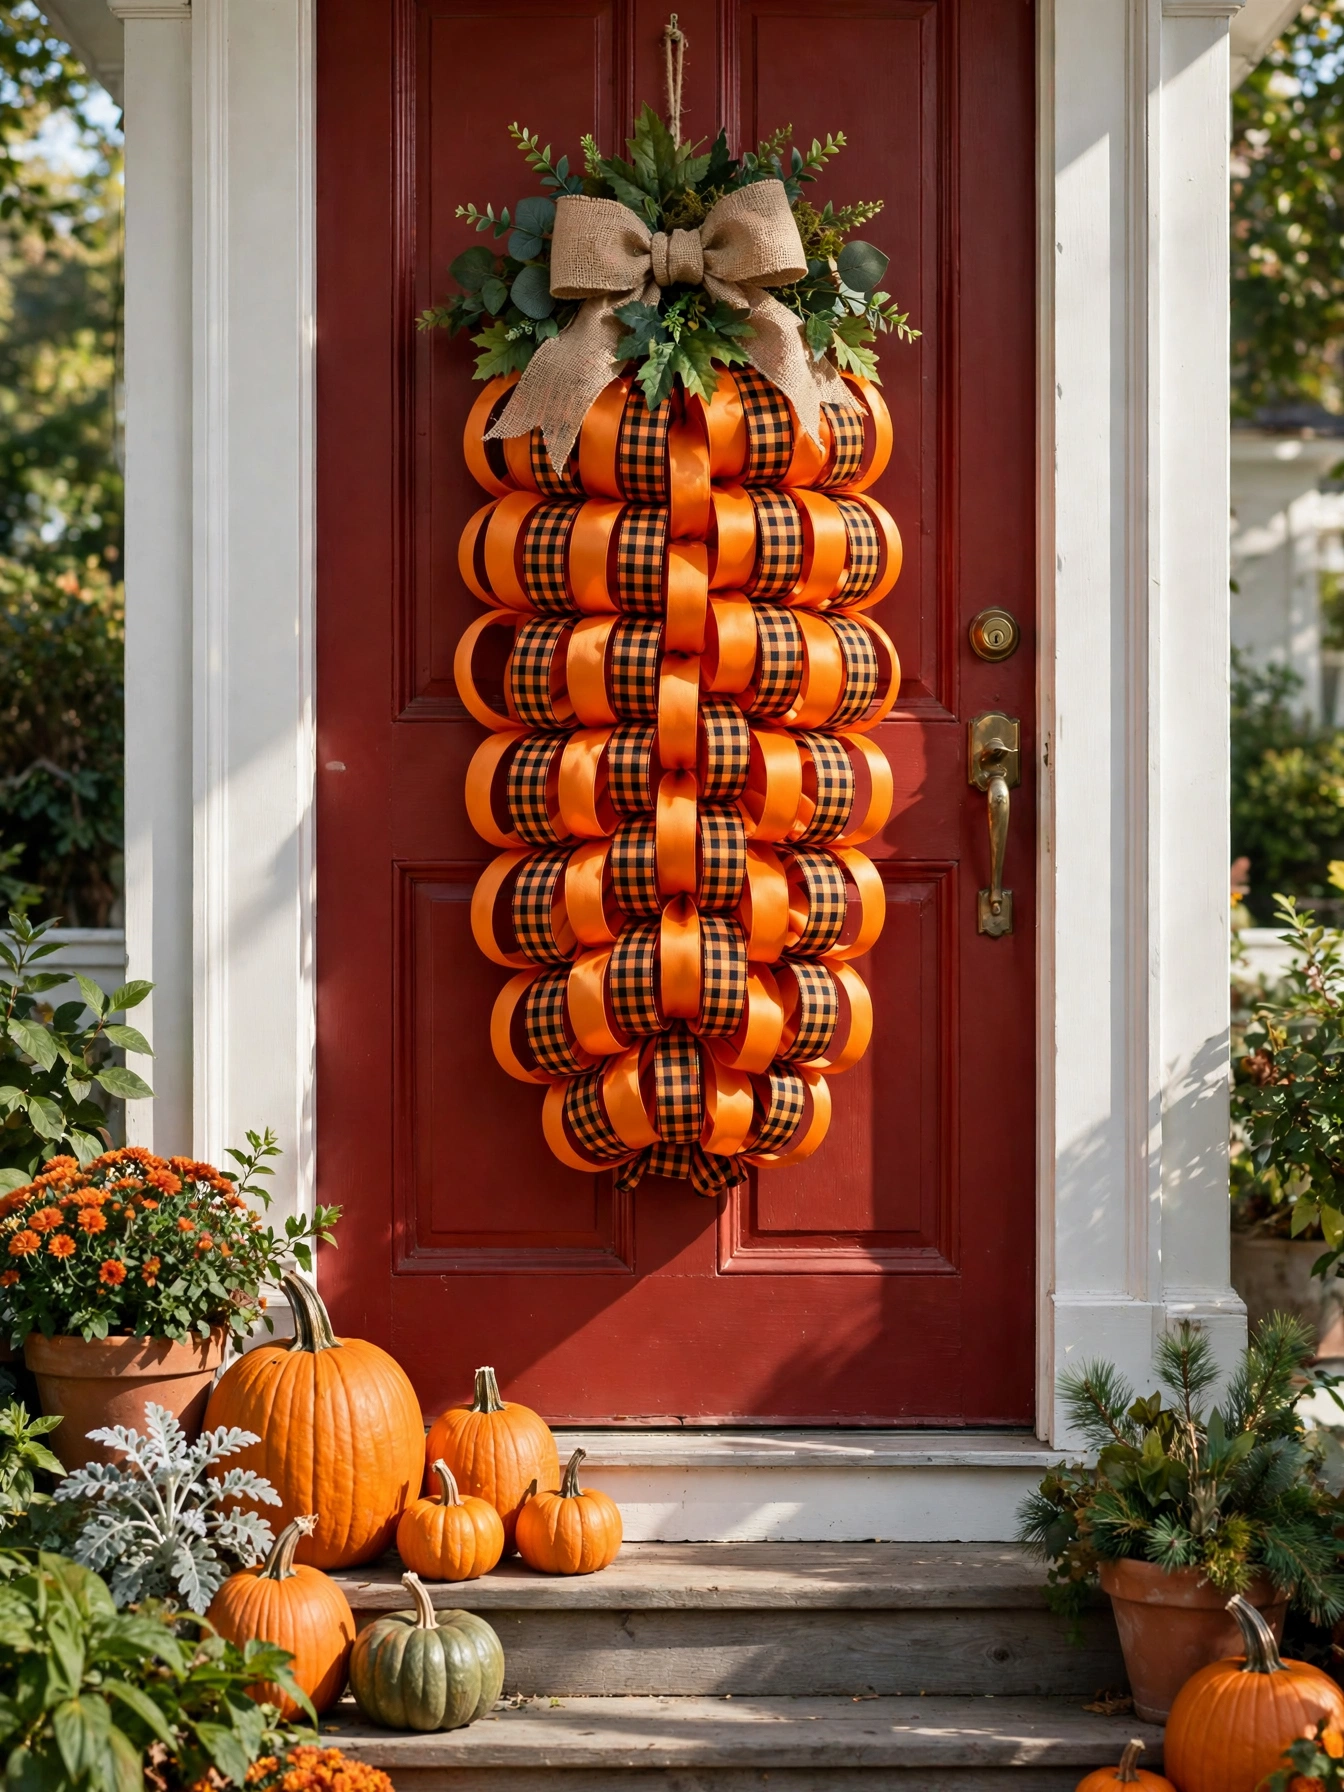
Why This Works:
- Looped ribbon forms a 20 inch pumpkin shape visible from the street
- Wired ribbon holds its loops without any sewing or glue lines showing
- The vertical swag fits narrow doors where round wreaths look cramped
- Materials cost about 13 dollars and the swag stores flat for next year
Cut 12 strips of 2.5 inch wired ribbon (orange and black-orange plaid) to 14 inches long, fold each strip into a loop, and wire the loops in a circle around a 6 inch wire wreath ring using 22 gauge floral wire. Stack a second smaller ring of 8 loops on top to build a rounded pumpkin profile about 20 inches tall. Add 3 faux green leaves at the top for the stem area and finish with a 5 inch burlap bow wired to the back of the top loop. Avoid non-wired ribbon because the loops collapse flat within 3 days; wired ribbon costs 2 dollars more per 10 yard roll but keeps its shape all season. Homeowners who have tried this find that fluffing the loops outward after hanging doubles the visual fullness. A light coat of fabric stiffener spray on the back of each loop adds wind resistance.
This swag suits tall, narrow doors and sidelights where a 24 inch round wreath would crowd the frame. The limitation is fading: orange ribbon loses about 20 percent of its color saturation after 4 weeks of direct sun, so hang it on a shaded or covered entry when possible. The finished swag weighs just 1.5 pounds and hangs from any standard wreath hook. To store it, press it gently between two sheets of tissue in a 24 inch box so the loops keep their shape.
DIY Halloween Bat Frame
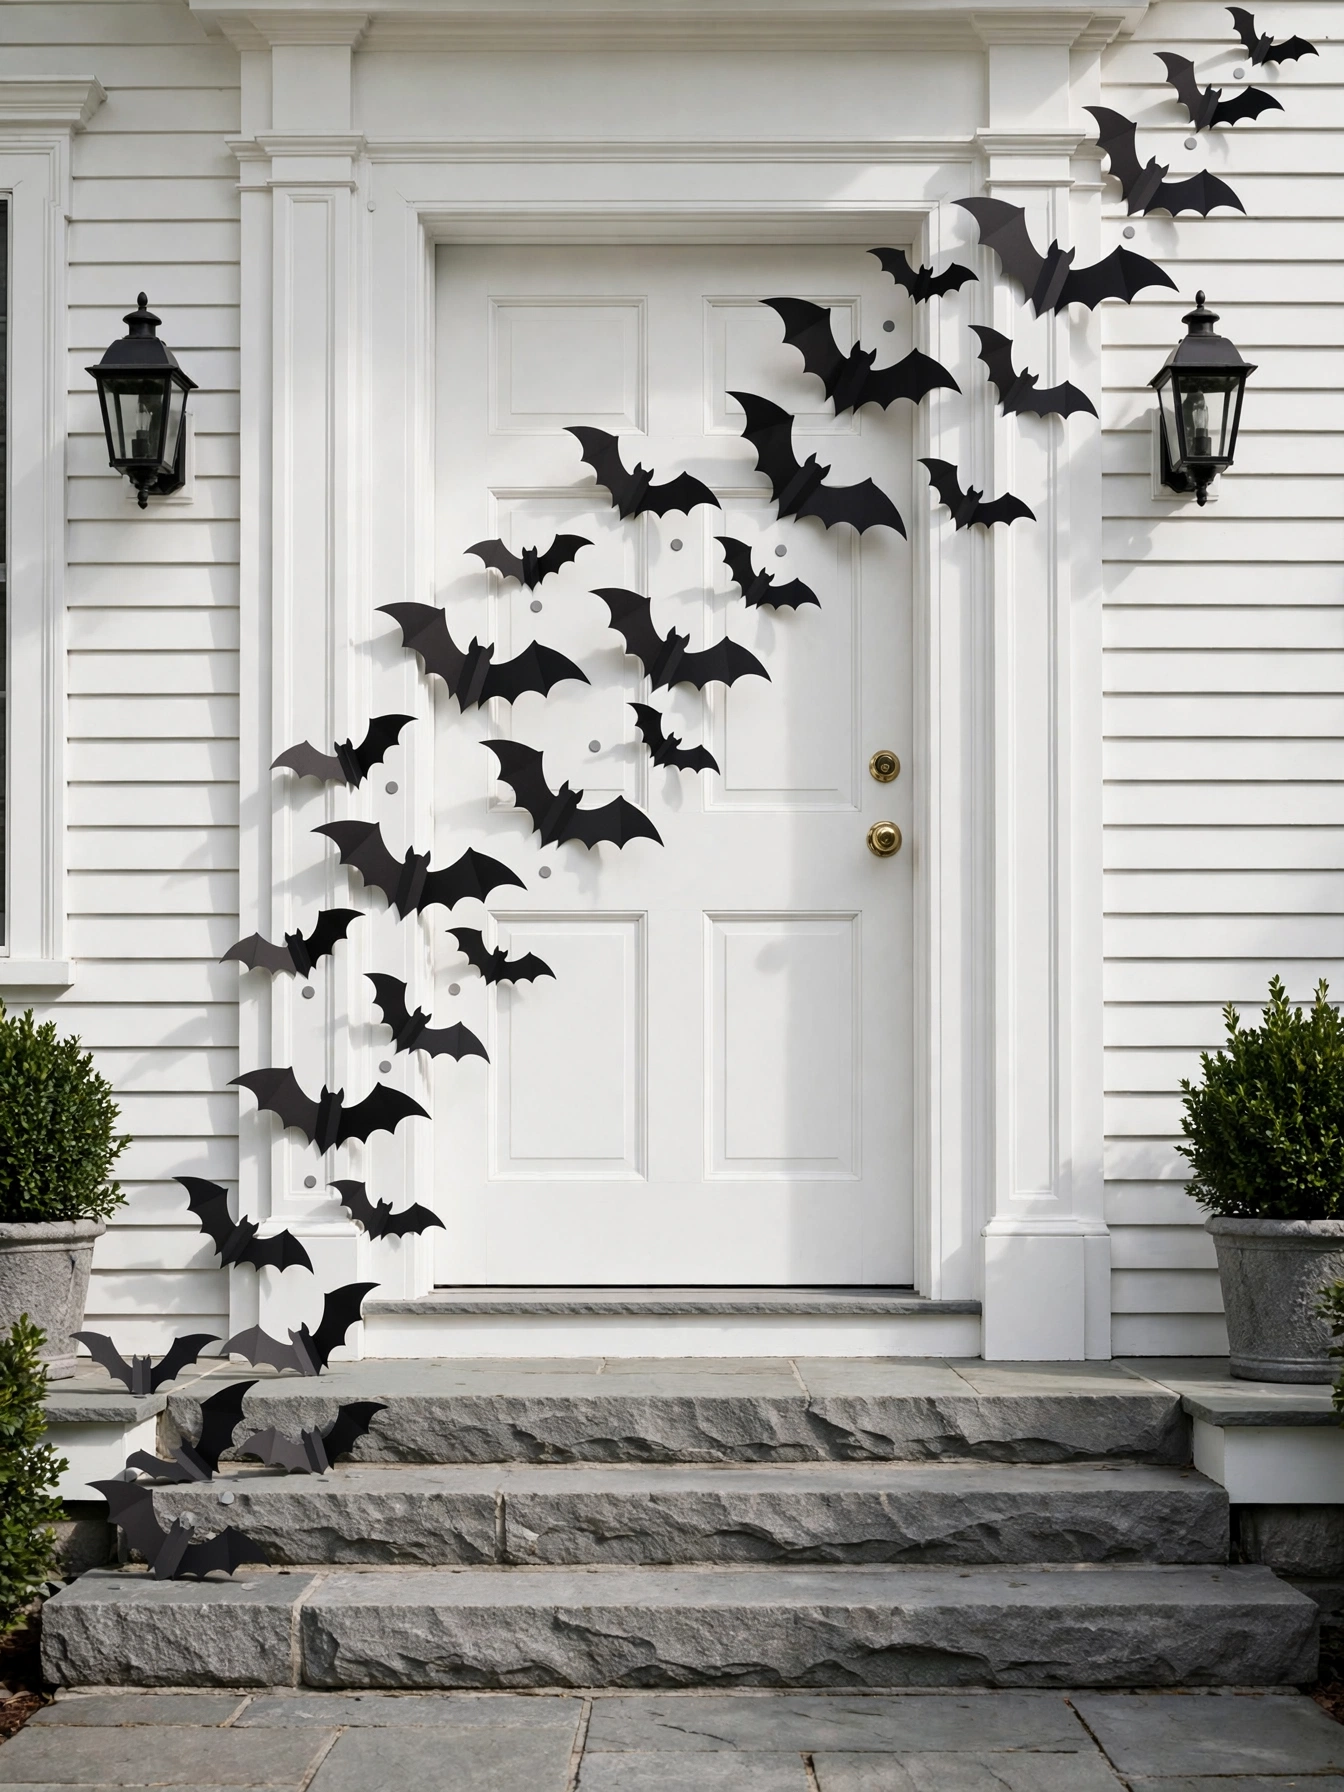
Why This Works:
- Twenty-eight paper bats fill a door and frame for about 5 dollars
- The swooping flight path looks designed, not random
- Removable adhesive dots peel off paint cleanly in November
- Cutting is the only skill needed, and a template does the hard part
Print a bat template in 3 sizes (4, 6, and 8 inch wingspans) and trace 28 bats onto black cardstock, cutting them out with sharp scissors or a craft knife. Fold each bat slightly down the center to give the wings a 3D lift of about half an inch. Plan the flight path on the floor first: start with 3 large bats low on the door and curve the trail upward across the frame with shrinking sizes, spacing bats 4 to 6 inches apart. Stick them up with removable adhesive dots (one dot per small bat, two per large), pressing each dot for 10 seconds. Avoid permanent foam tape or hot glue on painted doors because both pull paint off on removal; removable dots rated for 0.5 pounds each release cleanly for up to 3 months. Confirm before you buy that the dots say removable, not permanent, since the packaging looks nearly identical.
This is the fastest project in the collection at under 1 hour, and it is perfect for renters who cannot hang anything heavy. The limitation is weather: cardstock survives on a covered porch but dissolves in direct rain within a day, so this is a covered-entry project only. In real homes, the flight path reads best from 15 to 25 feet away, which is exactly the trick-or-treat approach distance. Save the template in a folder so next year you cut a fresh set in 30 minutes.
Mini Hay Bale Stack
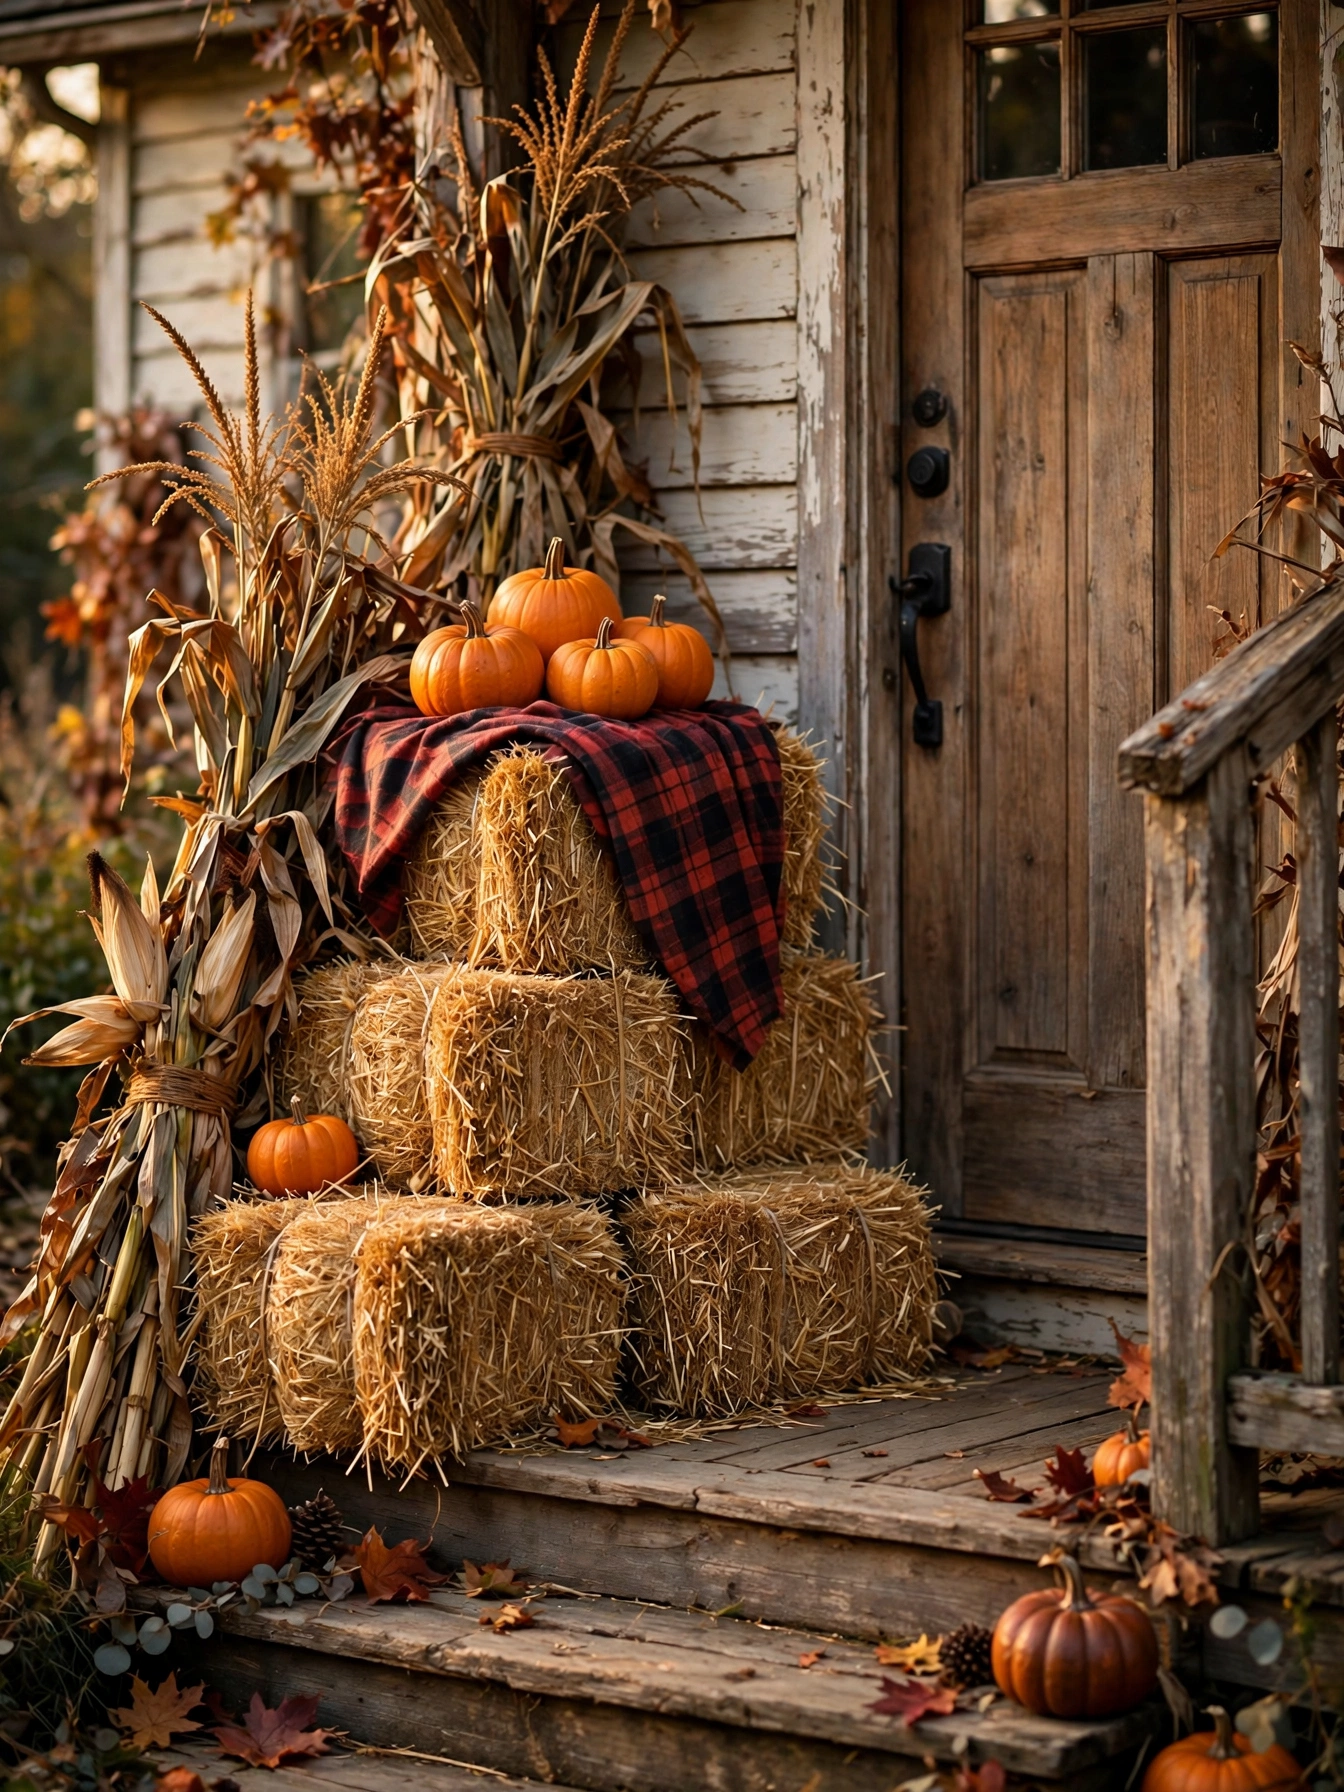
Why This Works:
- Three 12 inch hay bales build a 30 inch display in 15 minutes with no tools
- Real straw texture photographs beautifully and smells like fall
- The stack doubles as a riser for pumpkins, lanterns, and candy bowls
- Everything is reusable or compostable when the season ends
Buy 3 decorative mini hay bales (roughly 12 by 8 by 6 inches, about 6 dollars each) and stack two on the bottom with one centered on top, tying them together with two 24 inch lengths of natural twine cinched tight. Top the stack with 3 small pumpkins (3 to 5 inch diameter) and lean a bundle of 6 dried cornstalks (about 5 feet tall, 8 dollars per bundle) against the wall behind it. Drape a 12 by 18 inch piece of plaid fabric over the top bale to add color and hide the twine. Avoid placing the bales where roof runoff pours directly on them, because saturated straw weighs 4 times more than dry straw and the bottom bale will collapse within a week. According to Better Homes and Gardens, elevating straw decor on a pallet or bricks keeps the bottom 2 inches dry and doubles its outdoor life. Set the stack on two bricks to lift it off wet concrete.
This doorstep stack suits farmhouse and traditional homes with wide porches and works as a daytime anchor for the whole entry. The honest limitation is pests: straw attracts mice seeking nesting material, so do not push the stack against the door or leave it past mid-November. Check behind the bales weekly and bring the stack indoors during heavy storms. Total cost runs 24 to 28 dollars, with the pumpkins and cornstalks compostable at season end.
Painted Tin Can Lanterns
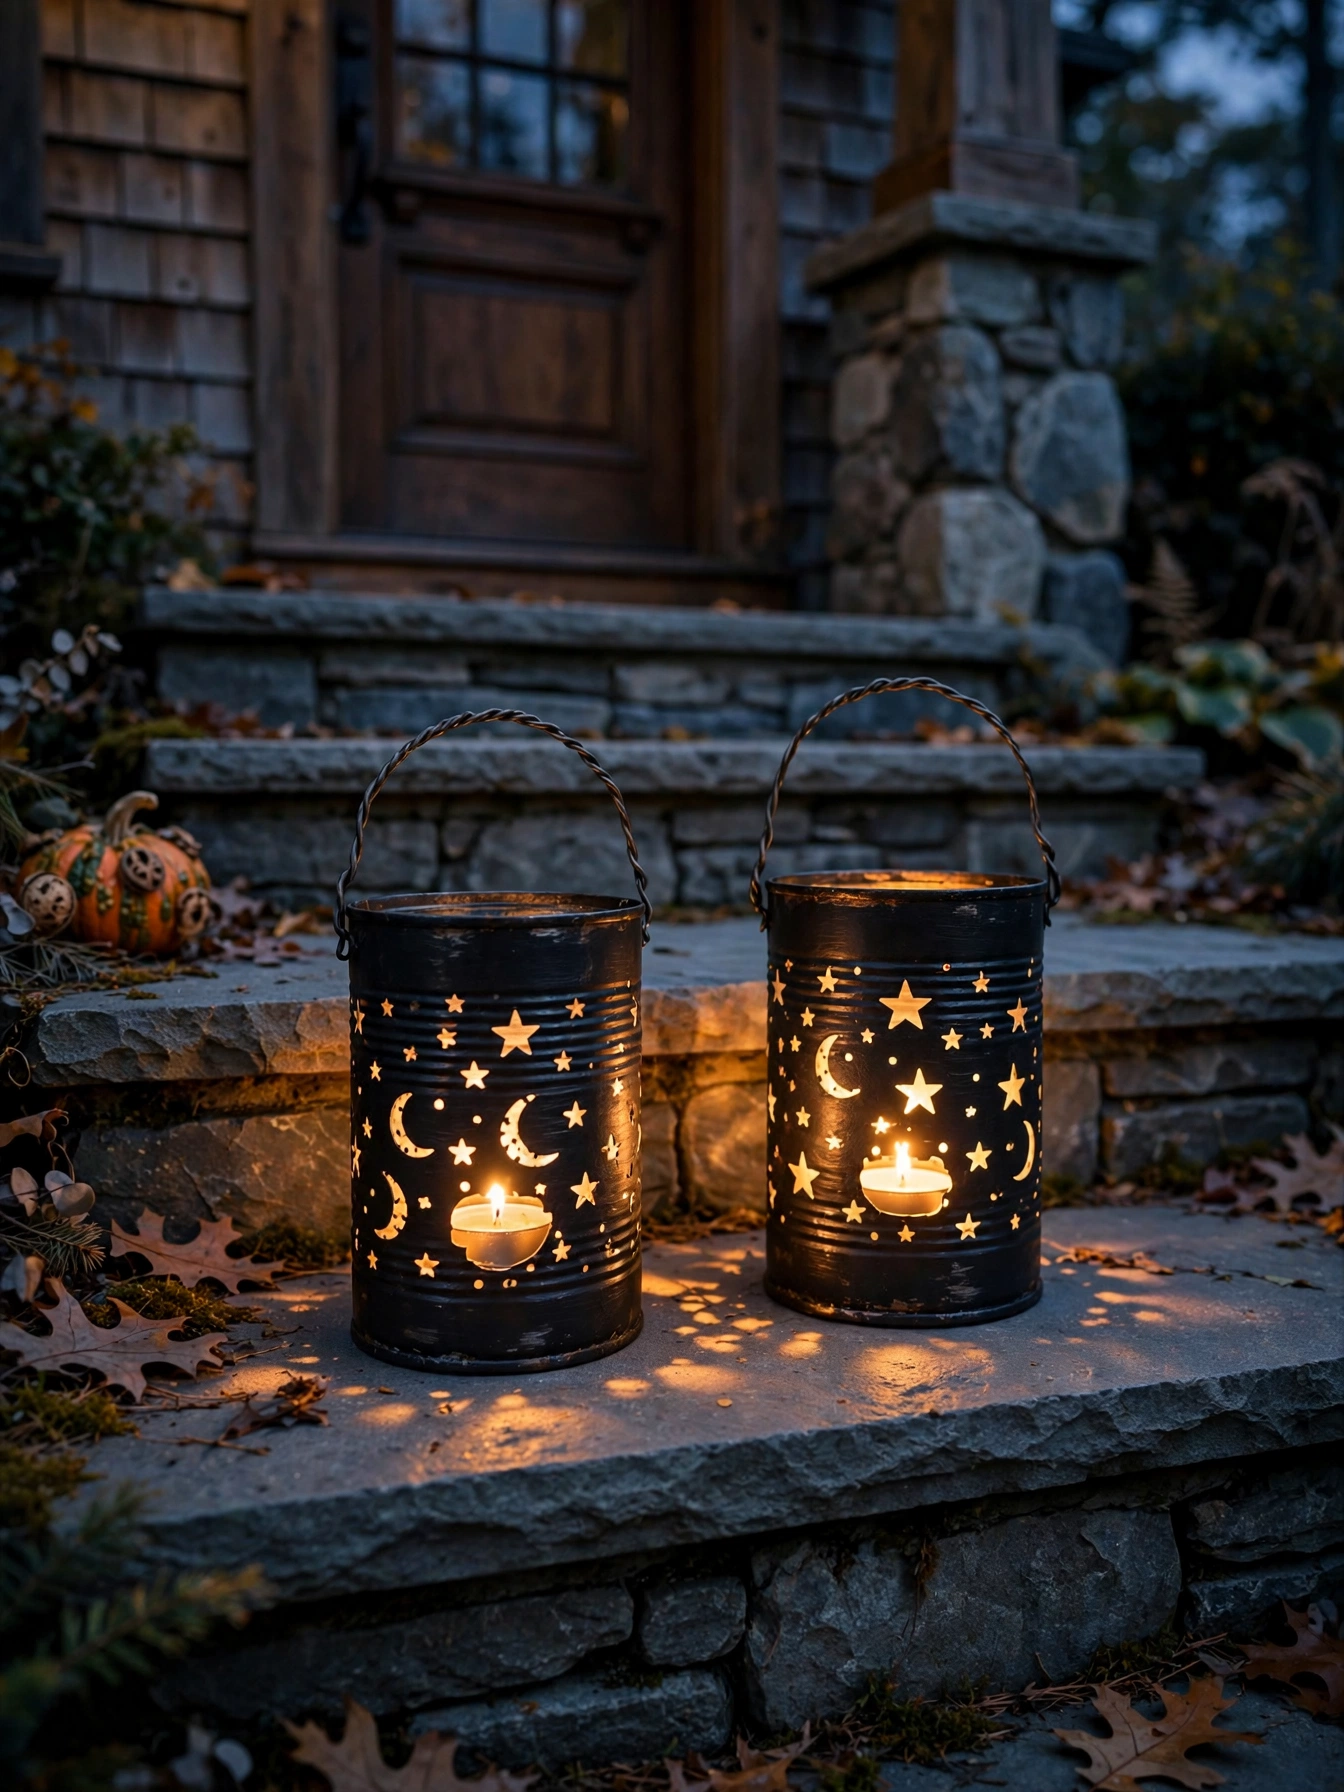
Why This Works:
- Punched tin patterns project glowing shapes onto the steps at night
- Two 28 ounce cans cost nothing if you save them from the kitchen
- Battery tea lights make them safe for kids and pets
- The pair flanks any door symmetrically for a finished look
Soak the labels off two 28 ounce tin cans, fill them with water, and freeze overnight so the ice supports the metal while you punch. Draw a simple star and moon pattern with a marker, then punch holes along the lines with a hammer and a 16 penny nail, spacing holes half an inch apart. Let the cans thaw and dry fully, spray with 2 coats of matte black spray paint (one 12 ounce can does both), and drop a battery tea light inside each. Avoid real candles because the punched holes let wind in and the can edges stay sharp; LED tea lights cost 1 dollar each and run 100 hours on one battery. A common mistake is punching before freezing, which dents the can walls and ruins the pattern. Twist an 18 inch length of 18 gauge wire through two holes near the rim for a handle.
These lanterns suit any porch style and look best in pairs flanking the door or lining the steps. The limitation is rust: even painted tin develops rust spots at the punched holes after 4 to 6 weeks outdoors, so bring them inside during heavy rain. They weigh almost nothing, so a strong gust can tip them; set each on a 4 inch square of museum putty or place a handful of pebbles inside. The project takes about 2 hours plus freezing time, and the cans store nested for next year.
Book-Page Pumpkin Wreath
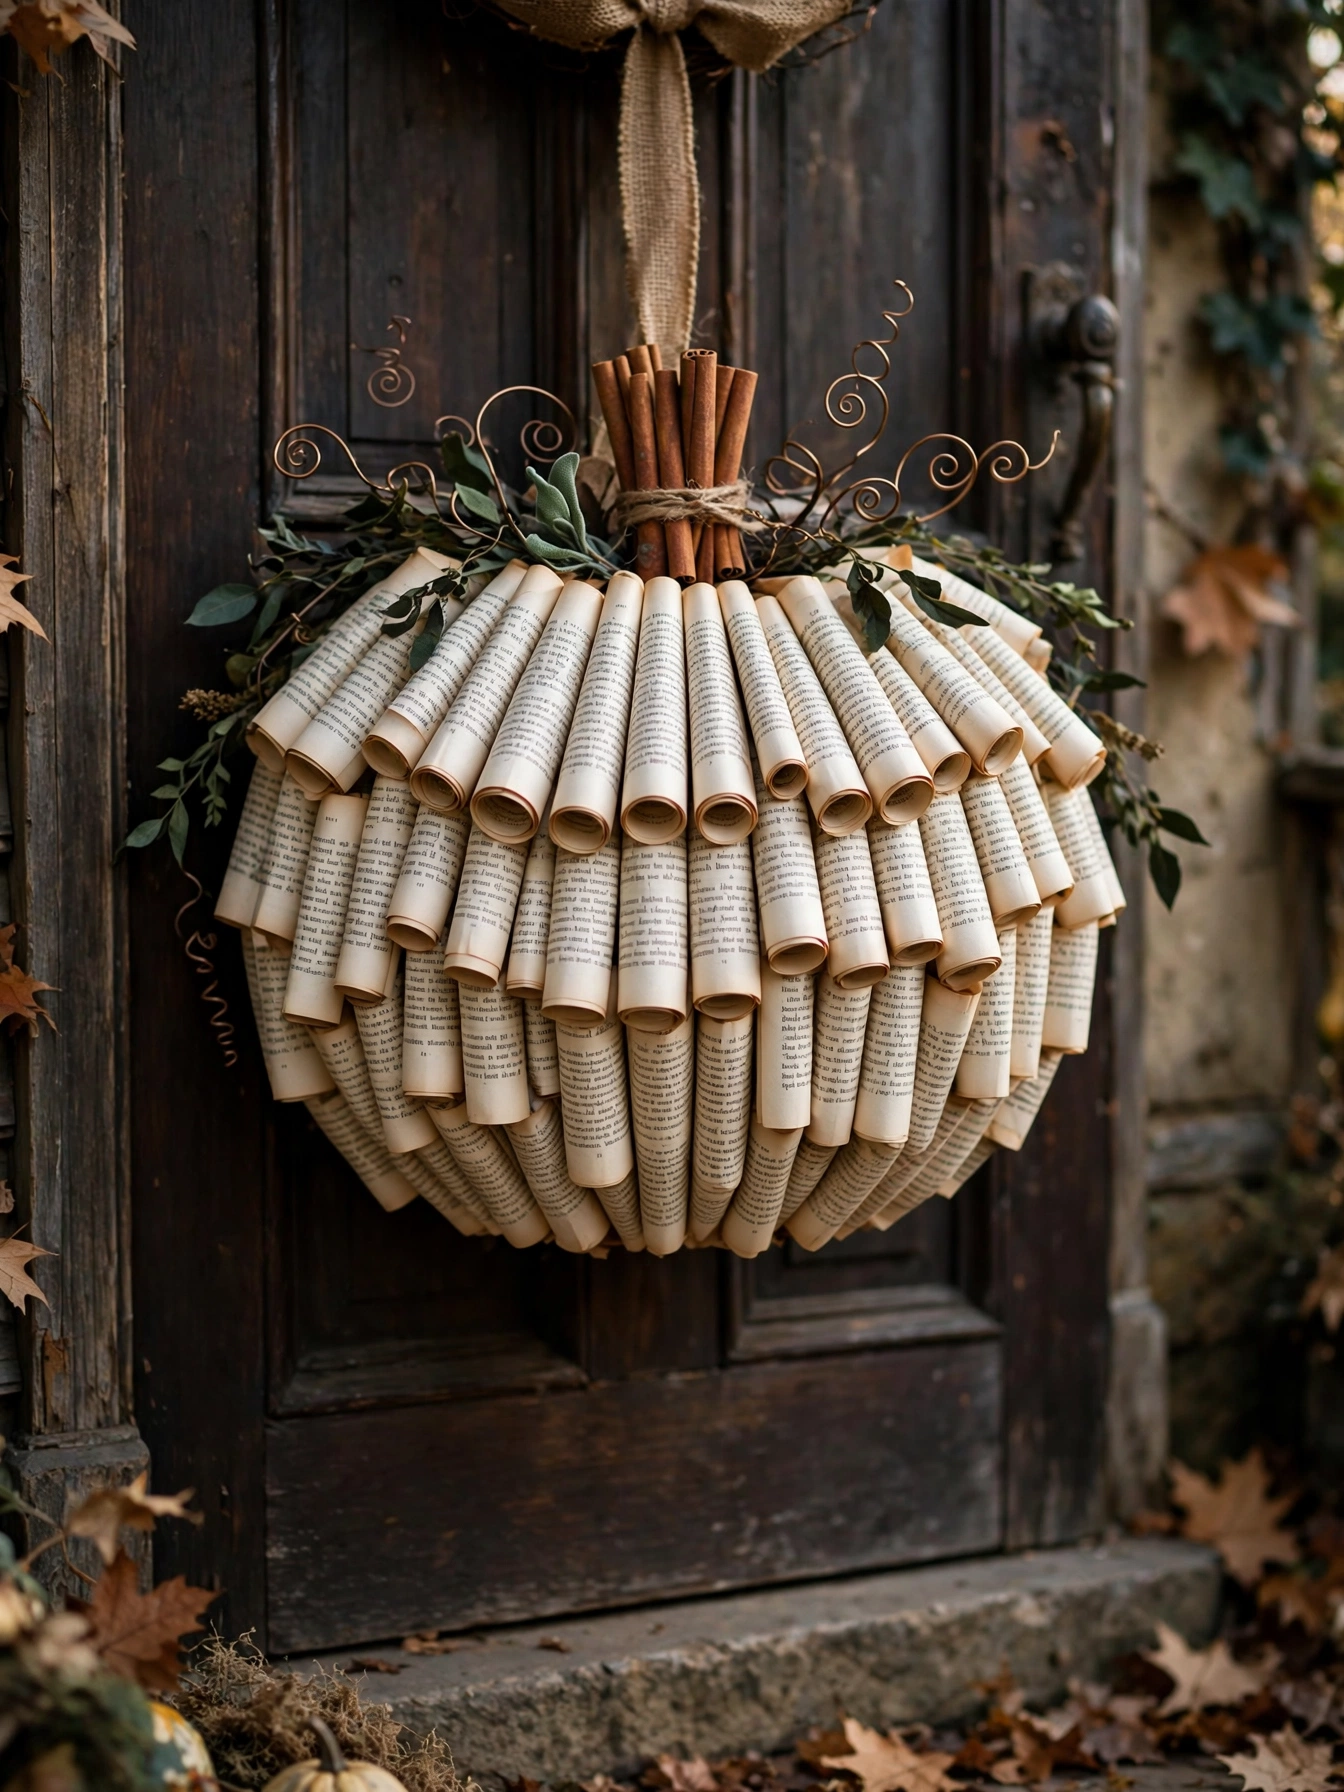
Why This Works:
- Rolled book pages form a 16 inch pumpkin for about 7 dollars
- An old paperback from a thrift store supplies all 120 pages needed
- The cream paper color glows softly under porch light at night
- Cinnamon stick stems add a subtle fall scent to the entryway
Tear 120 pages from an old paperback (thrift stores sell them for 1 dollar) and roll each page into a tight cone, securing the tip with a dot of hot glue. Hot glue the cones in concentric rings onto a 12 inch foam wreath form, starting with 40 cones around the outer edge and working inward with slightly shorter rolls to build the round pumpkin profile. Glue 3 cinnamon sticks (4 inch length) upright at the top for the stem and curl two 12 inch lengths of 20 gauge wire into tendrils. Avoid glossy magazine pages because the coating resists hot glue and the cones pop open within days; matte book paper bonds permanently. Verify before you purchase that the wreath form is foam, not straw, since hot glue melts into foam for a stronger hold. Spray the finished wreath with 2 coats of clear matte sealer to protect the paper from humidity.
This wreath suits book lovers and vintage-style homes, and it sparks conversation with every visitor. The limitation is moisture: paper wreaths belong on fully covered porches only, since one soaking rain ruins 3 hours of rolling work. It weighs under 2 pounds and hangs from any wreath hook. In real homes, this project works best as a sheltered statement piece paired with sturdier weatherproof decor on the steps below.
Fabric Scrap Ghosts
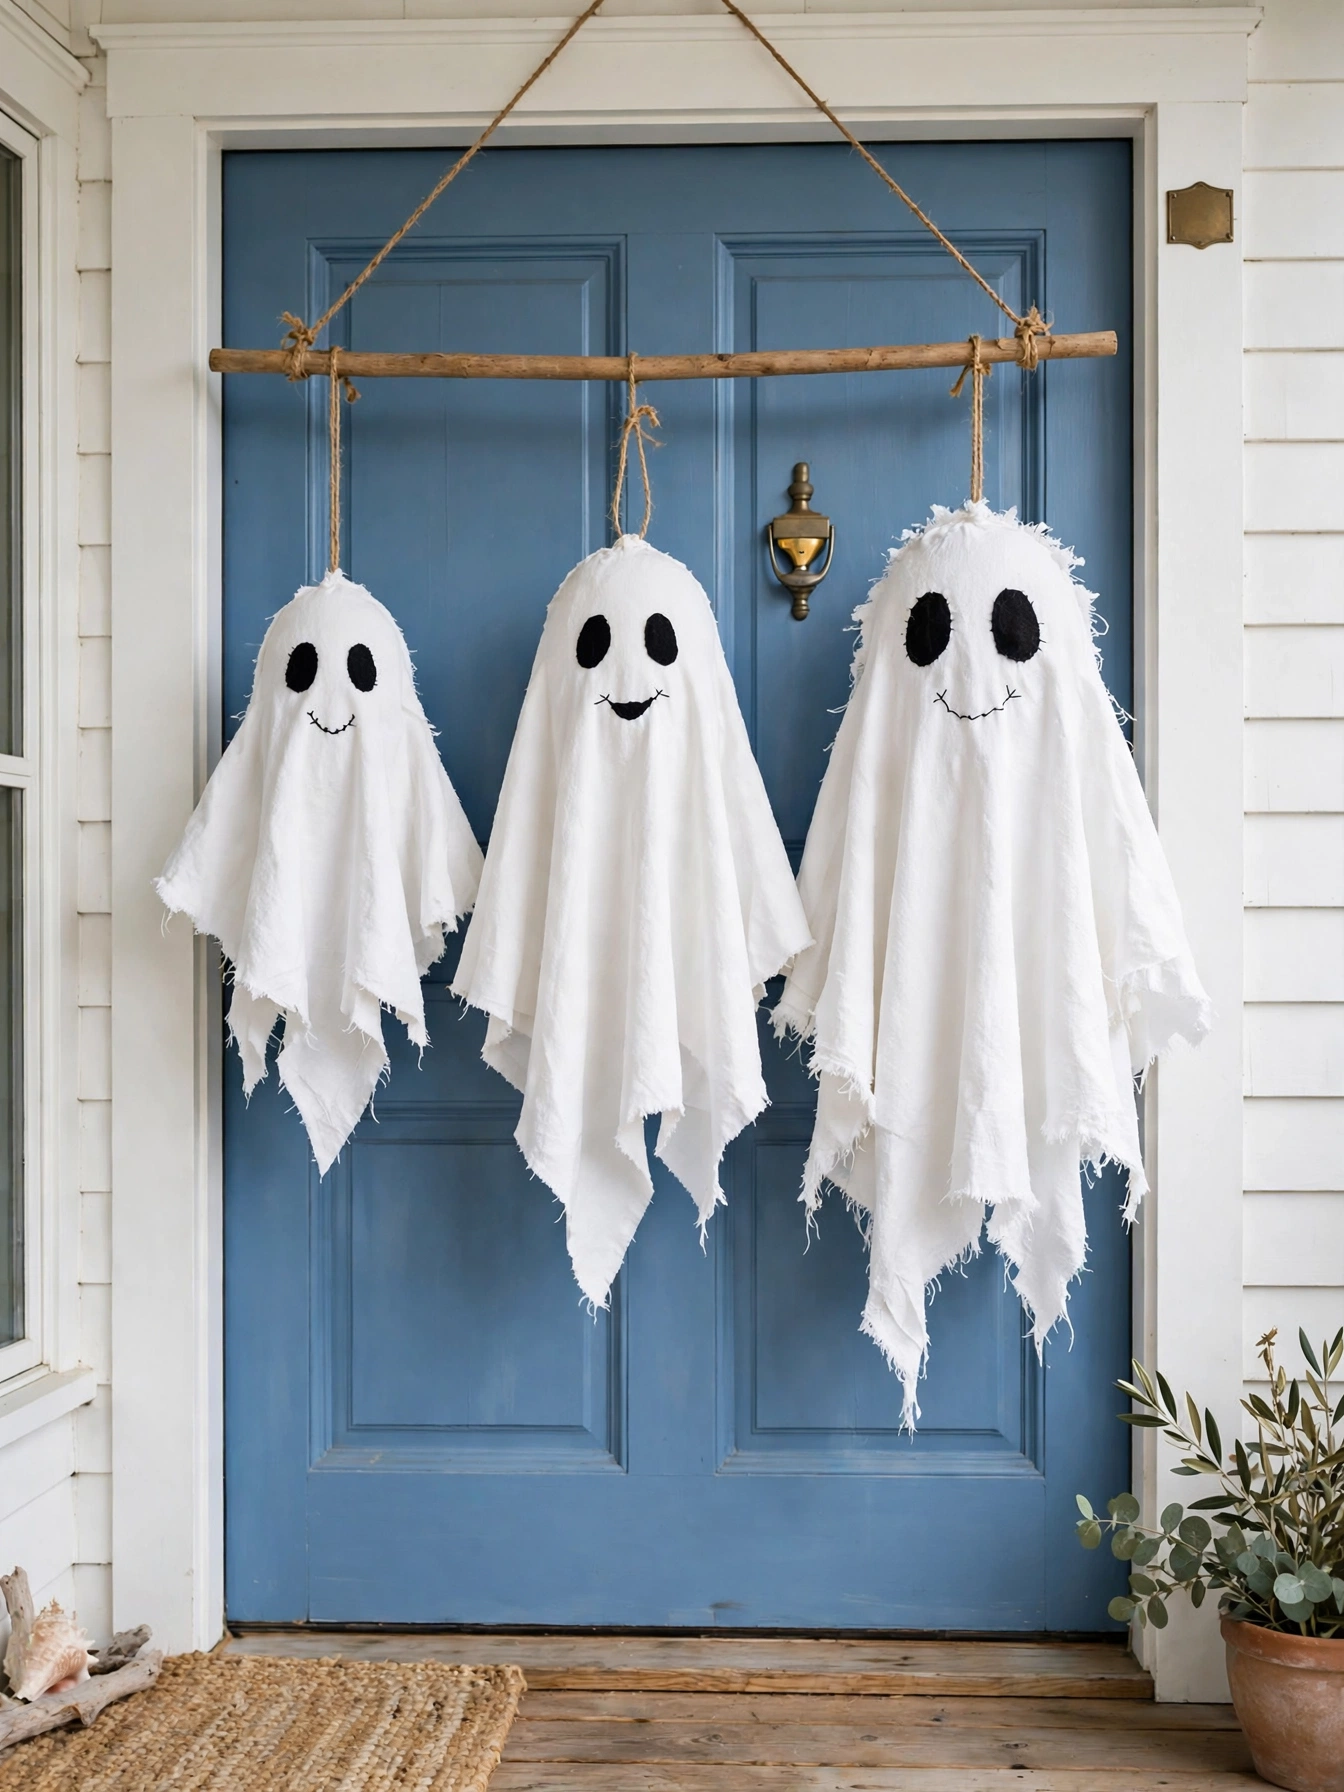
Why This Works:
- Fabric scraps from the sewing bin make this a nearly free project
- A 24 inch dowel holds 5 ghosts in graduated sizes for a designed look
- Felt eyes and stitched mouths give each ghost a handmade personality
- The whole hanger weighs under 1 pound and needs one small hook
Cut ghost shapes in 3 sizes (8, 10, and 12 inches tall) from white cotton fabric scraps, cutting two layers per ghost. Sew or hot glue the layers together around the edges, leaving the bottom open, and stuff each ghost lightly with polyester fiberfill (one 12 ounce bag fills all 5 ghosts). Glue on black felt oval eyes (1 inch tall) and stitch a simple mouth with black embroidery floss. Tie the 5 ghosts along a 24 inch wooden dowel with 6 inch lengths of jute twine, spacing them 4 inches apart. Avoid stretchy knit scraps because they sag and lose the ghost shape within a week; woven cotton holds its form for the full season. Hang the dowel from a single hook with a 12 inch jute loop tied at the balance point. Homeowners who have tried this find that pressing the fabric with a warm iron before cutting makes the ghost edges crisp and even.
This hanger is ideal for crafters with a scrap bin and for homes where kids will touch the decorations, since nothing breaks or tears easily. The limitation is the same as all fabric decor: keep it on a covered porch, because wet cotton takes 2 days to dry and can mildew in that time. Total cost is 5 to 7 dollars if you buy the dowel and fiberfill new. When Halloween ends, the ghosts pack flat in a shoebox for next year.
Spiderweb Yarn Wreath
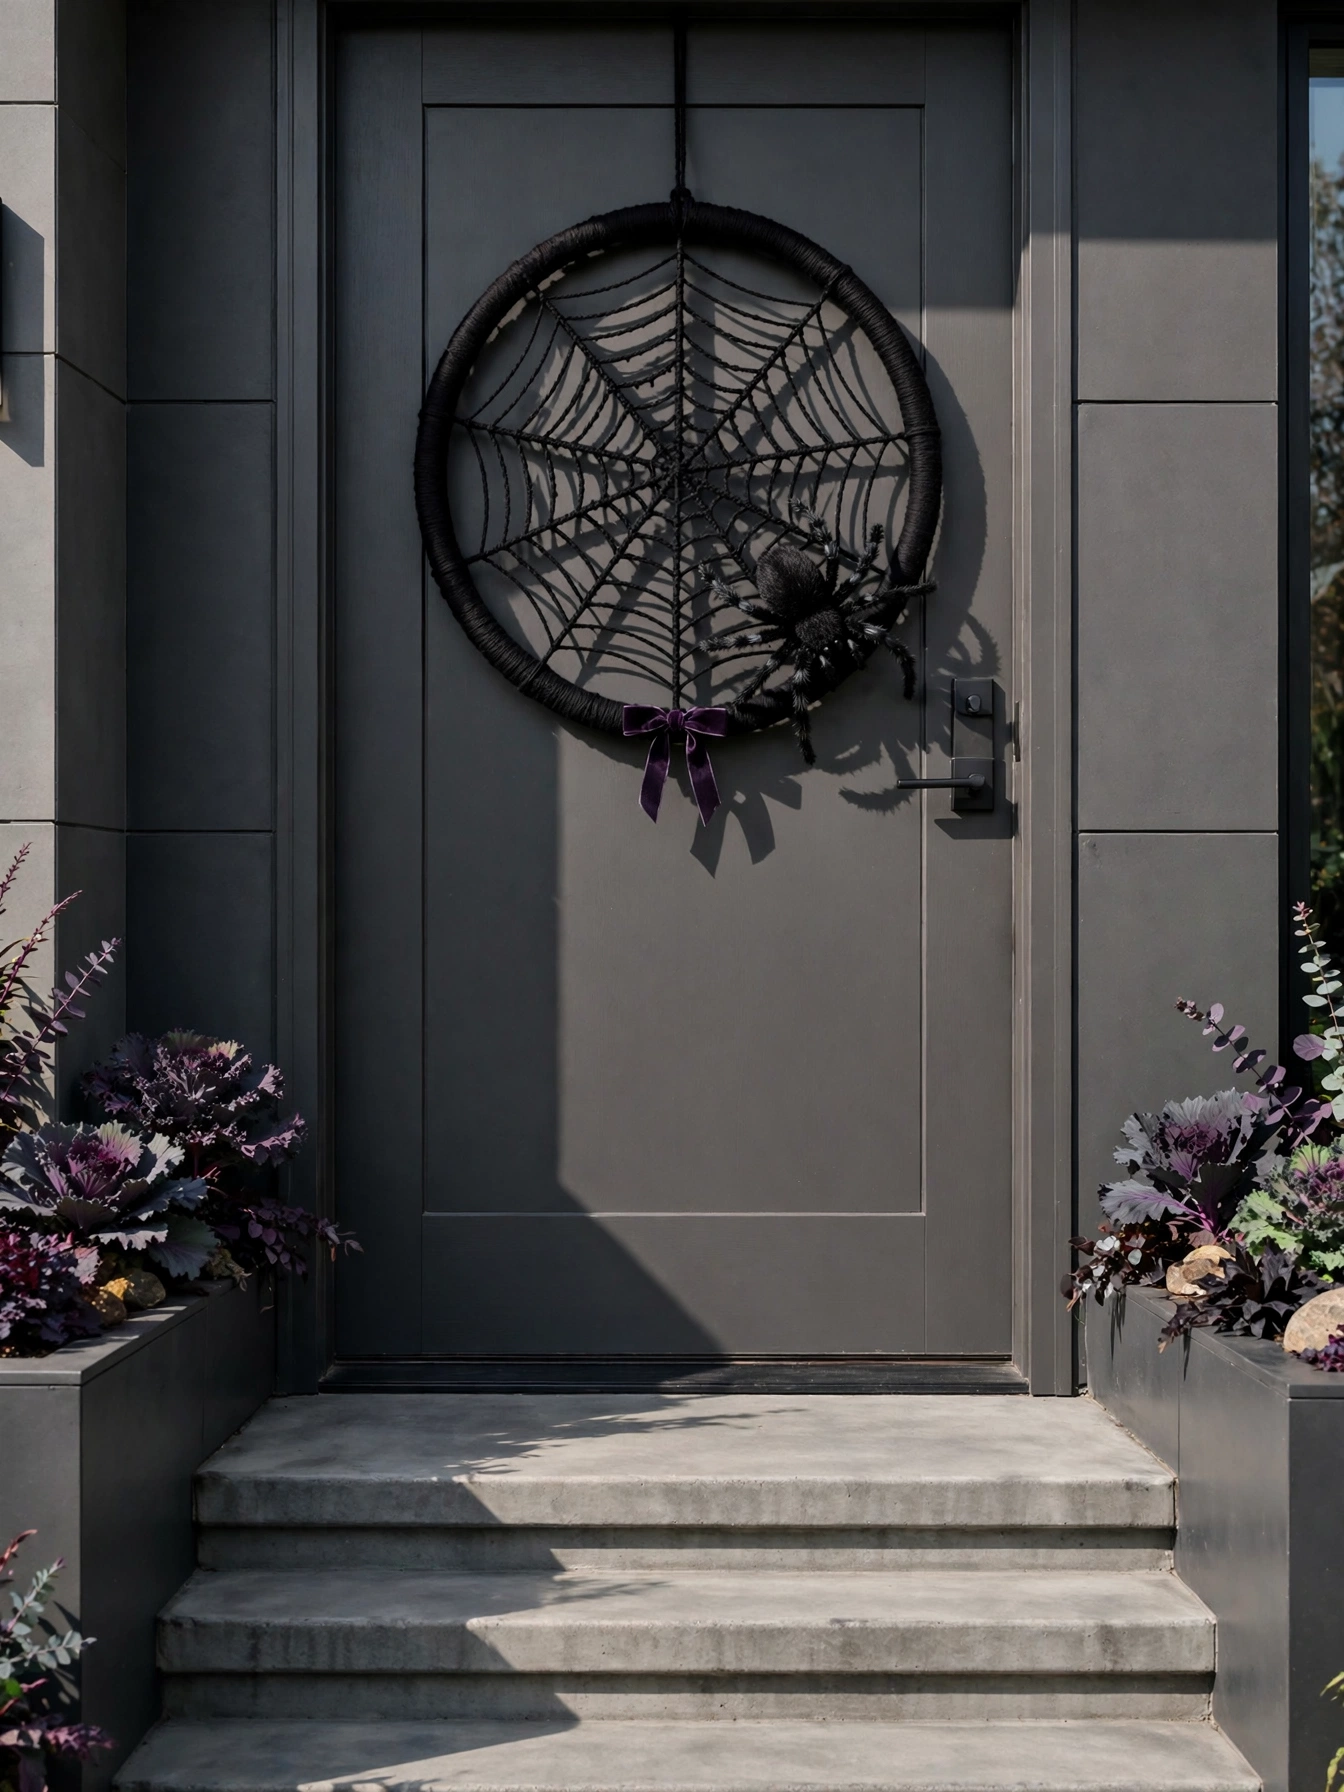
Why This Works:
- A 12 inch embroidery hoop and one skein of yarn build the web for 8 dollars
- The radial web pattern looks intricate but takes 30 minutes to weave
- A 4 inch faux spider gives it instant Halloween identity
- The flat profile survives wind that would shred fuller wreaths
Stretch 8 radial spokes of black yarn across a 12 inch wooden embroidery hoop, knotting each spoke tightly to the hoop and spacing them evenly like pizza slices. Weave a spiral of the same yarn around the spokes, looping over each spoke and pulling snug, working from the center outward with 1.5 inch gaps between spiral rounds. Tie off the end at the hoop and hot glue a 4 inch faux spider to the lower right quadrant. Avoid thin thread or string because it disappears against a dark door from more than 10 feet away; medium-weight yarn (4 to 5 millimeter) stays visible from the sidewalk. Tighten the hoop screw fully and add a drop of wood glue to the joint so the tension never slips. In real homes, this wreath works best on dark-colored doors where the black web contrasts sharply.
This is the best pick for modern homes and for windy, exposed entries, since the open web catches almost no wind. The limitation is the spider: cheap plastic spiders fade to gray in direct sun within 3 weeks, so choose a fabric-covered spider or spray it with UV-resistant clear coat. The wreath weighs under 1 pound and hangs from a single nail or adhesive hook. Total build time is about 45 minutes, making it a great last-minute project.
DIY Halloween Door Mat
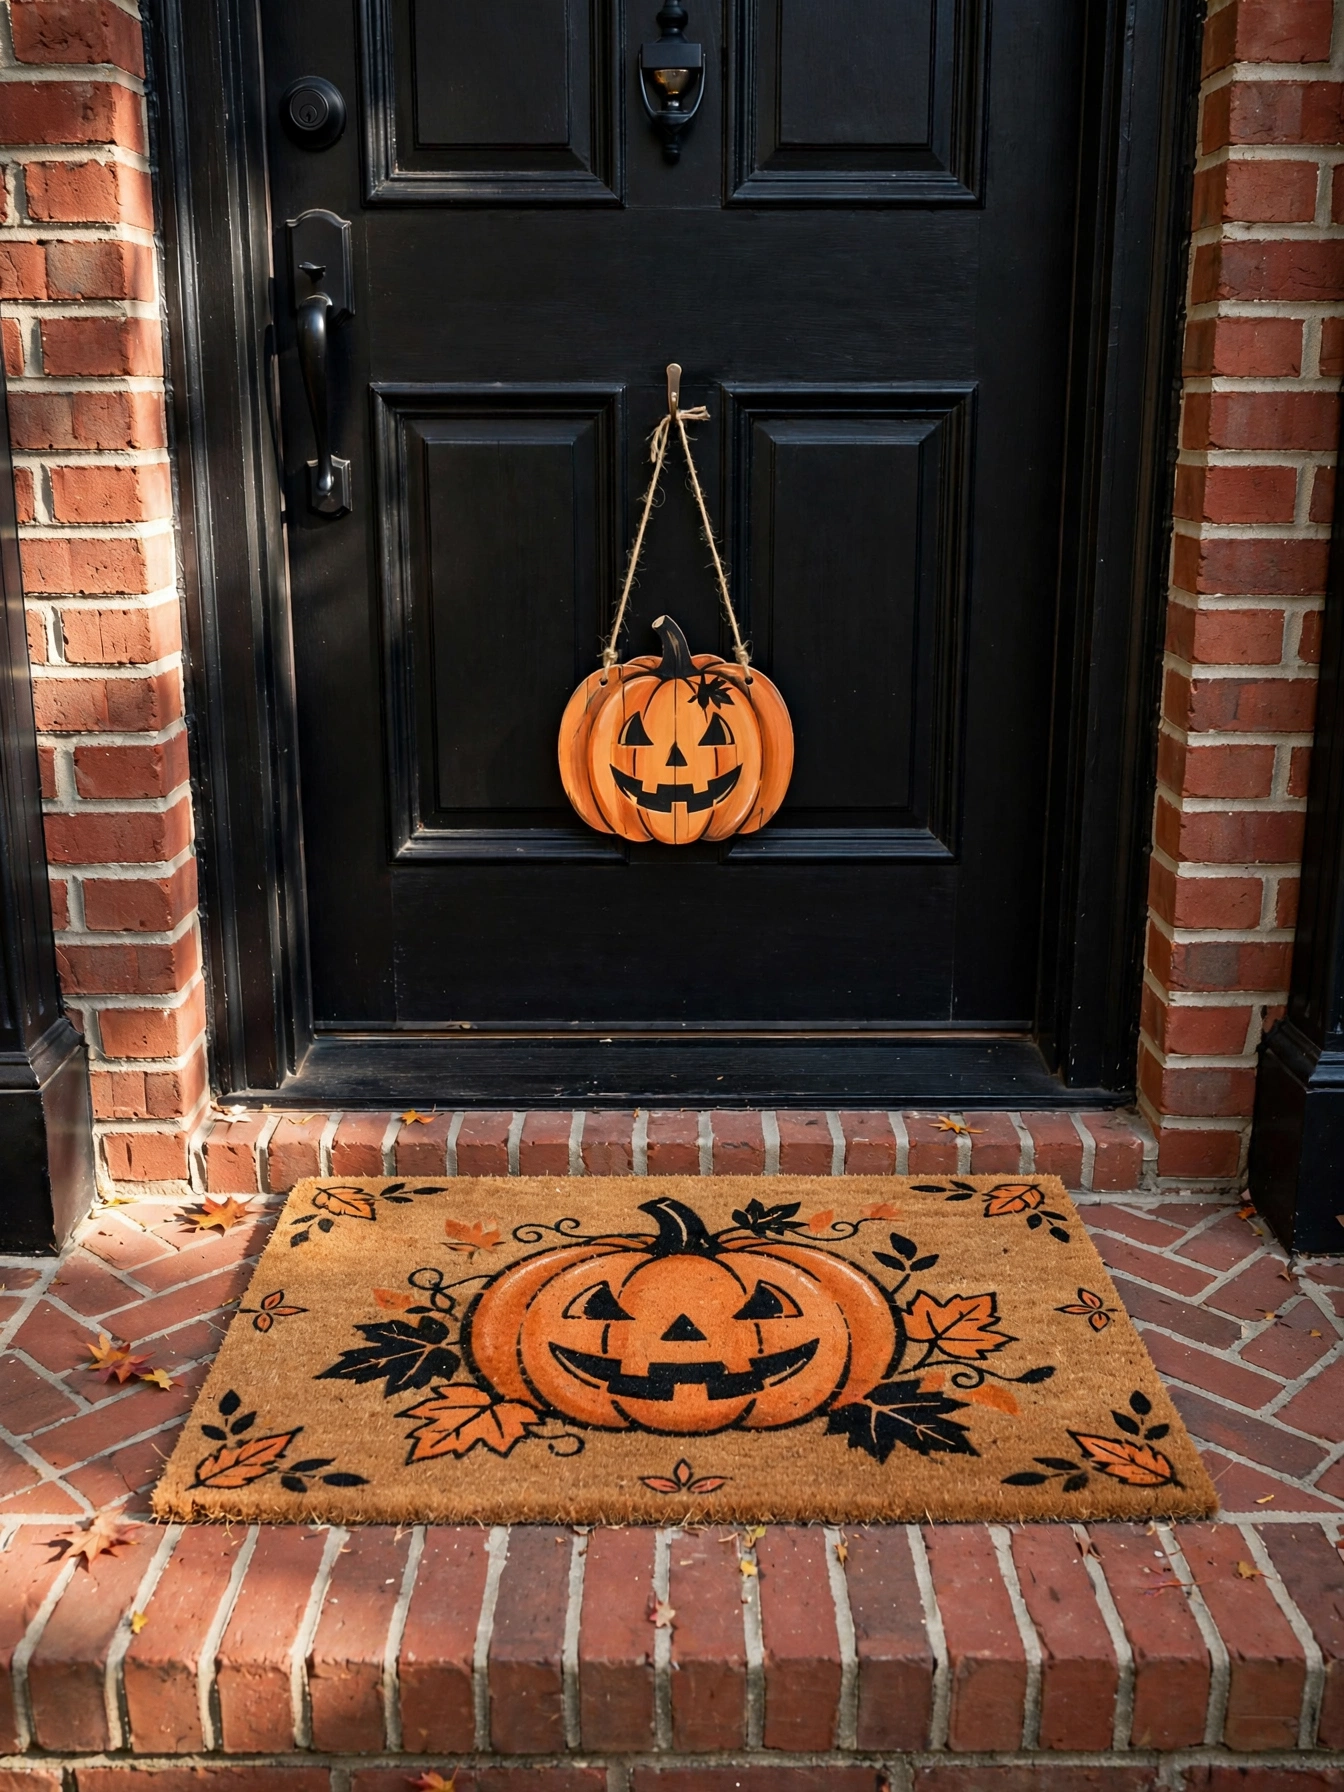
Why This Works:
- A painted 18 by 30 inch coir mat costs 14 dollars versus 30 plus for printed ones
- Matching the mat to a small door accent creates a coordinated entry
- Exterior acrylic paint survives foot traffic for the full season
- Stenciling keeps the design crisp even for non-artists
Buy a plain coir doormat (18 by 30 inches, about 10 dollars) and a simple pumpkin or bat stencil. Tape the stencil down with painter’s tape, stipple on exterior acrylic paint (orange and black) with a 1 inch stencil brush, and apply 2 coats with 1 hour of drying between them. Remove the stencil while the second coat is tacky for the cleanest edges, then seal the mat with 2 coats of clear exterior sealer sprayed from 10 inches away. Avoid regular craft paint because foot traffic wears it off within 5 days; exterior acrylic with a urethane additive lasts 6 weeks of daily use. Hang a matching 8 inch painted wooden pumpkin on the door above the mat to tie the entry together. According to The Spruce, sealing a painted coir mat adds roughly 3 weeks to the design’s life under normal foot traffic.
This combo suits any home with a standard doorstep and takes one afternoon including drying. The honest limitation is heavy rain: standing water under the mat breeds mildew, so lift the mat after storms and let the step dry. Shake the mat weekly to keep dirt from grinding the paint off. Total cost is 13 to 16 dollars, and the stencil is reusable for next year’s mat.
Pinecone Bat Mobile
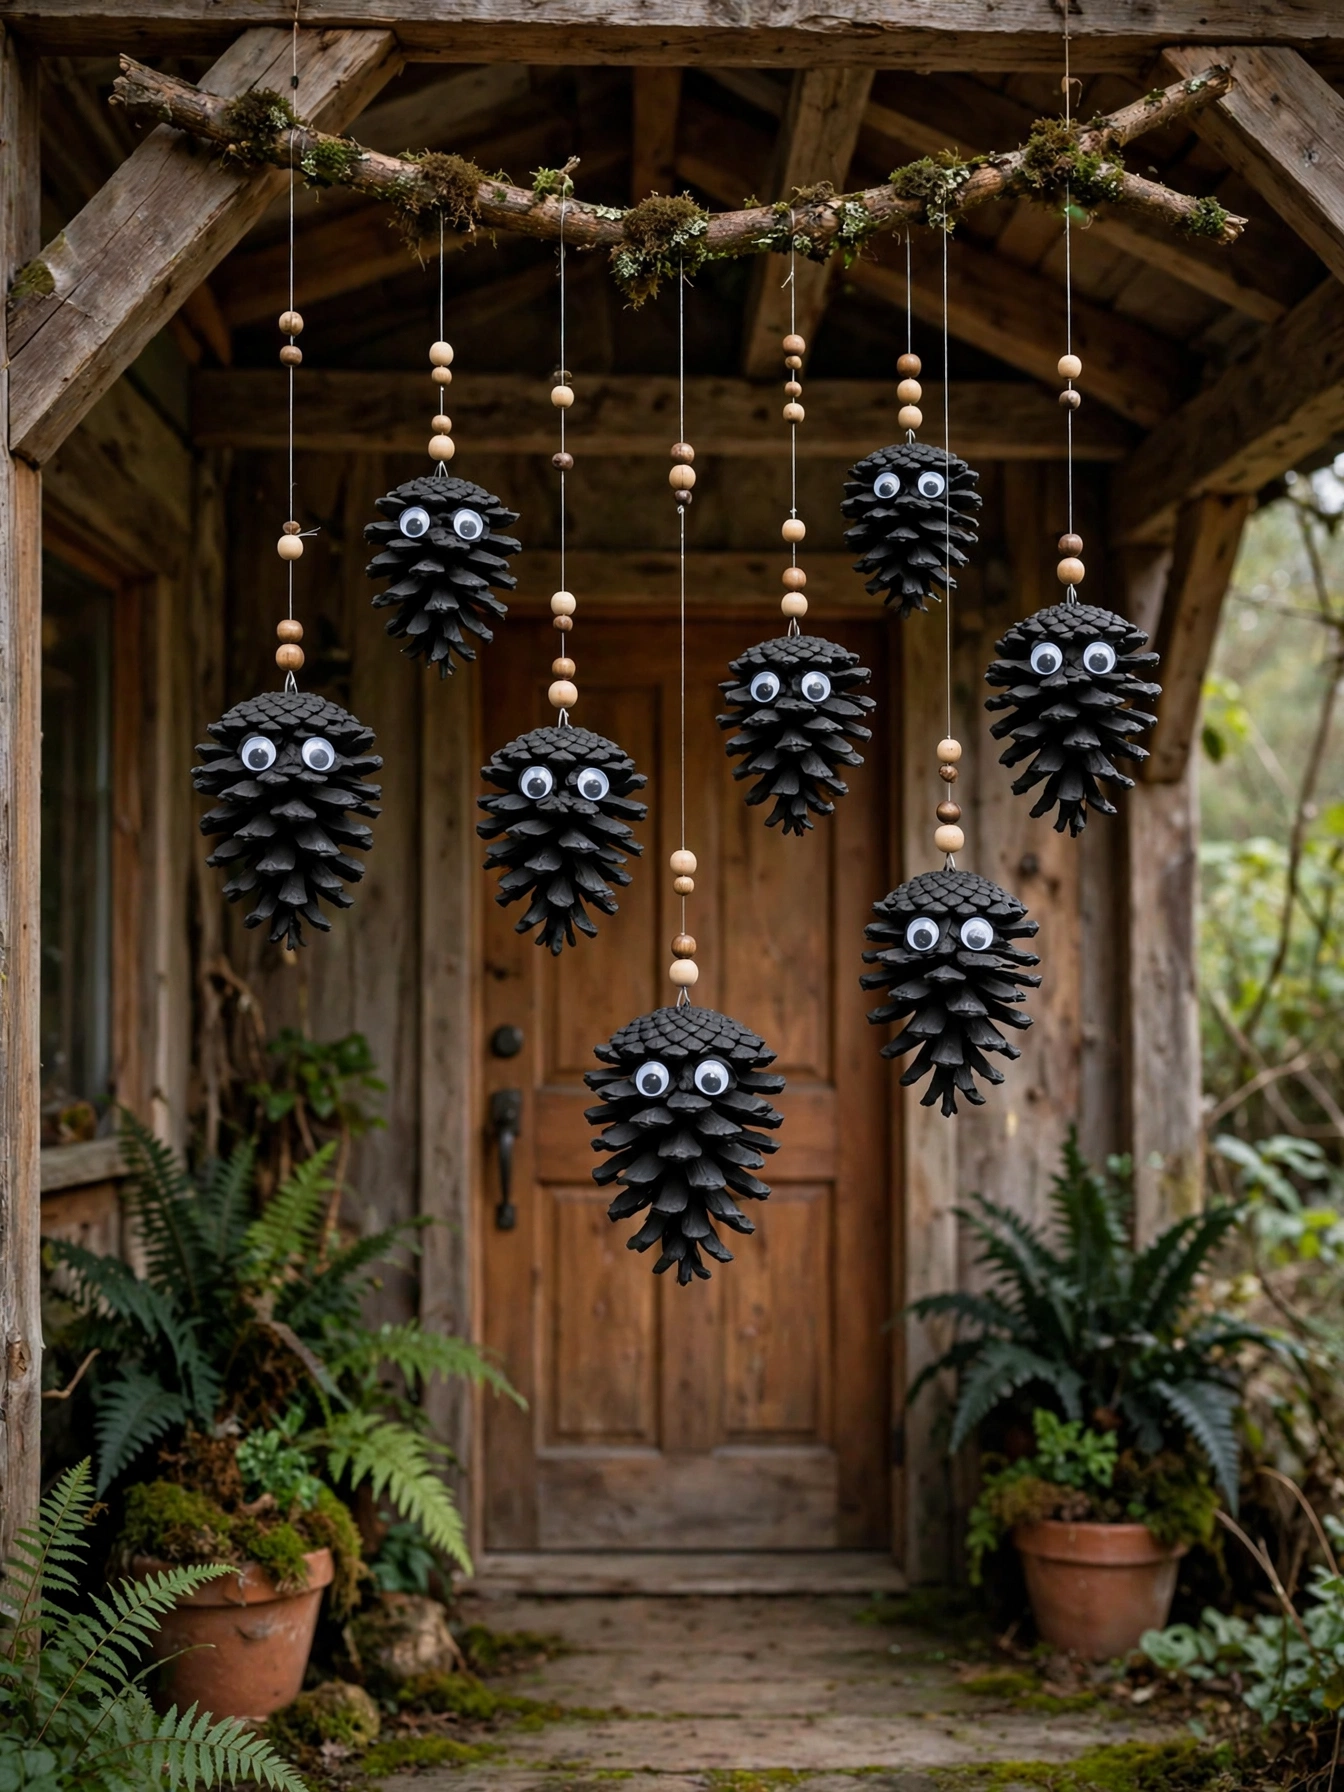
Why This Works:
- Pinecones are free from the yard and paint up into convincing bats
- Hanging 7 bats at staggered heights fills the space above any door
- The mobile sways gently, which draws the eye from the street
- Total cost is under 9 dollars with the branch also sourced outdoors
Collect 7 pinecones between 3 and 5 inches long and bake them at 200 degrees Fahrenheit for 45 minutes on a foil-lined tray to kill insects and open the scales. Spray them with 2 coats of matte black spray paint, glue on two half inch googly eyes per pinecone, and cut bat wings from black craft foam (two 4 inch triangles per bat) glued to the sides. Tie each bat to a 30 inch natural branch with clear fishing line cut to 10, 14, and 18 inch lengths, spacing the bats 4 inches apart. Avoid green, unopened pinecones because they continue to open and drop scales for 3 weeks after painting; fully open brown cones are stable. Hang the branch from the porch ceiling or door frame with two 24 inch lengths of jute twine. Before you hang it, test the hang on a calm day and add a small fishing weight to any bat that spins excessively in the breeze.
This mobile suits porches with an overhang at least 7 feet high so visitors do not bump the lowest bat. The limitation is the googly eyes: the adhesive backs fail in humidity after about 2 weeks, so add a dot of hot glue behind each eye for the full season. The whole mobile weighs under 2 pounds. When October ends, the bats store in a shoebox and the branch goes back to the yard.
Monster Eye Wreath
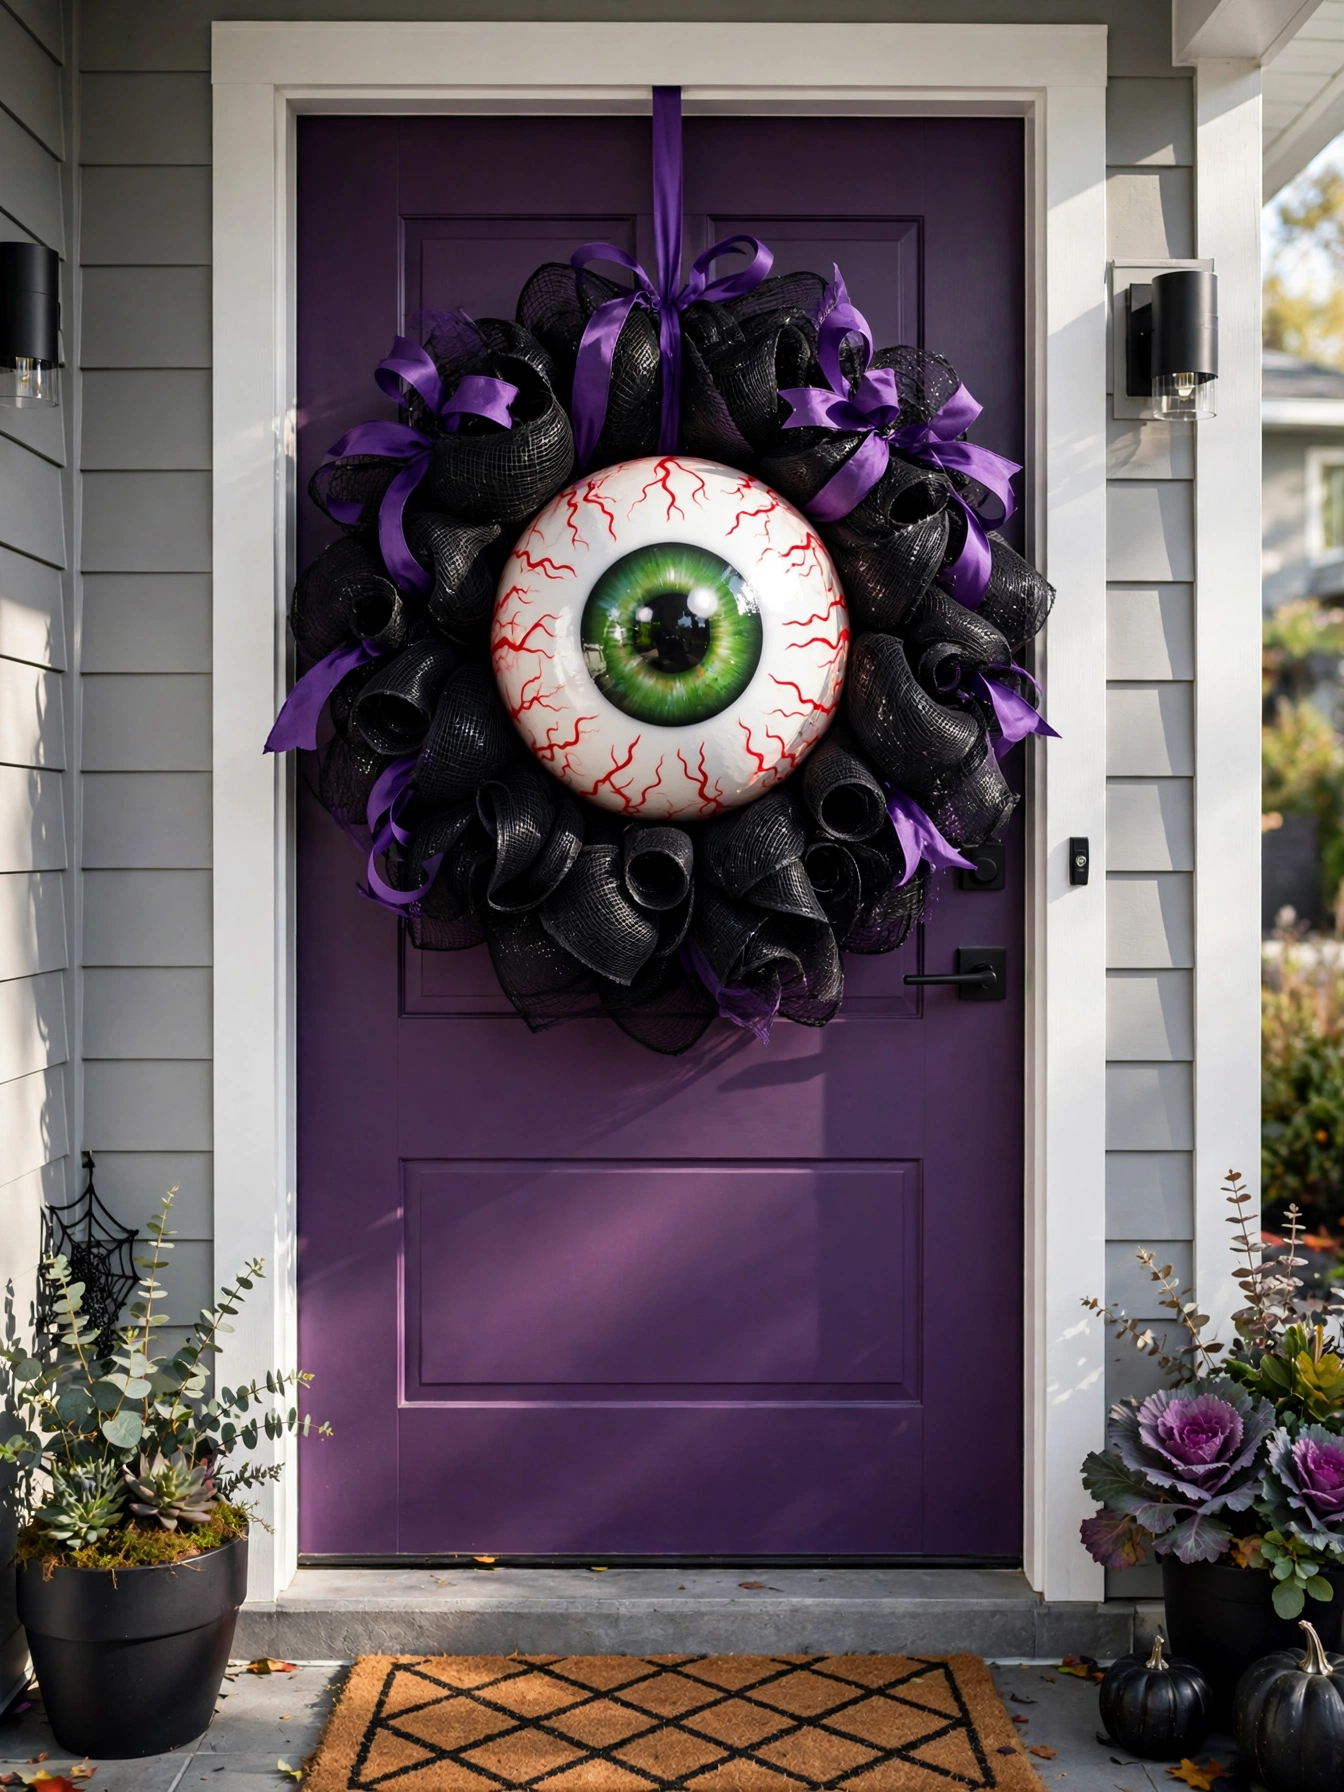
Why This Works:
- A single 8 inch eyeball creates the boldest focal point in this collection
- The wreath reads clearly from 50 feet away, farther than any other project here
- Black mesh hides the foam base completely with minimal skill
- Kids love it, and it takes about 2 hours to build
Paint a 6 inch white foam ball with 2 coats of white acrylic, then paint a 3 inch iris in vivid green (close to DecoArt Hauser Light Green) with a 1.5 inch black pupil and thin red veins radiating outward with a detail brush. Seal the ball with 2 coats of high-gloss sealer for a wet, realistic shine. Build a 14 inch wreath base by gathering 20 yards of black deco mesh through a wire frame, then hot glue the eyeball into the center, pressing firmly for 30 seconds. Add 4 loops of 2.5 inch purple wired ribbon at the top. Avoid styrofoam balls with visible bead texture because the bumps show through the paint; smooth foam craft balls cost 1 dollar more and paint flawlessly. Homeowners who have tried this find that the gloss sealer is what sells the effect, since a matte eyeball looks flat and unfinished.
This wreath is the showstopper pick for families with kids and for houses on busy trick-or-treat streets. The limitation is subtlety: there is none, so pair it with calm, simple step decor rather than competing bold pieces. It weighs about 3 pounds, so use a wreath hook rated for 5 pounds minimum. Total cost is 15 to 18 dollars, and the eyeball alone gets reused as a party decoration indoors after Halloween.
FAQs
What are the best DIY Halloween door decor ideas 2026 for a covered porch?
Covered porches suit the widest range of projects, from the burlap bubble wreath to the book-page pumpkin wreath. Without direct rain, paper and fabric crafts last the full 31 days of October with one light sealer coat. Reserve tin lanterns and painted plywood for fully exposed entries.
How do I weatherproof these DIY Halloween door decor ideas 2026?
Apply 2 to 3 coats of clear exterior sealer, such as Krylon UV-Resistant Clear, with 2 hours of drying between coats. According to The Spruce, sealed craft projects last 2 to 3 times longer outdoors than unsealed ones. Elevate ground pieces on bricks and bring paper crafts inside during storms.
Which DIY Halloween door decor ideas 2026 work best for renters?
Renters should choose projects that hang from removable hooks, including the paper bat flight path and felt leaf garland. Removable adhesive hooks hold up to 3 pounds each and release cleanly from painted doors for 90 days. Avoid screws, nails, or permanent adhesives on surfaces you do not own.
How long do homemade Halloween door wreaths last outdoors?
A well-sealed wreath lasts 4 to 6 weeks outdoors, covering the Halloween season with margin. Yarn and mesh wreaths outlast paper ones by about 3 weeks in the same conditions. According to HGTV, storing wreaths in sealed boxes between seasons lets crafters reuse the base for 3 years or more.
Where is the cheapest place to buy craft supplies for these projects?
Dollar stores cover about 60 percent of the materials list, including foam forms, felt, paint, and ribbon, at 1 to 3 dollars per item. Craft chains run 40 percent off coupons weekly on the rest. Buying across both keeps the average project cost between 7 and 15 dollars.
Conclusion
These 20 DIY Halloween door decor ideas 2026 prove that a memorable entryway comes from craft supplies and an afternoon, not a big budget. Seal every project for the outdoors, hang paper and fabric crafts under cover, and let one bold piece carry the whole display. Start with this: pick the project that fits your porch and gather its materials this weekend. Follow HomelyCrafter on Pinterest for more ideas. Save this to your Pinterest boards so you can refer back to it!

Muhammad Israr is a home decor enthusiast and the writer behind Homely Crafter. He spends his days researching paint colors, layouts and budget-friendly styling ideas, then breaks them down into practical, easy-to-follow guides so you can decorate with confidence.
4 thoughts on “20 DIY Halloween Door Decor Ideas That’ll Wow in 2026”