
Open a kitchen junk drawer in December and you already own half a Christmas workshop. These diy christmas decor ideas 2026 turn pinecones, jars, scrap wood, and leftover fabric into finished pieces with clear measurements and honest material lists. You will learn exact sizes, drying times, and safe finishing steps for each project.
Most projects use tools you already have, such as scissors, a hot glue gun, a ruler, and a paintbrush. A few need an evening to dry, so plan one project per night in the week before you decorate. Each section lists what to skip, what to substitute, and how long the finish should last.
Work through the list in order or jump to the project that matches your spare materials. Start with one small piece, test the method, then repeat it in larger numbers for a mantel, table, or entry shelf.
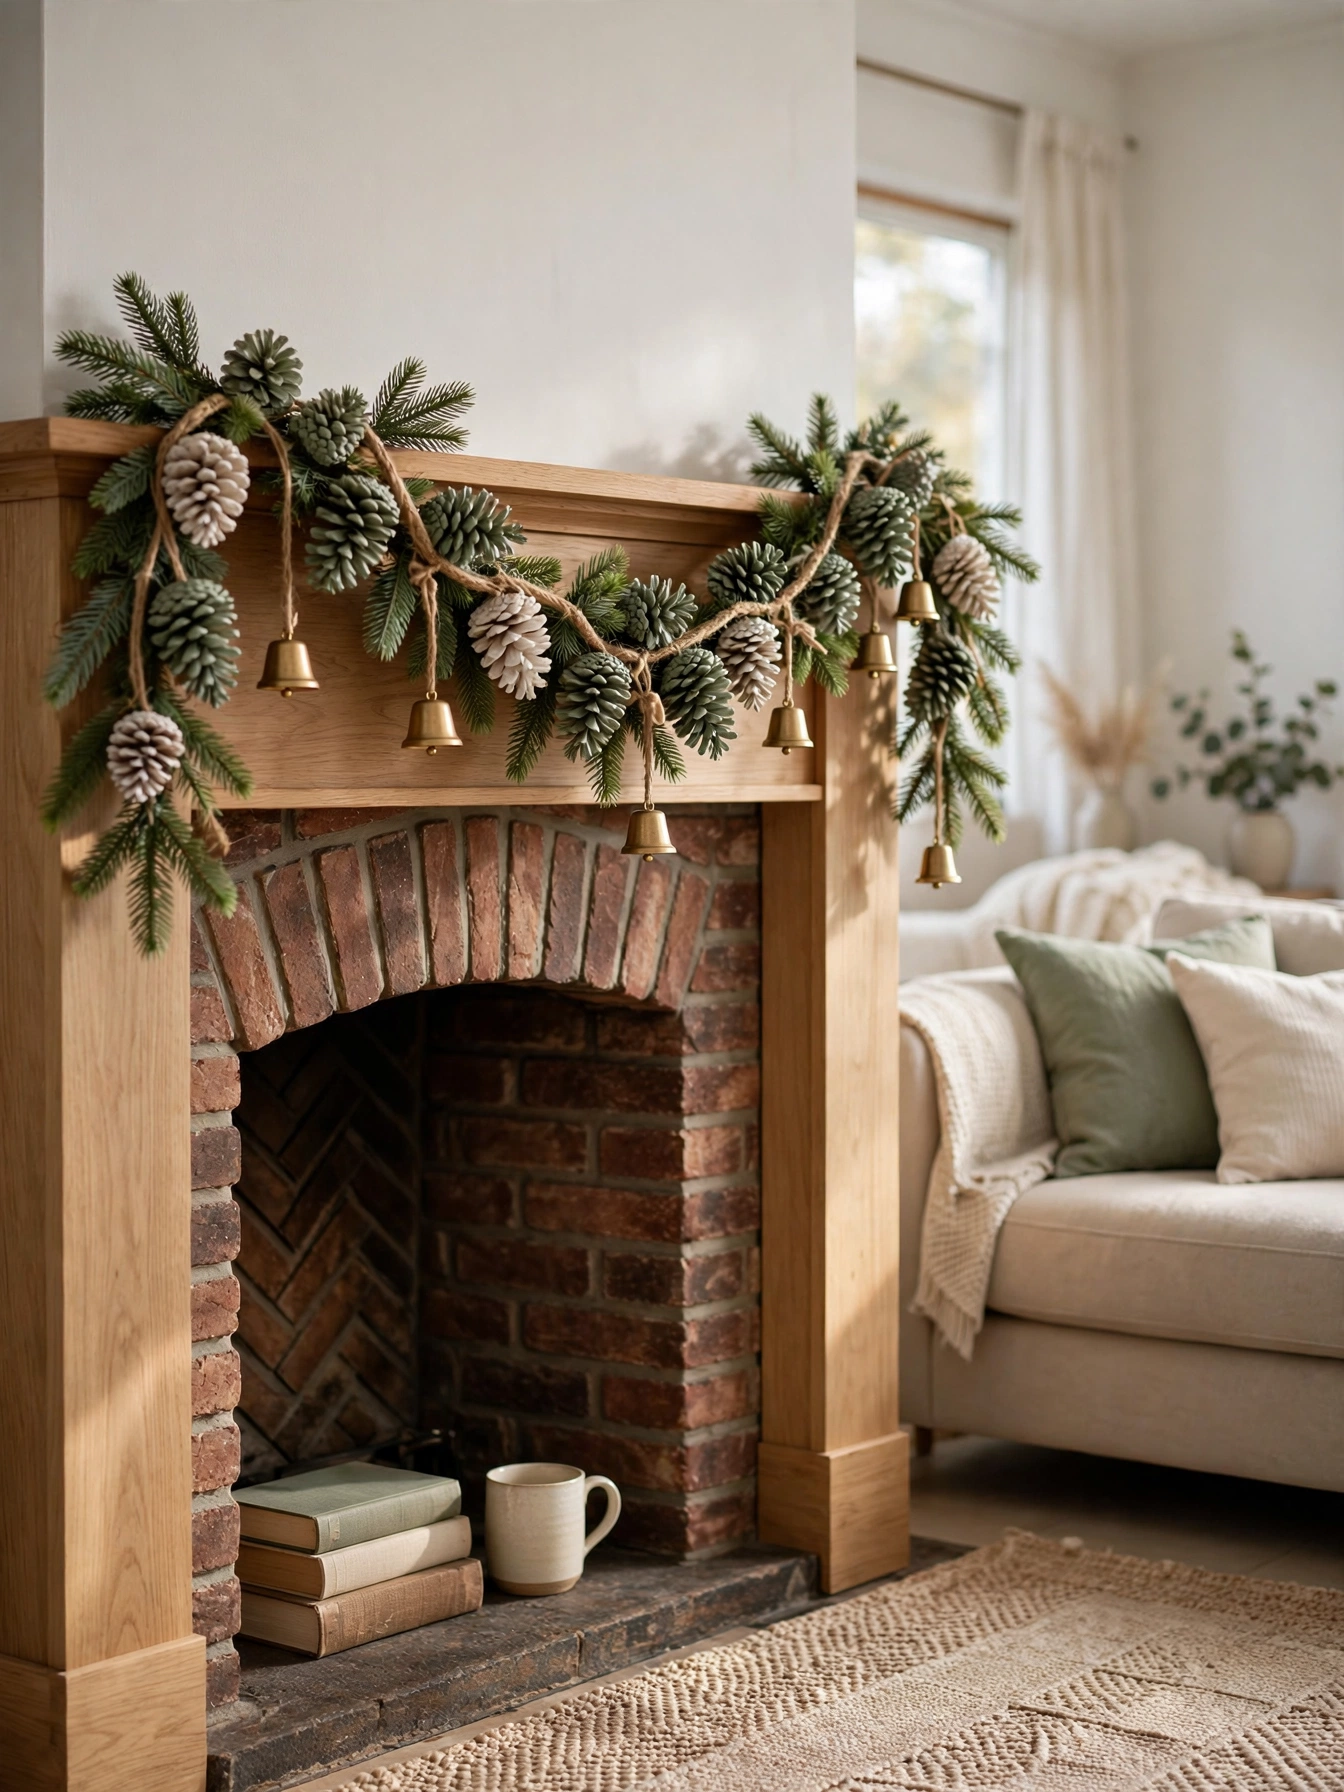
Painted Pinecone Garland
Why This Works:
- Uses 12 to 15 pinecones per 6 foot garland, so a single park walk supplies one mantel.
- Acrylic paint dries in 30 minutes and seals with one clear coat.
- Twine holds 2 pounds without stretching when knots sit 4 inches apart.
- The palette mixes with spruce and cedar without competing for attention.
Choose pinecones 3 to 4 inches long with closed, even scales, then bake them at 200 degrees Fahrenheit for 30 minutes to remove moisture and insects. Paint only the outer scale tips with matte acrylic in sage, cream, or dusty gold, using a 1 inch flat brush for control. Thread the cones on 8 feet of jute twine with 4 inches between centers, knotting on both sides of each cone so the spacing stays even. Leave out glossy spray paint on this project because the shine hides the natural texture and chips faster on rough scales. Compared with hot glue alone, a twine knot plus a dot of glue holds through a full season, while glue alone loosens when indoor heat dries the cones.
This garland suits a renter who wants a mantel accent without drilling, since two removable hooks carry the full weight. It works best above a fireplace that stays unlit during display hours, because direct heat fades paint within two weeks. Shedding is the weak point here, so expect a few scales on the mantel after the first week and shake the garland outdoors before hanging. For a cleaner look, brush loose scales off with an old toothbrush and keep a small jar of touch-up paint nearby.
Pro Tip: Paint 2 extra pinecones and store them with the garland, so a chip can be swapped in 5 minutes without repainting the whole strand.
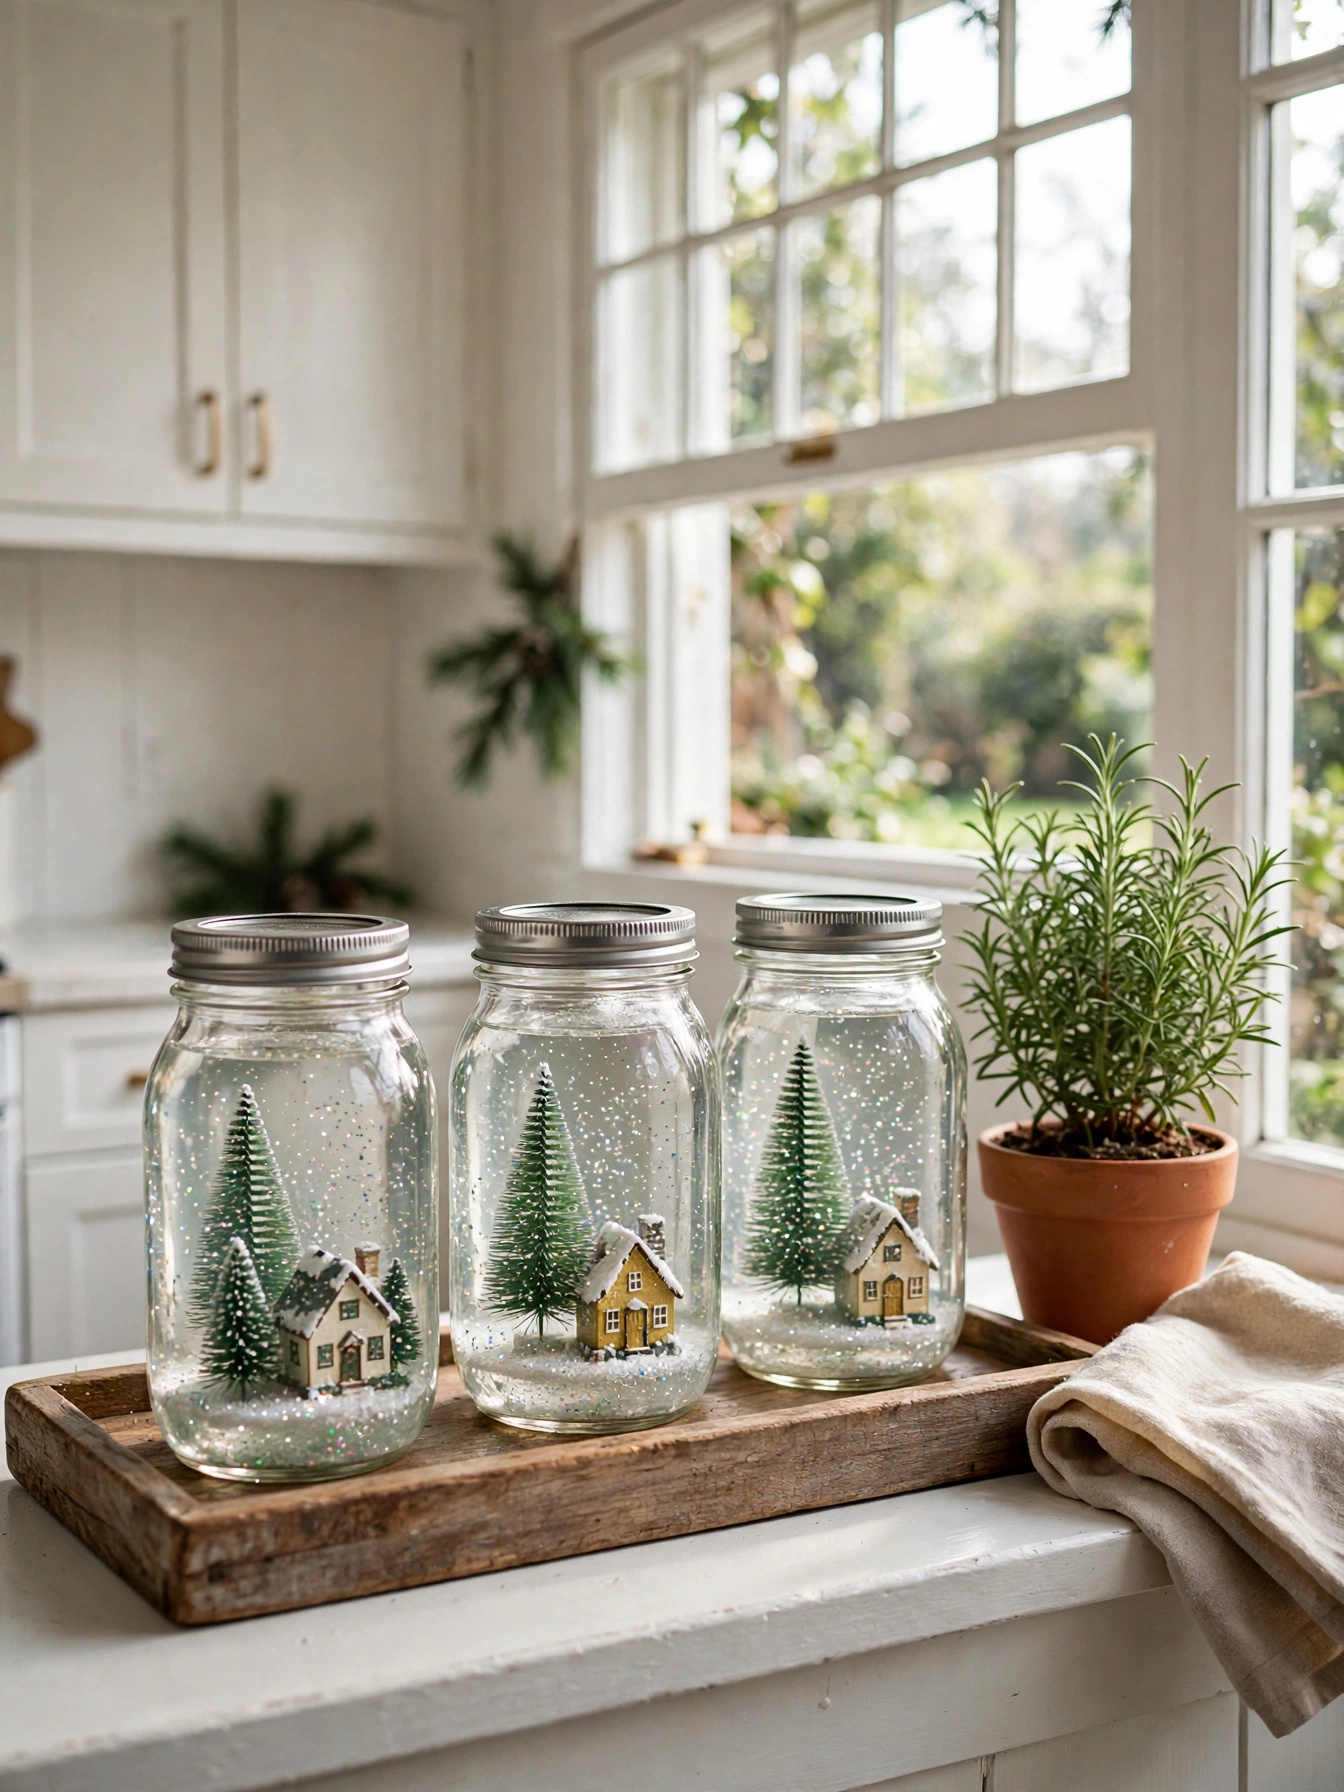
Mason Jar Snow Globe Village
Why This Works:
- Three jars in heights 5, 6, and 7 inches create a skyline without crowding a sill.
- Distilled water keeps the scene clear for 4 weeks or longer.
- A 2 inch bottle brush tree fits a wide mouth jar with room for snow.
- Glycerin, 1 teaspoon per jar, slows the glitter fall to about 20 seconds.
Start with wide mouth quart jars and scrub the lids with warm soapy water so the seal stays tight. Glue a 2 inch bottle brush tree and one tiny house to the inside of each lid with waterproof epoxy, then let the bond cure for 24 hours. Fill each jar with distilled water to 1 inch below the rim, add 1 teaspoon of glycerin and 1 tablespoon of fine glitter, then screw the lid on firmly. Pass on tap water here because minerals cloud the glass within days and hide the village. A silicone ring beats a bare lid here, since it stops slow leaks, while a bare lid often weeps after a week on a warm sill.
Families with young children often place this trio on a low bookshelf where little hands can shake a jar without breaking anything heavier. The jars handle daily shaking, yet the glitter settles into clumps if the water sits untouched for a month. A quick shake every few days keeps the snow even, and a soft cloth wipes fingerprints without scratching the glass. Keep the village away from a south facing window, since full sun warms the water and loosens the epoxy bond over time.
Pro Tip: Test one jar for 48 hours on a paper towel before making the set, so any leak shows up before you finish all three.
Scrap Wood Block Village

Why This Works:
- Five blocks from one 24 inch board make a complete village row.
- Heights from 3 to 7 inches read as houses, a shop, and a church.
- One quart of chalk paint covers 3 villages with paint left over.
- Felt pads under each block stop scratches on a 48 inch shelf.
Cut pine offcuts into blocks 3, 4, 5, 6, and 7 inches tall, keeping the depth at 2 inches so the row sits stable on a narrow shelf. Sand each cut with 120 grit paper, then 220 grit for a smooth edge that takes paint evenly. Paint roofs in deep green, charcoal, or brick red, and leave the sides cream or natural pine for contrast. Do not use pressure treated offcuts for indoor display because the chemical treatment is not meant for living spaces and the smell lingers. Two thin coats beat one thick coat, since they give a harder finish that resists chips when the blocks are packed away, with 2 hours of drying between coats.
A narrow console or hallway shelf gives this village a home where guests see it at eye level without losing table space. People who enjoy weekend woodwork can finish the full set in about 3 hours, including drying time between coats. Weight is the downside, since pine blocks feel heavier than they look and a toddler can topple a tall tower. Place the tallest block at the back, keep the row 3 inches from the shelf edge, and add a small battery candle behind the village for evening glow.
Pro Tip: Label the base of each block with its height in pencil, so next year you can rebuild the same skyline in 10 minutes.
Sweater-Wrapped Candle Sleeves

Why This Works:
- One adult sweater yields 4 sleeves, each 4 inches tall.
- A 3 inch pillar candle fits a sleeve cut 10 inches around.
- Felt lining, 1/8 inch thick, stops snags on rough knit.
- Sleeves store flat and last 3 seasons or more.
Trim sweater sleeves or body panels into rectangles 10 inches wide by 4 inches tall, then wrap each piece around a 3 inch pillar candle to check the fit. Sew the back seam with a 1/4 inch allowance, or secure it with fabric glue if you do not sew, and fold the top edge under by 1/2 inch for a clean rim. Use flameless LED candles inside the sleeves, since fabric sits close to the flame and standard candles need open clearance. Steer clear of loose chunky knits with open holes because stray fibers can catch heat and the sleeve slides off the candle. A flat jersey knit hugs the candle more evenly than a tight cable knit, which gaps and needs pins to stay put.
In a reading corner, these sleeves soften the look of plain white pillars and add texture without buying new candle holders. Crafters who have a bag of old sweaters can match sleeves to throws and cushions in an afternoon. Cleaning is the trade-off, since knit sleeves collect dust and need a gentle hand wash once a season. Air dry each sleeve flat on a towel, then slip it back on the candle when fully dry to avoid stretching.
Pro Tip: Cut the sleeve 1/2 inch shorter than the candle height, so the top rim stays visible and the LED glow reads clearly.
Twine Star Wall Hanging

Why This Works:
- Five wooden skewers, each 12 inches long, form one sturdy star.
- Thirty feet of jute twine wraps one star with full coverage.
- Total weight stays under 8 ounces, so one small nail holds it.
- A 14 inch star fits above a 24 inch console without overwhelming it.
Lay out 5 bamboo skewers, each 12 inches long, into a five point star and hot glue each crossing where two sticks meet. Wrap the frame with 30 feet of natural jute twine, pulling each pass snug and adding a dot of glue every 6 inches to stop slipping. Trim the skewer tips to 1/2 inch beyond the last wrap for a neat point, then tie a 10 inch hanging loop at the top point. Skip thin cotton string for this project because it stretches under its own wraps and leaves gaps by the second week. Twine beats craft wire for this frame, since it gives a warmer texture and grips the frame, while wire needs pliers and often slides on smooth bamboo.
Above a small entry table, the star adds height without taking any surface space, which helps in rooms where every inch counts. Renters and students find it easy to hang, since the finished piece weighs less than a paperback. Symmetry is the weak point, so a star built by eye can lean visibly once hung. Measure the distance between opposite points before wrapping, adjust any long arm by 1/4 inch, and step back 6 feet to check the shape.
Pro Tip: Wrap the star twice in opposite directions for 60 feet total, and the center crossings will look woven instead of bundled.
DIY Christmas Decor Ideas 2026: Dried Lemon and Lime Slice Garland

Why This Works:
- Eight lemons and 6 limes yield about 40 slices for a 7 foot garland.
- Slices dried at 200 degrees Fahrenheit for 3 hours stay flat for weeks.
- Threading with 3 inches between slices keeps the colors visible.
- Total cost stays under 12 dollars when citrus is on sale.
Slice lemons and limes into rounds 1/8 inch thick, blotting each slice with a paper towel to remove surface juice before drying. Arrange the slices in a single layer on a parchment lined baking sheet and dry at 200 degrees Fahrenheit for 3 hours, flipping once at the 90 minute mark. Thread the cooled slices on 8 feet of twine with a needle, leaving 3 inches between slices and knotting lightly so the fruit does not crack. Avoid slices thicker than 1/4 inch because the centers stay damp, darken, and grow soft within days. Oven drying beats air drying, since it gives flat, translucent slices in one afternoon, while air dried slices curl and need two weeks on a rack.
Strung across a kitchen window, the garland catches daylight and adds color without blocking the view. Cooks and bakers who already buy citrus in bulk can dry a batch while baking other holiday treats. Fragility is the cost, since dried citrus snaps if bent or packed tightly. Store the garland flat between sheets of parchment, hang it away from steam above the stove, and expect to replace 2 or 3 slices each season.
Pro Tip: Dry 6 extra slices on the same tray, and you can replace any cracked piece in under 2 minutes without reheating the oven.
Cinnamon Stick Candle Bundles

Why This Works:
- Ten cinnamon sticks, each 4 inches long, wrap one 3 inch pillar.
- A 12 inch length of ribbon ties the bundle with a double knot.
- Scent lasts 2 weeks in a small room without lighting the candle.
- Bundles stand safely on a 5 inch saucer with room to spare.
Set a 3 inch pillar candle on a heat safe saucer at least 5 inches wide, then stand 10 cinnamon sticks, each 4 inches long, upright around the candle. Tie the ring with two loops of jute twine or ribbon, pulling firm enough to hold the sticks but not so tight that the bark cracks. Keep the cinnamon tops at least 1 inch below the candle top so the flame never reaches the sticks when lit. Hold back real flames on this project when the room will be empty, because cinnamon bark is flammable and every open flame needs at least a foot of clear space around it. These bundles beat scented candles for spice scent, since they give a stronger spice scent without added fragrance oils, while a scented candle fades faster once the top wax melts.
On a coffee table or entry tray, the bundle reads as a small gift and brings a warm spice note to the room. Hosts who want scent without a diffuser can place one bundle per seating area and rotate them weekly. Mess is the honest cost, since cinnamon dust sheds onto the saucer and nearby linen. Wipe the saucer with a damp cloth every 3 days, keep the bundle away from open windows, and never leave a lit candle unattended.
Pro Tip: Replace the outer 2 sticks after 14 days, and the scent will stay fresh without rebuilding the whole bundle.
Hand-Painted Ornament Set

Why This Works:
- Six clear glass ornaments, each 3 inches wide, make a matching set.
- Two coats of acrylic cover in 20 minutes with 1 hour drying.
- A 1/4 inch brush paints dots, stripes, and sprigs cleanly.
- Sealed ornaments keep color for 4 seasons or more.
Remove the metal cap from each 3 inch clear ornament and pour in 1 teaspoon of acrylic paint, then roll the ornament slowly until the inside coats evenly. For outside painting, use a 1/4 inch detail brush and work on one side at a time, letting each side dry for 60 minutes before turning. Add simple sprigs, dots, or stripes in two colors, keeping the pattern to one motif per ornament so the set looks calm. Keep paint away from the cap opening because dried paint seals the cap and makes the ornament hard to hang. Brush acrylic beats spray paint here, since it gives sharper lines and less waste, while spray paint fogs the clear glass and needs masking.
Painters who enjoy quiet evening crafts can finish a set of 6 in one sitting, with drying time between sides. The set works well as a gift, since the matching colors tie a tree together without buying a boxed set. Chipping is the risk, as glass ornaments chip if they knock together in storage. Wrap each ornament in one sheet of tissue, store the set in a divided box, and keep a small bottle of each paint color for touch ups.
Pro Tip: Apply the lightest color first and let it dry for 2 full hours, so the second color stays crisp instead of bleeding.
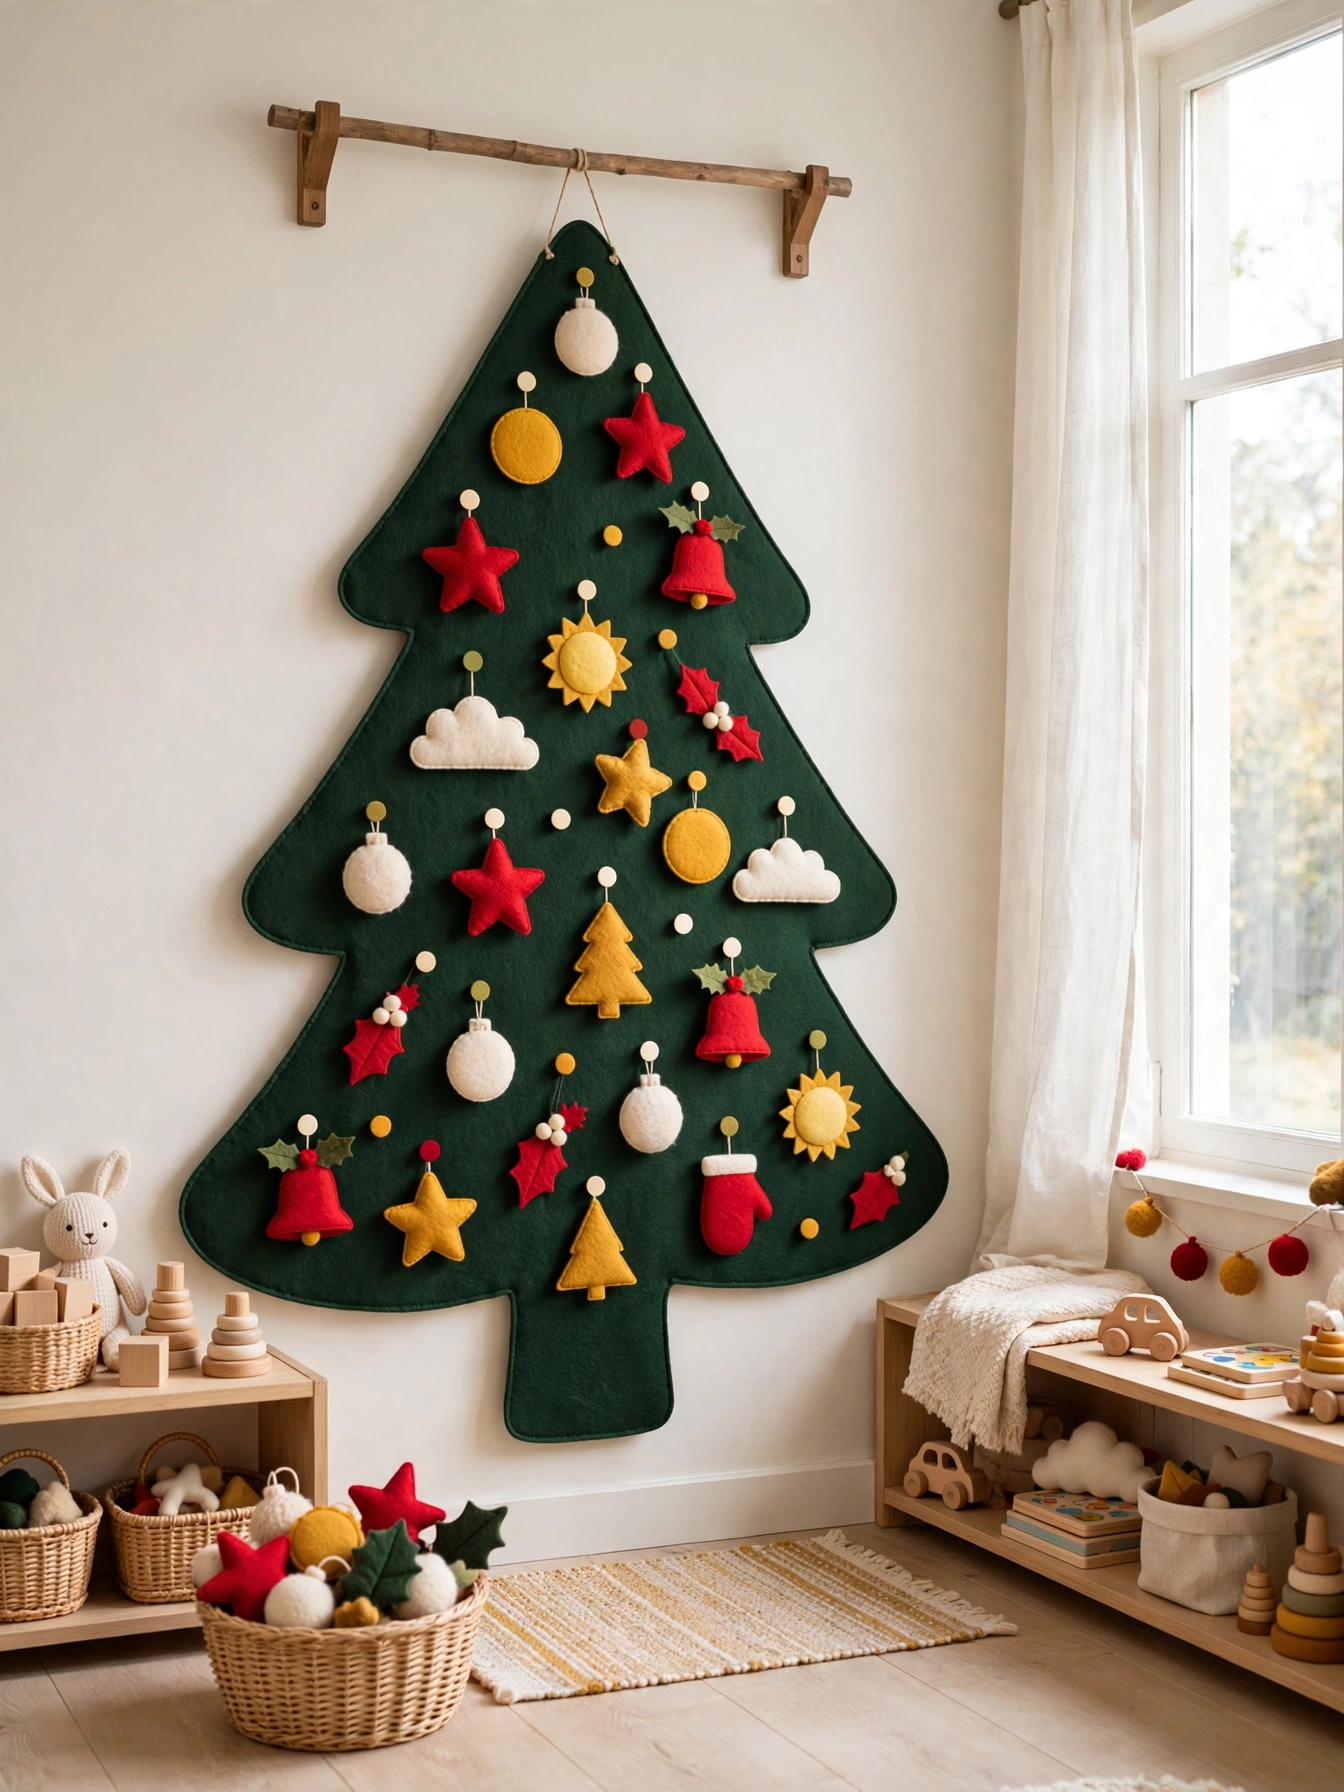
Felt Christmas Tree Wall Hanging
Why This Works:
- A 24 by 36 inch felt tree fills a blank wall without a floor tree.
- Fifteen felt ornaments, each 3 inches wide, decorate the tree.
- Hook and loop dots, 3/4 inch wide, hold ornaments for daily rearranging.
- The whole hanging weighs under 1 pound and ships flat.
Shape a tree 24 inches wide by 36 inches tall from dark green felt, then back it with a second felt layer to stop stretching. Sew or glue a 1 inch sleeve across the top, slide in a 26 inch wooden dowel, and hang the dowel from two hooks spaced 20 inches apart. Attach 15 felt ornaments with 3/4 inch hook and loop dots, placing larger ornaments near the bottom and smaller ones near the top. Set aside thin craft felt under 1 millimeter for the tree body because it sags within a week and the ornaments pull it out of shape. A double layer beats a single layer, since it holds its triangle and keeps the dowel from bowing, while a single layer wrinkles at the corners.
Inside a nursery, playroom, or small apartment, this tree gives children a safe place to decorate without glass or lights. Parents can let toddlers move ornaments daily, which keeps the tree fresh through December. A flat look is the compromise, since felt cannot match the depth of a real tree. Add a 2 inch felt star at the top, a few pom poms for texture, and a basket of spare ornaments nearby for swapping.
Pro Tip: Make 3 spare ornaments in each color, so a lost piece can be replaced the same day without cutting new felt.
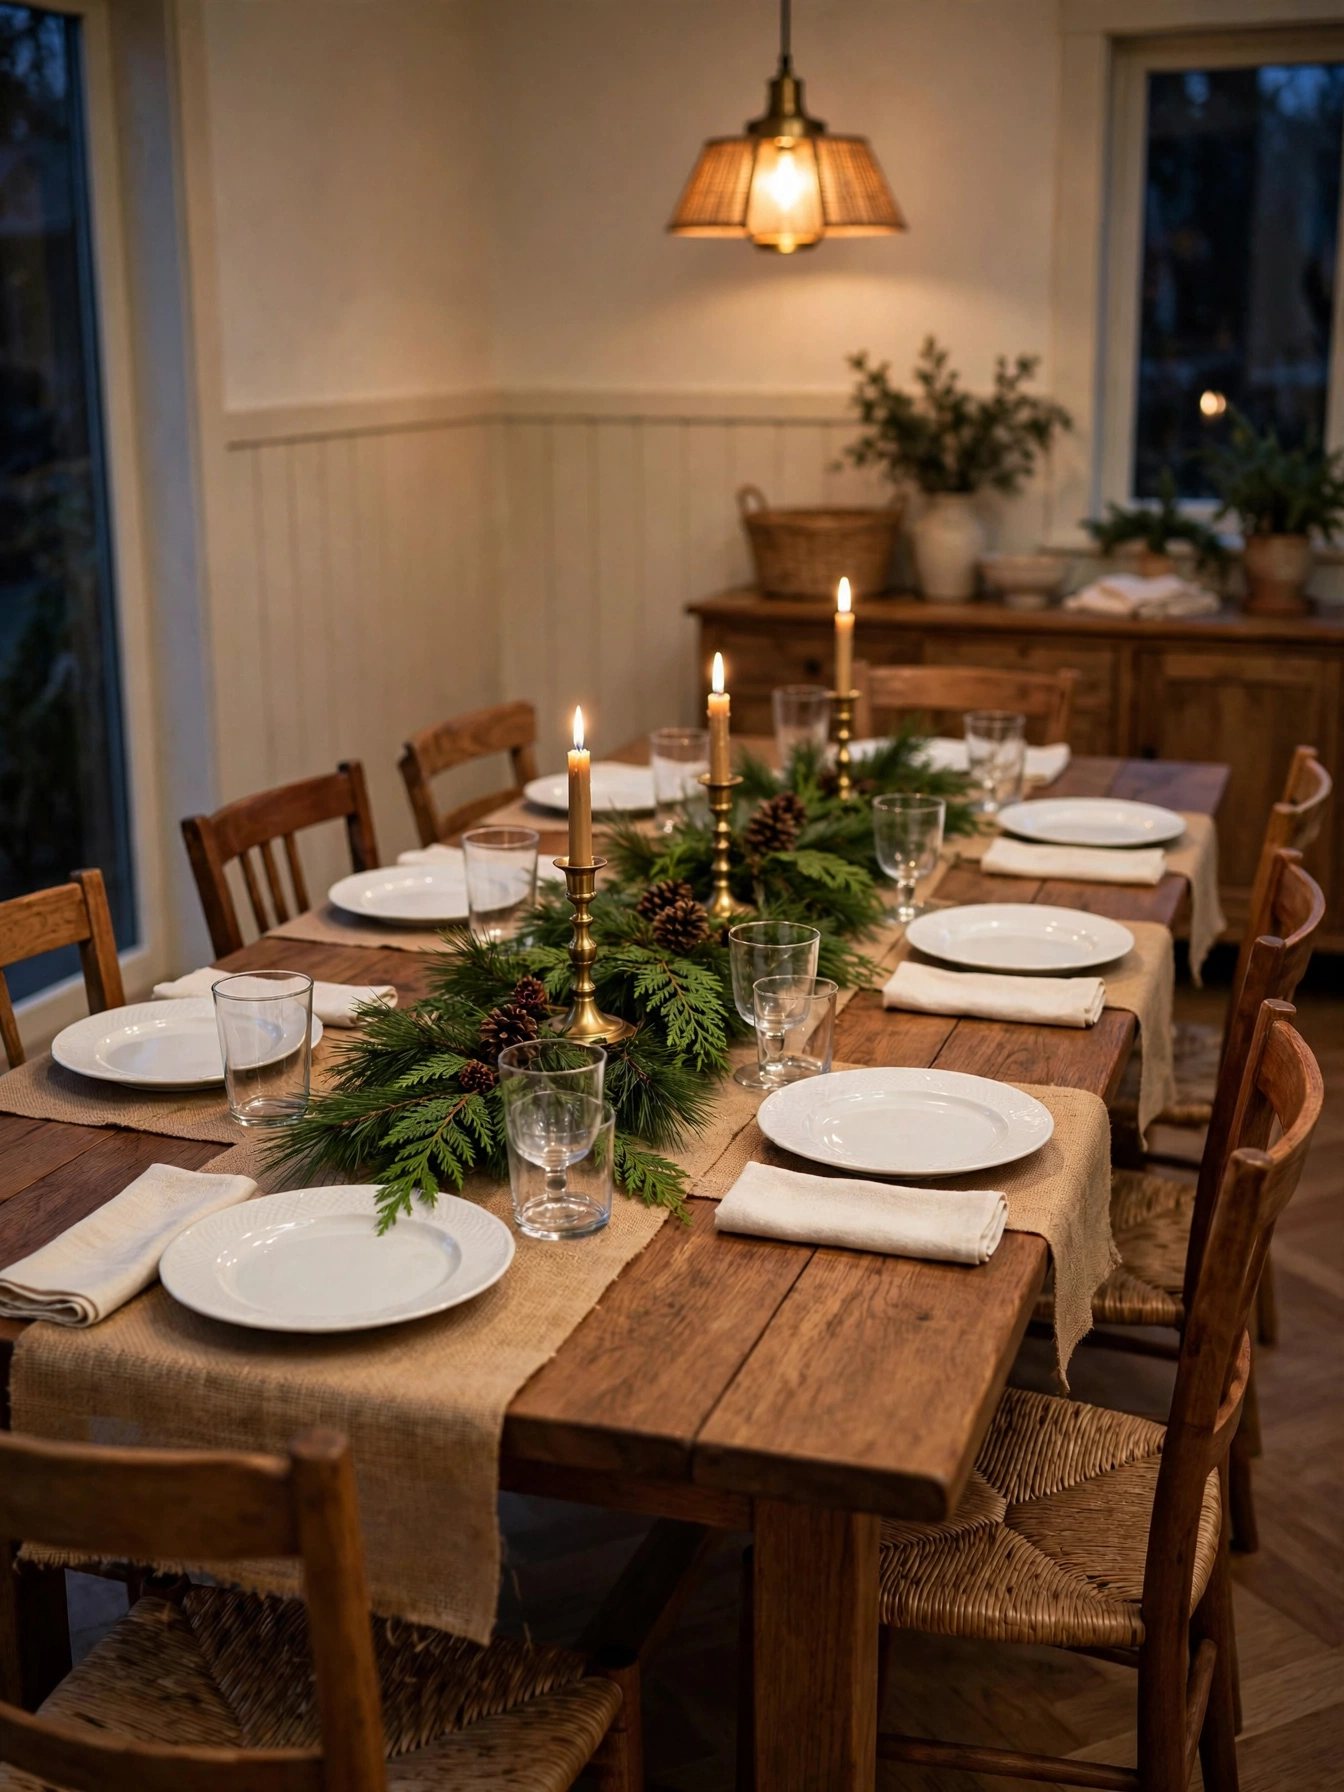
Pine Branch Table Runner
Why This Works:
- Six fresh pine branches, each 24 inches long, cover a 72 inch table.
- Overlapping by 6 inches hides stems and keeps the runner full.
- A 12 by 72 inch burlap strip protects the table under the greens.
- The runner stays fresh for 10 days with daily misting.
Place a 12 by 72 inch strip of burlap or cotton canvas down the center of the table, then arrange 6 pine branches, each 24 inches long, with stems pointing toward the center. Overlap each branch by 6 inches and wire the stems to the runner base with 4 inch floral wire twists so the greens do not slide. Tuck in 8 sprigs of cedar and 5 pinecones for texture, keeping all greens at least 12 inches from any candle flame. Keep fresh greens away from a lit fireplace or heat vent because dry needles drop faster and the runner thins within days. Fresh pine beats faux greens for one event, since it smells stronger and costs less, while faux greens last all season without water or misting.
For a holiday dinner, this runner sets the table in about 45 minutes and leaves room for plates, glasses, and serving dishes. Anyone hosting once a season can build it the morning of the meal and compost it afterward. Needle drop is the trade-off, so expect a light sweep under the table each evening. Mist the greens once a day, keep the runner 18 inches from a heat vent, and replace any branch that turns brown at the tips.
Pro Tip: Trim 1 inch off each stem and soak the branches in cool water for 2 hours before arranging, and the runner will stay fresh 3 days longer.
Salt Dough Ornament Set

Why This Works:
- Two cups flour, 1 cup salt, and 3/4 cup water make 12 ornaments.
- Rolling to 1/4 inch thick keeps ornaments light and even.
- Baking at 200 degrees Fahrenheit for 2 hours hardens the dough fully.
- Painted ornaments last 2 years when stored dry.
Mix 2 cups of all purpose flour, 1 cup of fine salt, and 3/4 cup of water until a smooth dough forms, then knead for 5 minutes on a floured board. Roll the dough to 1/4 inch thick, cut shapes with 3 inch cookie cutters, and punch a 1/4 inch hole near the top of each shape for hanging. Bake on parchment at 200 degrees Fahrenheit for 2 hours, flipping once after 60 minutes so both sides dry evenly. Rule out dough thicker than 1/2 inch because the center stays soft, cracks as it cools, and the ornament feels heavy on a branch. Oven baking beats air drying here, since it gives a hard, paint ready surface in one afternoon, while air dried dough needs 48 hours and often warps.
Classrooms, family kitchens, and gift swaps all fit this project, since the ingredients cost little and the steps are easy to share. Children can press handprints, stamps, or sprigs into the dough before baking, which makes each ornament personal. Moisture is the enemy, so a humid room can soften finished ornaments over time. Seal each piece with 2 coats of clear varnish, store the set with a silica packet, and hang ornaments away from steamy windows.
Pro Tip: Bake 2 test ornaments first and check them after 24 hours, so you can adjust the thickness by 1/8 inch before baking the full batch.
Twine-Wrapped Bottle Vases
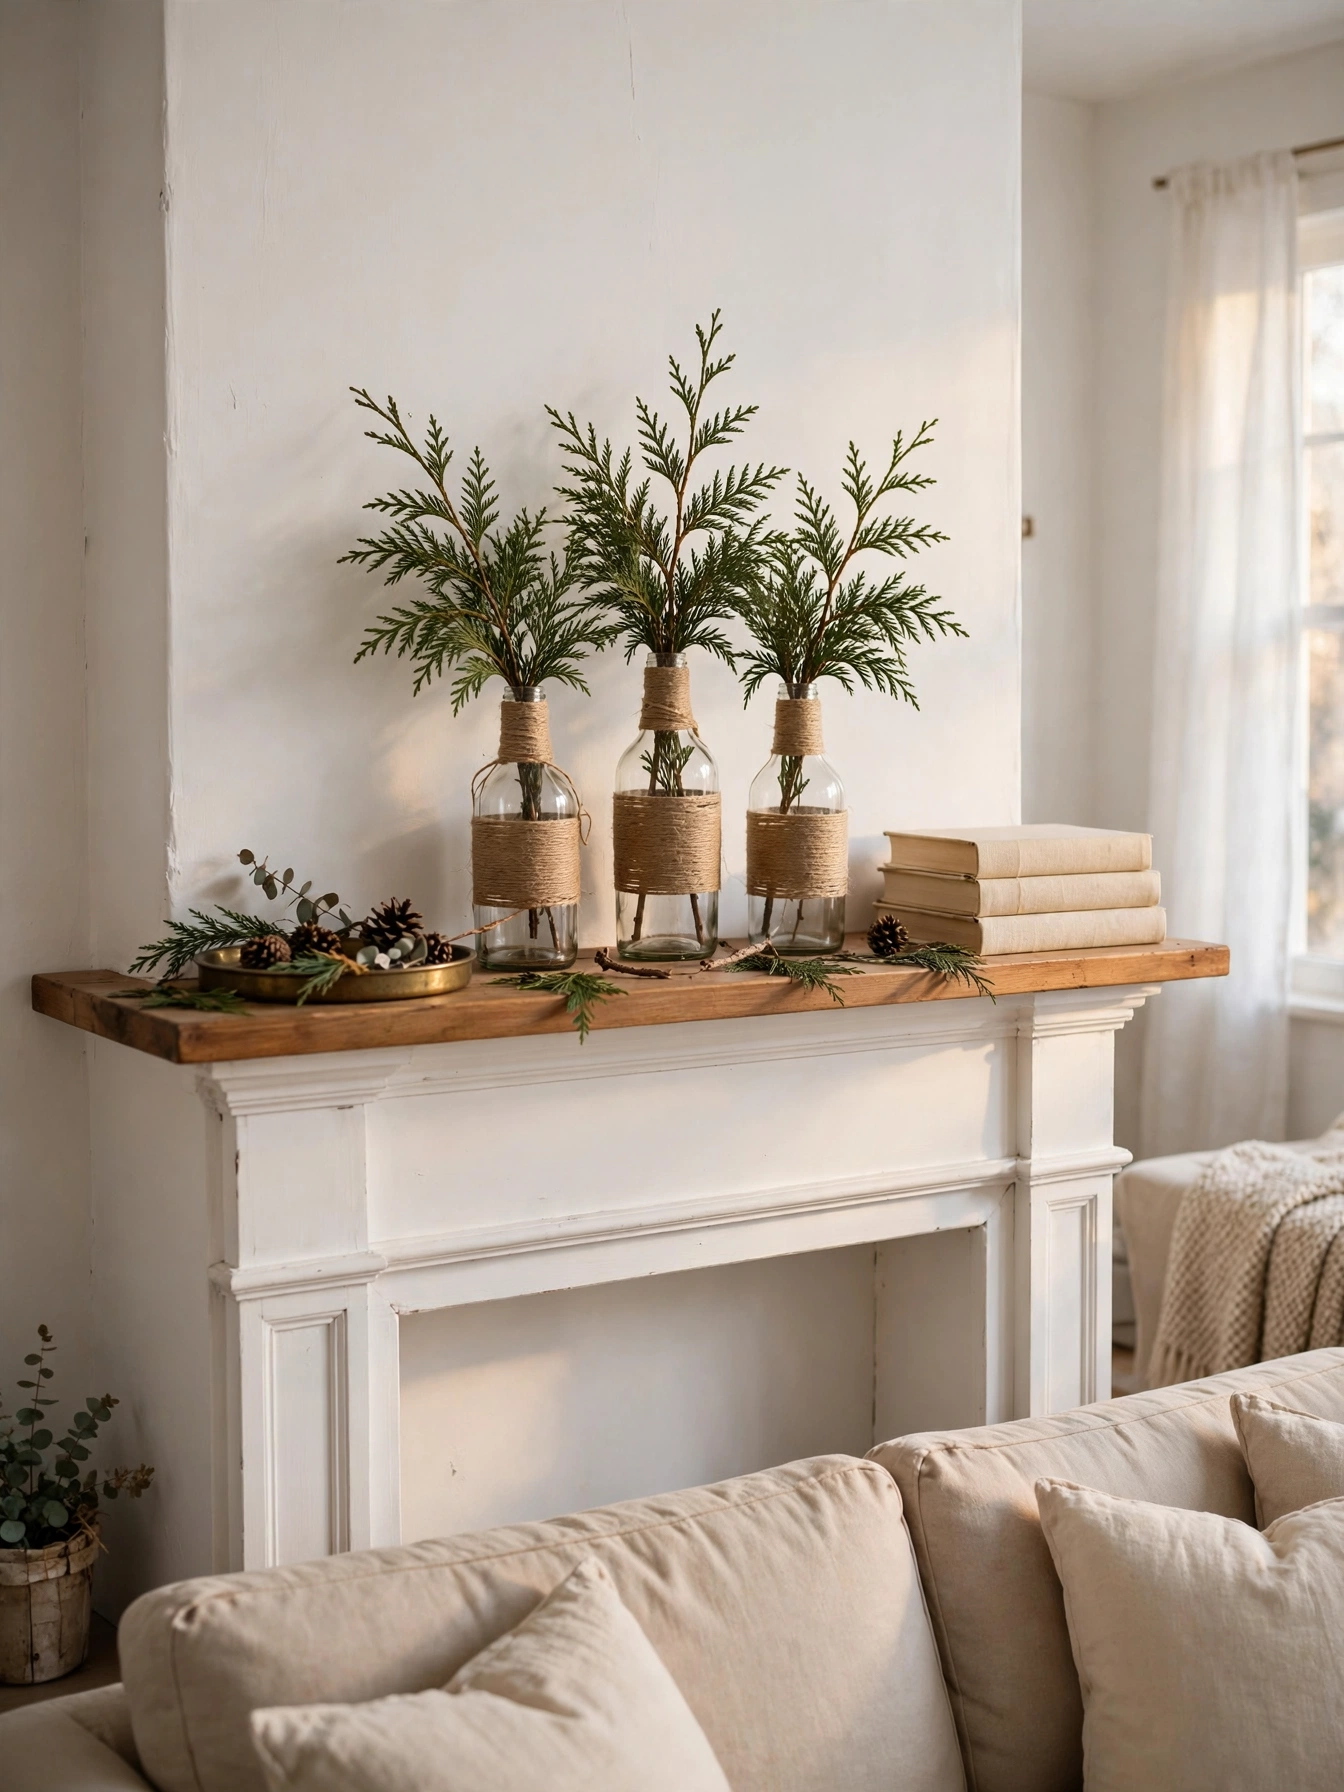
Why This Works:
- Three glass bottles, 8 to 10 inches tall, make a balanced trio.
- Twenty feet of twine wraps one bottle with tight, even rows.
- A 4 inch sprig of cedar fits each bottle without tipping it.
- Vases cost under 9 dollars when bottles come from recycling.
Wash 3 glass bottles, each 8 to 10 inches tall, and remove labels with warm water and a plastic scraper so the glass is smooth. Start wrapping at the base with 20 feet of jute twine, gluing the first 2 inches in place and keeping each row tight against the last. Work upward for 6 inches, then finish with a knot tucked under the last row and a dot of glue to hold it. Bypass thin twine under 2 millimeters for this wrap because it takes twice as long and shows gaps between rows. Twine beats paint for reused bottles, since it adds grip and texture that hides label residue, while paint needs primer and shows every scratch on reused glass.
Across a mantel or dining table, the trio holds single stems, dried grasses, or short cedar sprigs without looking fussy. Reusers of jars and bottles can build the set in one evening and change the stems weekly. Water is the weak spot, since twine weakens if soaked and a leaking bottle can stain the wrap. Use a dry sprig or a small plastic liner inside each bottle, and keep the base 2 inches from a table edge.
Pro Tip: Double wrap the first 3 rows twice as tightly as the rest, and the twine will stay anchored even if the top rows loosen.
Cookie Cutter Ornament Mobile
Why This Works:
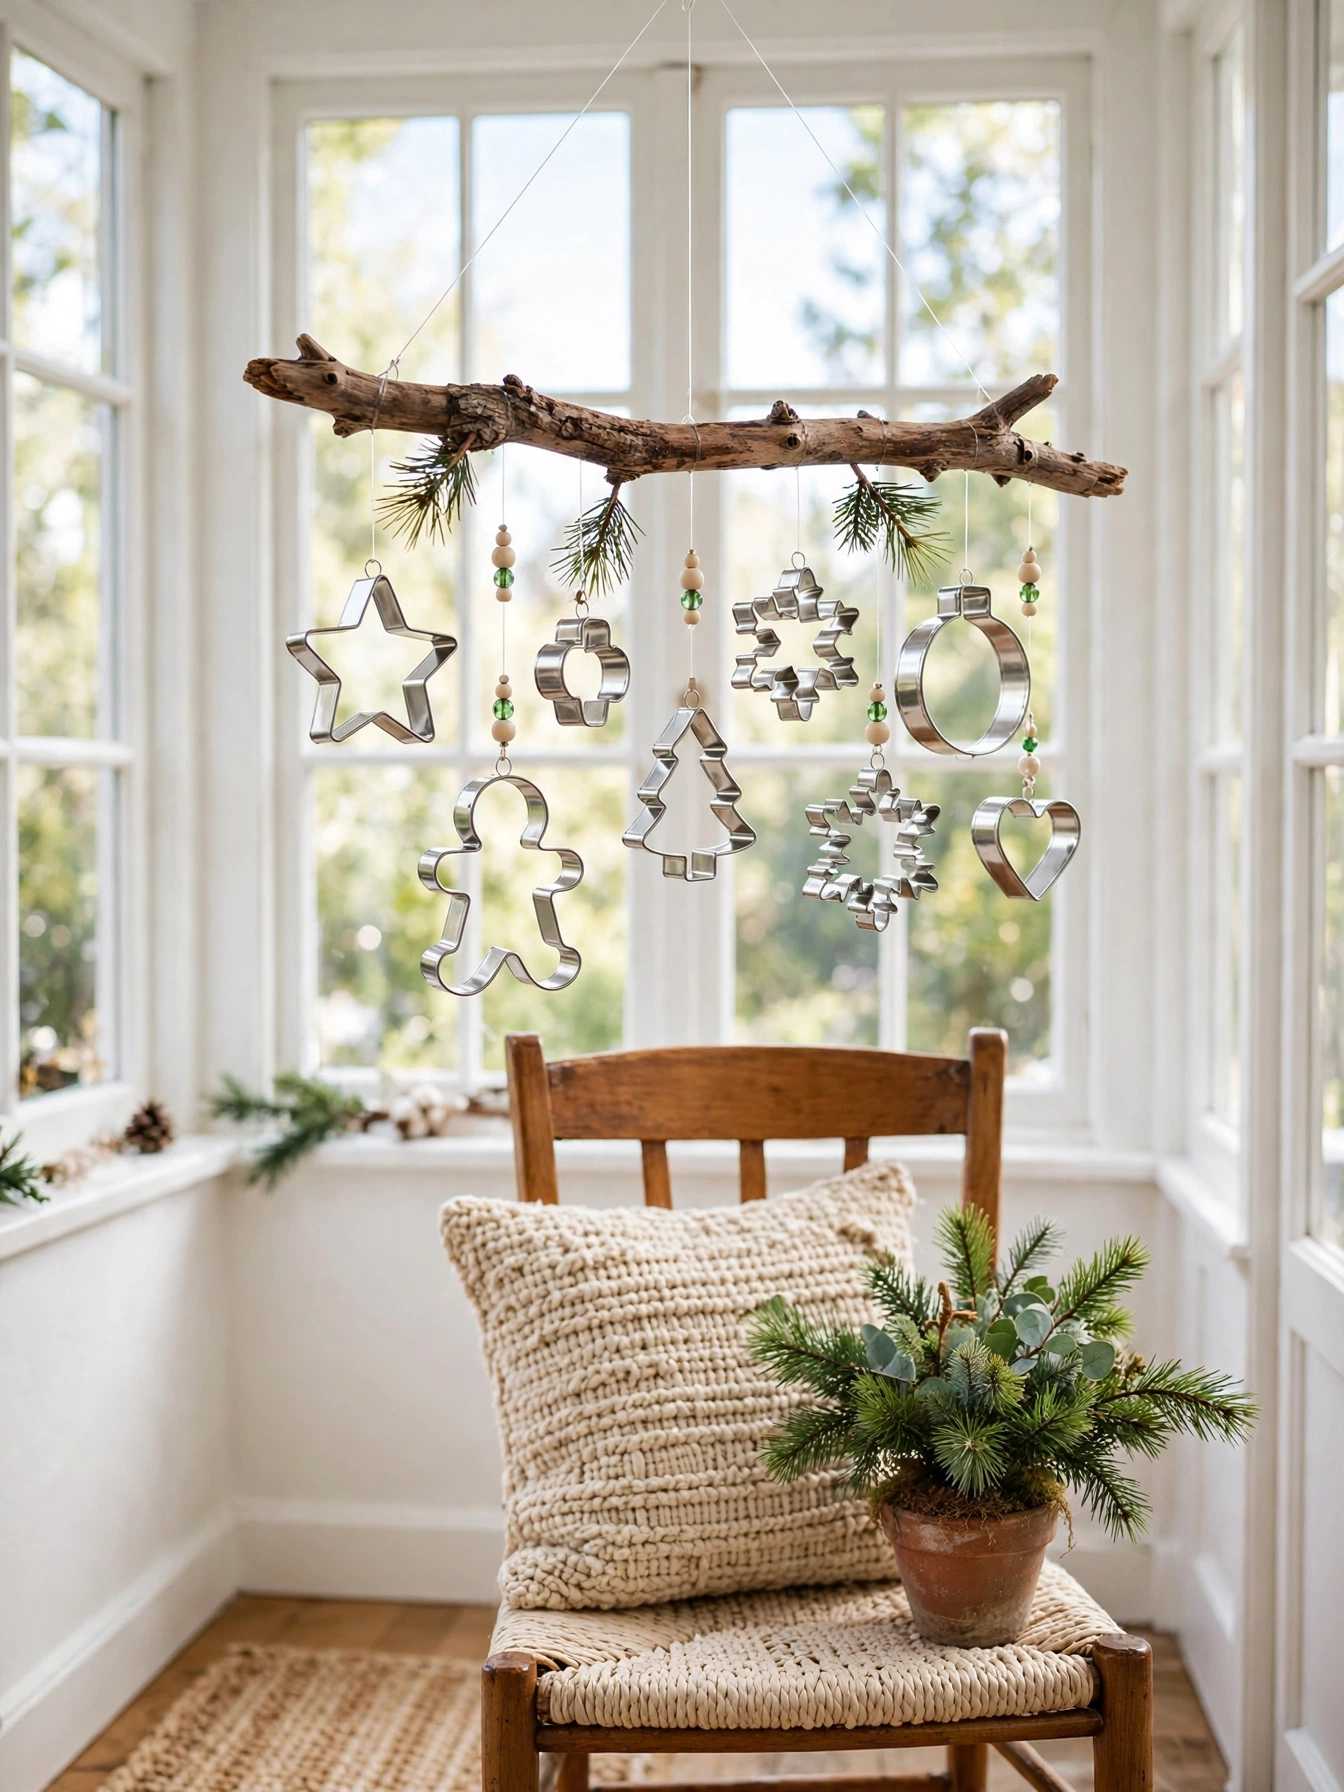
- Five cookie cutters, each 3 to 4 inches wide, make one balanced mobile.
- A 12 inch branch holds the cutters at varied heights.
- Fishing line, 10 pound test, holds each cutter without stretching.
- The mobile spins slowly in a draft and catches light.
Gather 5 metal cookie cutters, each 3 to 4 inches wide, in shapes such as a star, tree, bell, gingerbread person, and snowflake. Tie each cutter to a 12 inch driftwood branch with clear fishing line, using lengths of 6, 8, 10, 8, and 6 inches so the shapes hang at varied heights. Balance the branch on one finger, then slide the outer lines by 1/2 inch until the mobile hangs level. Drop yarn for the hanging lines because it stretches, tangles, and lets the cutters drift out of balance. Fishing line beats ribbon here, since it stays nearly invisible and holds the shapes steady, while ribbon twists and shows from across the room.
Hung in a window or above a side table, the mobile turns gently and throws small reflections when the sun hits the metal. Apartment renters who cannot drill a ceiling hook can hang it from a curtain rod or a removable hook rated for 2 pounds. Tangling is the weak spot, since long lines twist together in a breeze. Keep the mobile 12 inches from a curtain, check the knots once a week, and shorten any line that wraps around its neighbor.
Pro Tip: Add a 1/4 ounce fishing weight to the lightest cutter, and the mobile will balance without moving the hanging lines.
DIY Christmas Decor Ideas 2026: Chalkboard Countdown Board
Why This Works:
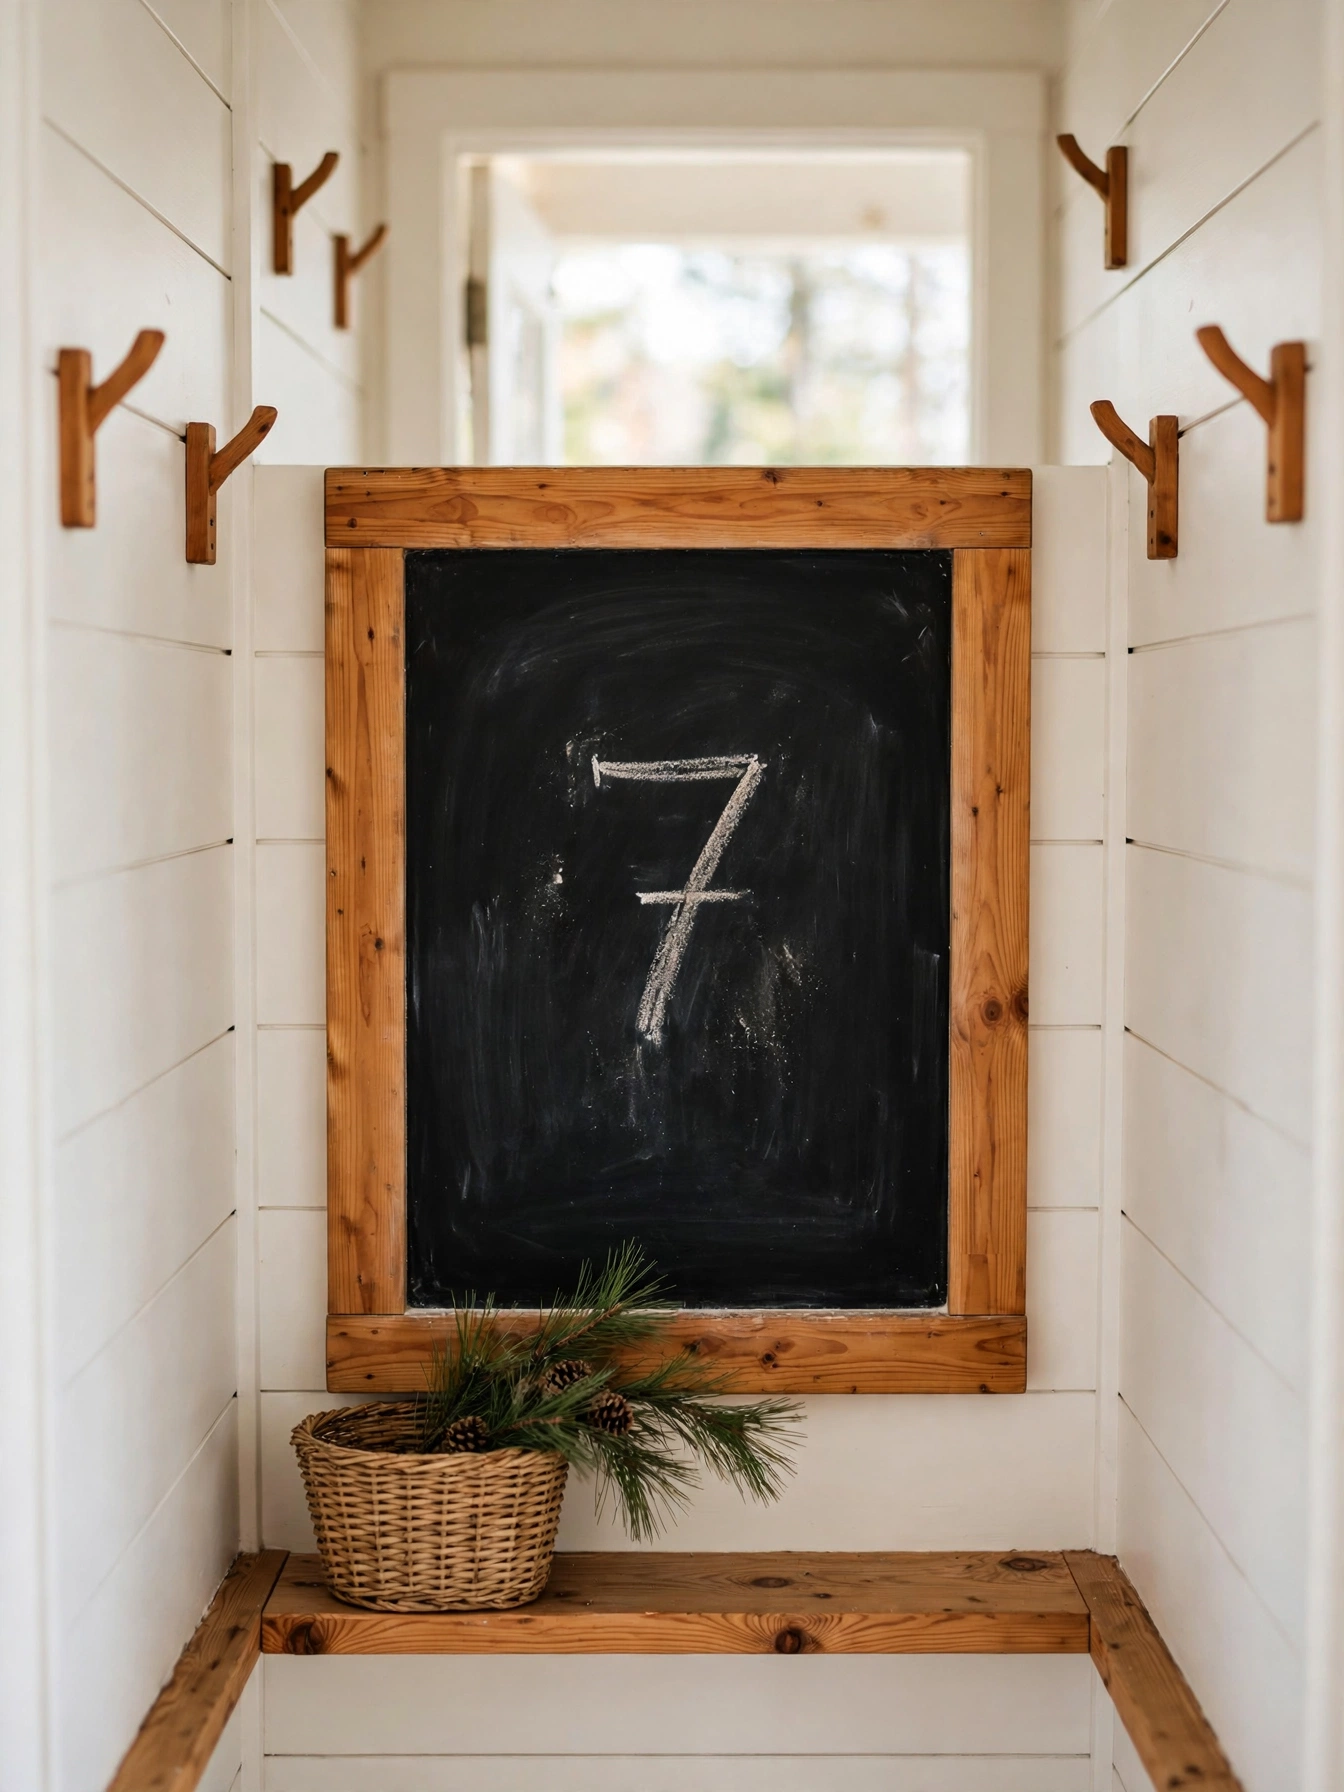
- A 16 by 20 inch board counts down 25 days with room for notes.
- Chalk markers, 6 millimeter tip, write cleanly and wipe off fully.
- One coat of chalkboard paint covers 4 square feet per small can.
- The board hangs on 2 screws and stores flat after Christmas.
Sand a 16 by 20 inch plywood board with 150 grit paper, then apply one coat of chalkboard paint and let it dry for 4 hours. Add a second coat, wait 24 hours, then season the surface by rubbing chalk across the full board and wiping it clean. Frame the board with 4 strips of pine, each 1 inch wide, glued and pinned at the corners for a finished edge. Omit regular wall paint under the chalkboard layer because it peels when chalk is wiped and the board turns patchy. A plywood board beats a store bought board on cost and size, since you choose the exact size, while a ready made board often comes in one size and needs new hanging hardware.
Within a kitchen or hallway, the board gives the family a daily ritual and a place to note one small activity each day. Households with children can let a different person update the number each morning, which keeps the countdown fair. Dust is the price, since chalk leaves a fine film on nearby surfaces. Wipe the frame with a damp cloth twice a week, keep markers capped when not in use, and store the board flat with a sheet of paper over the face.
Pro Tip: Write the numbers with a 6 millimeter chalk marker and let each number dry for 5 minutes, so the digits stay sharp when the board is moved.
No-Sew Felt Stocking

Why This Works:
- One stocking needs 2 felt sheets, each 12 by 18 inches.
- Fabric glue, 2 ounces per stocking, holds seams for a full season.
- A 4 inch cuff folds cleanly and holds a name tag.
- Stockings hold 1 pound of small gifts without tearing.
Stack 2 felt sheets, each 12 by 18 inches, and cut a stocking shape 16 inches tall by 8 inches wide, keeping the top edge straight. Glue the sides and bottom with fabric glue, pressing each seam for 60 seconds and letting the bond cure for 12 hours before use. Fold the top 4 inches down for a cuff, glue a 1 inch loop at the back corner, and add a felt initial 3 inches tall on the front. Shun hot glue on thin felt because the heat melts the fibers and the seam turns stiff and brittle. Fabric glue beats sewing for beginners, since it needs no machine and dries flat, while a sewn seam holds longer but shows stitches on the front.
When time is short, this stocking comes together in one evening and lets you match colors to a room without buying a set. Beginners who do not sew can still make a neat stocking, since the glue line hides under the cuff. Weight is the constraint, so a stocking filled with heavy gifts can pull the glue seam. Keep gifts under 1 pound, hang the stocking from a sturdy hook, and test the seam with a book before filling it.
Pro Tip: Leave the felt 1/2 inch wider than your pattern, so the glue seam sits inside the edge and the stocking keeps its shape.
Window Snowflake Cling Scene

Why This Works:
- Eight snowflakes, each 4 to 6 inches wide, cover one 36 inch window.
- Static cling vinyl, 12 by 24 inch sheet, makes 6 snowflakes.
- Clings peel off cleanly and reuse for 3 winters.
- No adhesive means no residue on glass.
Trace snowflake shapes from static cling vinyl using a template 4 to 6 inches wide, keeping the arms at least 1/2 inch thick so they do not tear. Clean the window with glass cleaner, let it dry fully, then press each cling from the center outward to push air bubbles to the edges. Arrange 8 snowflakes across a 36 inch window, spacing them 3 inches apart and mixing large and small sizes for depth. Favor static cling over adhesive vinyl for windows because the glue leaves residue that needs scraping in January. Clings beat paper snowflakes, since they look cleaner from outside and survive condensation, while paper curls and falls after one damp night.
Placed on a front window, the scene greets visitors without blocking light, since the clings cover less than a third of the glass. Apartment dwellers can decorate without tape, nails, or landlord issues, and removal takes minutes. Static is the weak point, as dry indoor air can loosen a cling after two weeks. Press the edges down once a week, mist the glass lightly before reapplying, and store used clings between sheets of wax paper.
Pro Tip: Keep 2 extra snowflakes from the same sheet, so a torn shape can be replaced in 3 minutes without buying more vinyl.
Holly Sprig Candle Plate

Why This Works:
- A 10 inch ceramic plate holds one 4 inch pillar with room for greens.
- Five holly sprigs, each 6 inches long, ring the candle evenly.
- Eight cranberries fill gaps and add color for 7 days.
- The plate wipes clean and reuses every year.
Center a 4 inch pillar candle in the middle of a 10 inch ceramic plate, then arrange 5 holly sprigs, each 6 inches long, around the base with stems pointing outward. Add 8 fresh cranberries between the sprigs, keeping every green and berry at least 3 inches from the flame and at least 12 inches from curtains. Use a flameless LED candle if children or pets share the room, since a real flame needs constant watching. Near a live flame, fresh holly is safer than dry leaves, because dry leaves catch quickly. Fresh holly stays safer for about a week. A plate centerpiece beats a garland for speed, since it takes 15 minutes to build and moves in one piece, while a garland needs an hour and sheds on the way to the table.
Busy hosts wanting a quick centerpiece can build it after setting the table, without tools or glue. The plate anchors the setting and leaves the rest of the table free for dishes. Freshness fades fast, since holly dries and cranberries soften after about 7 days. Replace the berries twice during the season, mist the holly once a day, and keep the plate 18 inches from a heat vent.
Pro Tip: Place the candle on a 1/2 inch thick cork coaster, so melted wax stays off the plate and cleanup takes 30 seconds.
Book Page Tree
Why This Works:
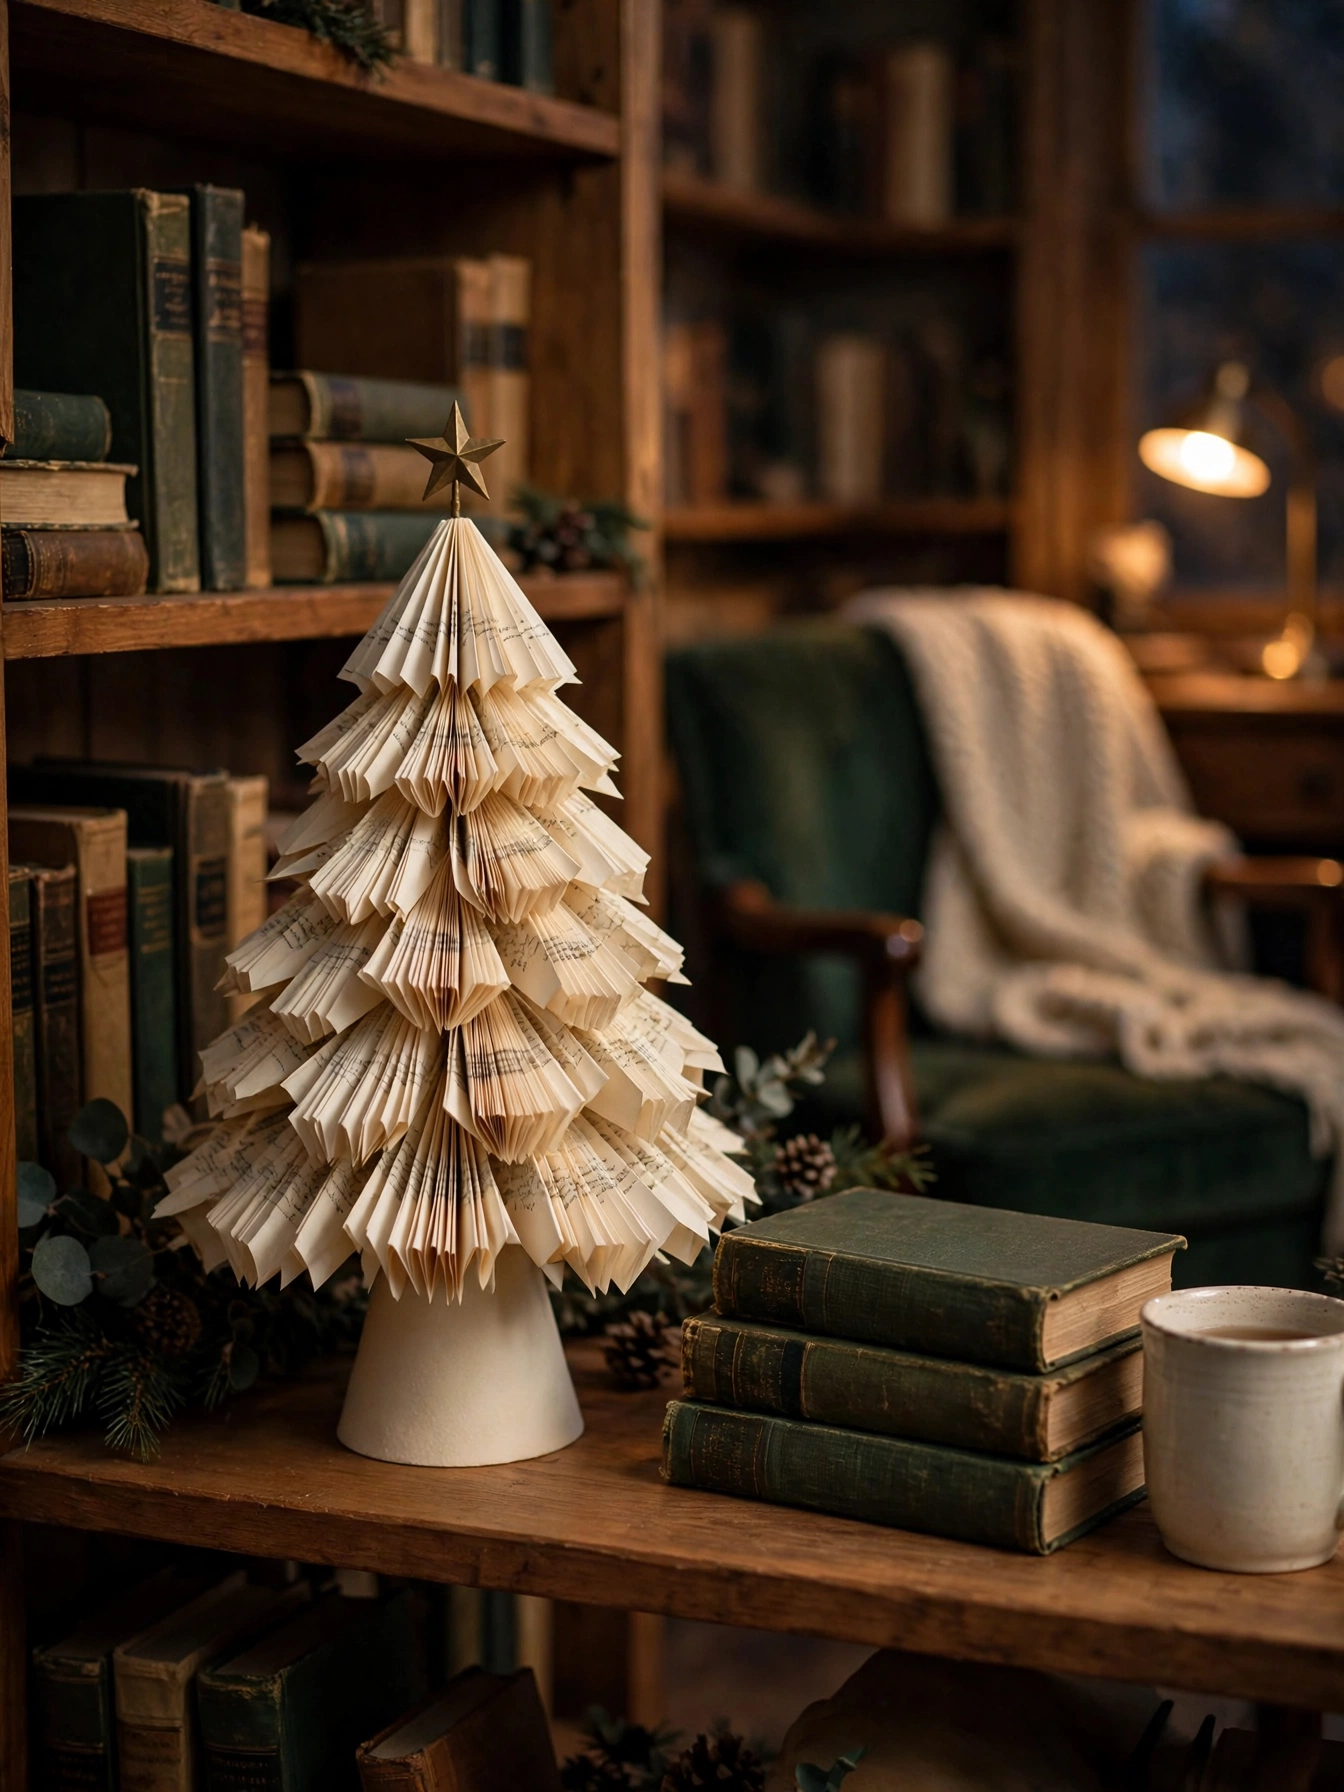
- One paperback with 200 pages yields 40 folded branches.
- A 10 inch foam cone holds the full tree without glue showing.
- Each fold takes 20 seconds, so the tree finishes in 30 minutes.
- The tree stands 12 inches tall and fits a small shelf.
Fold 40 pages from an old paperback, each page about 6 inches tall, into a triangle by folding the top corner to the center crease and then folding again. Pin or glue the folded pages to a 10 inch foam cone, starting at the base and overlapping each row by 1 inch. Work upward in rows of 8, 7, 6, 5, 4, 3, 2, and 1 pages, keeping the cone covered with no foam showing. Exclude glossy magazine pages for this tree because the coating resists glue and the pages spring open. A page cone beats a ribbon wrapped cone on cost, since it uses free material and shows varied text, while ribbon needs 5 yards and hides the paper texture.
Book lovers often place this tree on a reading shelf where the folded pages echo the books nearby. A library sale or thrift shop can supply a worn paperback for under 2 dollars, which keeps the project cheap. Fragility is the compromise, since folded pages dent if handled often. Keep the tree on a high shelf, dust it with a soft brush once a week, and store it in a box with tissue between the branches.
Pro Tip: Fold 10 extra pages and keep them in a bag, so a dented branch can be swapped in 5 minutes.
Scented Pinecone Gift Sachets

Why This Works:
- Six small pinecones, each 2 inches long, scent one 5 by 7 inch sachet.
- Ten drops of cedarwood oil scent a sachet for 3 weeks.
- Muslin bags, 5 by 7 inches, breathe and release scent slowly.
- Sachets tuck into drawers, gift boxes, and suitcases.
Bake 6 small pinecones, each about 2 inches long, at 200 degrees Fahrenheit for 30 minutes, then let them cool for 1 hour on the tray. Place the cones in a 5 by 7 inch muslin bag, add 10 drops of cedarwood essential oil, and tie the bag closed with 12 inches of ribbon. Let the sealed bag rest for 24 hours so the oil soaks into the cones before gifting or placing it in a drawer. Cap the oil at 15 drops per bag because excess oil stains fabric and the scent turns sharp. A sachet beats a spray for lasting scent, since it releases scent slowly for 3 weeks, while a spray fades in a few hours and needs reapplying.
Slipped into a gift box, the sachet adds a handmade touch that costs little and smells like a forest walk. Batch gift makers can assemble 10 sachets in one afternoon with one tray of pinecones. Strength is the drawback, since the scent fades in a large room and works best in closed spaces. Refresh the sachet with 5 drops of oil after 3 weeks, keep it away from light colored linen, and label the bag so the scent is clear.
Pro Tip: Tuck 1 dried orange slice into each bag, and the cedar scent will read warmer for 7 extra days.
Spice Bundle Hanging Ornaments
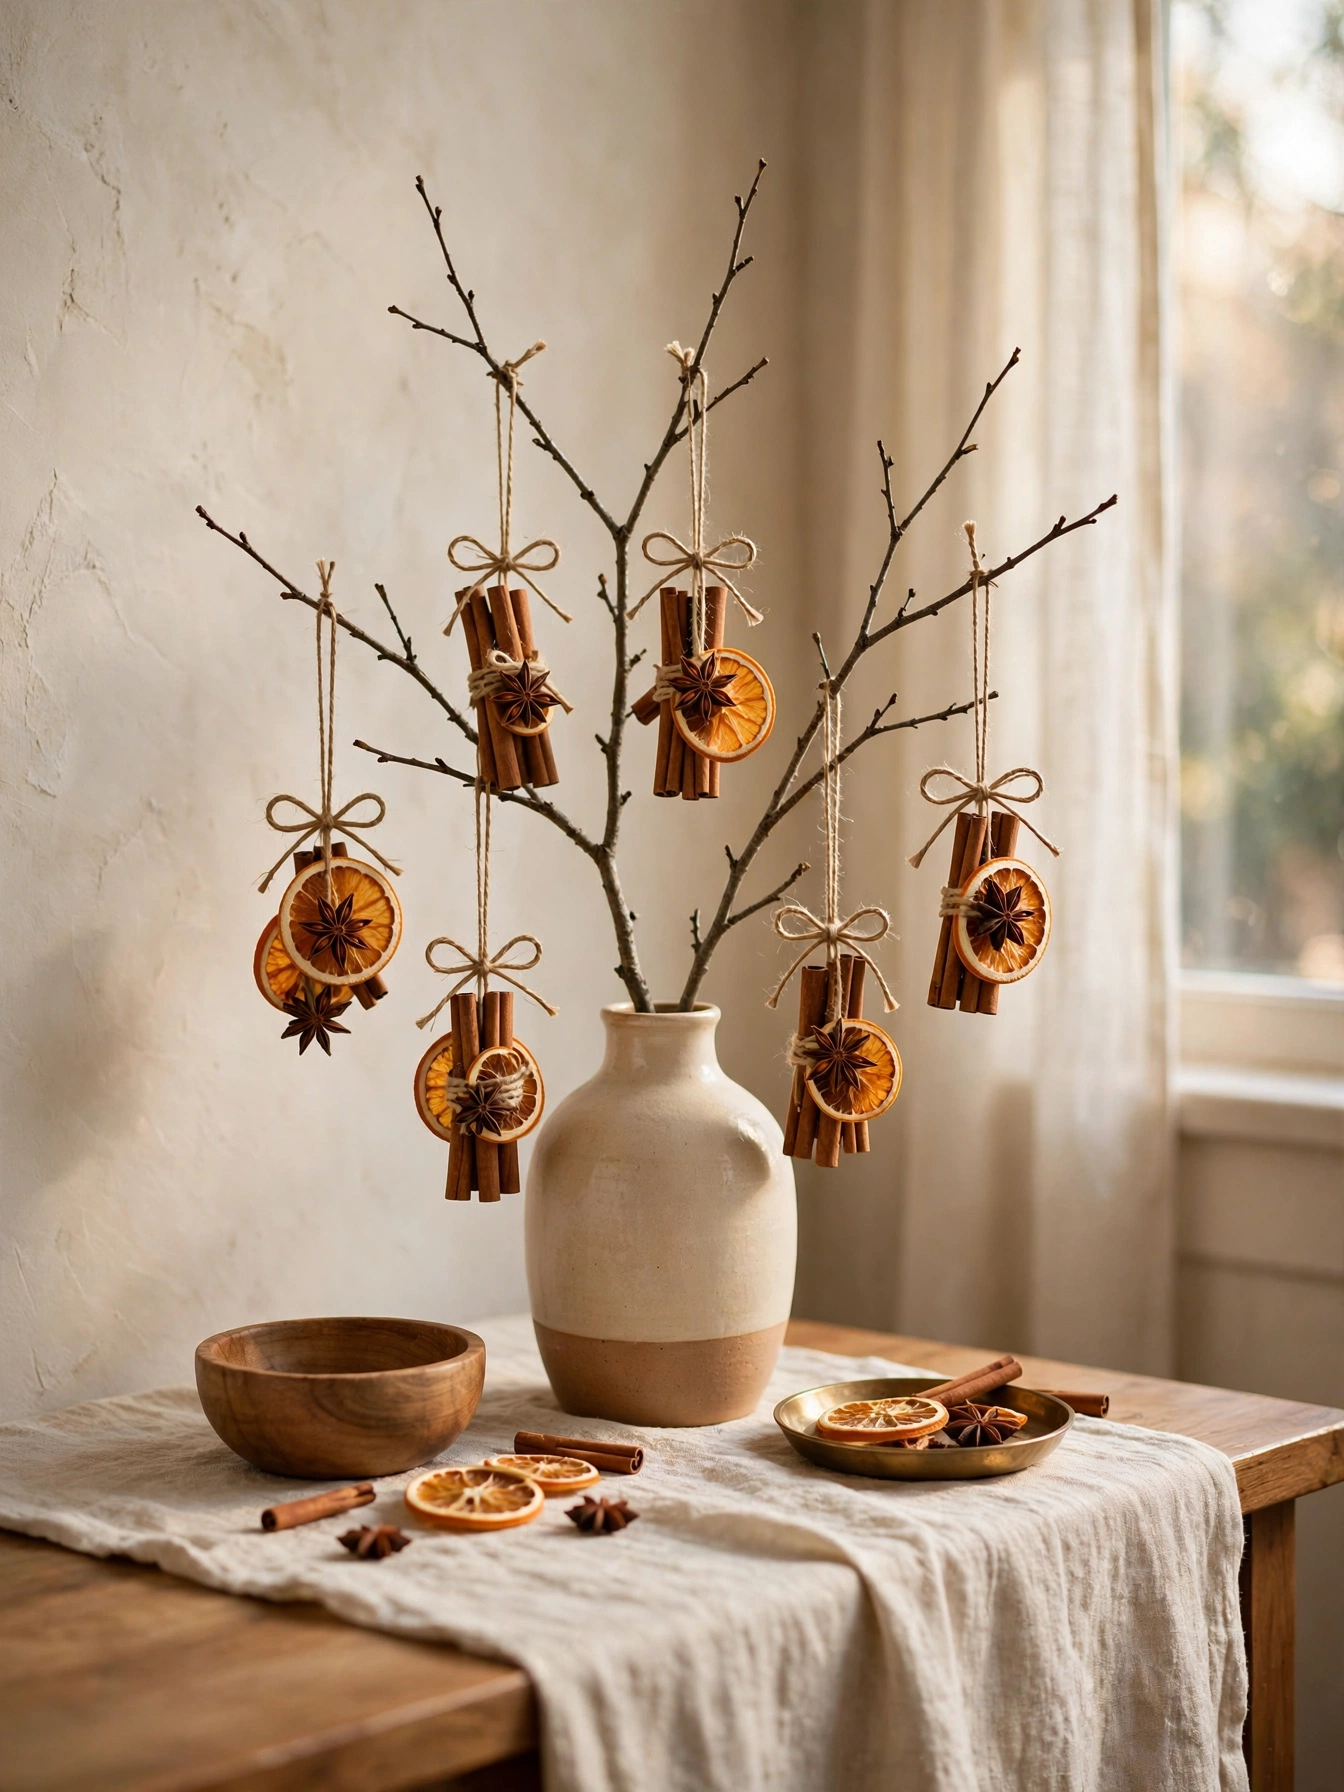
Why This Works:
- Eight bundles, each 3 inches long, fill one small tree branch.
- Each bundle uses 3 cinnamon sticks, 2 star anise, and 1 dried orange slice.
- Twine loops, 4 inches long, hang each bundle evenly.
- Bundles scent a room for 2 weeks without a flame.
Bundle 3 cinnamon sticks, each 3 inches long, with 2 star anise and 1 dried orange slice, then wrap the bundle twice with twine and tie a 4 inch loop at the top. Make 8 bundles for one branch, keeping each bundle under 2 ounces so a thin branch holds the full set. Hang the bundles 4 inches apart on a 24 inch branch, checking that no two bundles touch and tangle. Hang spice bundles away from a lit candle because heat dries the spices and the scent turns bitter. Spice bundles beat a commercial air freshener on running cost, since they use no plug or battery, while a plug in freshener needs an outlet and runs all day.
Suspended from a branch in a vase, these bundles give an entry table a scented accent that guests notice at the door. Makers who already dry citrus can use leftover slices and keep the cost near zero. Dust is the downside, since spices collect a fine film after a week. Shake each bundle outdoors every 7 days, replace the orange slice after 14 days, and compost the bundle at the end of the season.
Pro Tip: Tie each bundle with 6 extra inches of twine, so you can adjust the hanging height by 2 inches without retying the knot.
FAQs
What are the best diy christmas decor ideas 2026 for beginners?
Start with the pinecone garland, salt dough ornaments, and twine wrapped bottles, since each needs under 10 basic supplies and finishes in 3 hours or less. Choose one project, gather the listed measurements, and test the method on a small piece before making a full set.
How can I use candles safely in DIY Christmas decor?
Use flameless LED candles inside fabric, twine, or spice projects, and keep any real flame at least 12 inches from anything that can burn. Place candles on a heat safe plate at least 5 inches wide, and never leave a lit candle unattended.
How much do diy christmas decor ideas 2026 cost to make?
Most projects in this list cost between 5 and 15 dollars when you reuse jars, bottles, and fabric from home. Pinecones, scrap wood, and paper cost almost nothing, while paint, felt, and twine add 3 to 8 dollars per project. Buy basics once, then repeat the method across several pieces.
How long do homemade Christmas decorations last?
Felt, wood, and twine pieces last 3 seasons or more when stored dry in a labeled box. For lighted projects, choose Energy Star certified LED strings, which use less energy and run cooler than older bulbs. Replace any strand with 2 or more dead bulbs before hanging it again.
What should I do first if I have only one evening?
Pick the pinecone garland or the chalkboard countdown board, since each needs one evening and under 12 supplies. Gather the materials, read the measurements once, and build one test piece. If the test looks clean after 24 hours, make the full set the next evening.
Conclusion
These diy christmas decor ideas 2026 prove that a calm, handmade Christmas starts with simple materials, clear measurements, and safe finishing. The three takeaways are plain: start with one small project, keep candles and heat at a safe distance, and reuse what you already own before buying more. Your first action is to pick the pinecone garland, gather 12 to 15 pinecones and 8 feet of twine, and build one strand this week. Follow HomelyCrafter on Pinterest for more ideas. Save this to your Pinterest boards so you can refer back to it!

Muhammad Israr is a home decor enthusiast and the writer behind Homely Crafter. He spends his days researching paint colors, layouts and budget-friendly styling ideas, then breaks them down into practical, easy-to-follow guides so you can decorate with confidence.