
A tray is the only Christmas decor that moves with the party. It carries cocoa to the living room, cookies to the dining table, and candles to the bedroom, all without a single redecorating session. These christmas tray decor ideas 2026 treat the tray as a portable stage: one base, one focal point, and a few supporting pieces that lift off and reset in seconds. Trays are the hardest-working small styling tool in a home, and at Christmas that is doubly true, because a tray corrals the seasonal clutter that otherwise spreads across every surface.
You will get 23 complete tray setups, each with tray dimensions, material picks, what to avoid, and one specific pro tip. Most use a tray you already own and cost under $30 in extras.
Start with the tray you have: measure it, note whether it has handles and a lip, and pick the setup that fits its shape. Round trays suit centerpieces, rectangular trays suit serving, and anything with a 1-inch lip holds candles safely.
Pinecone Base Layer
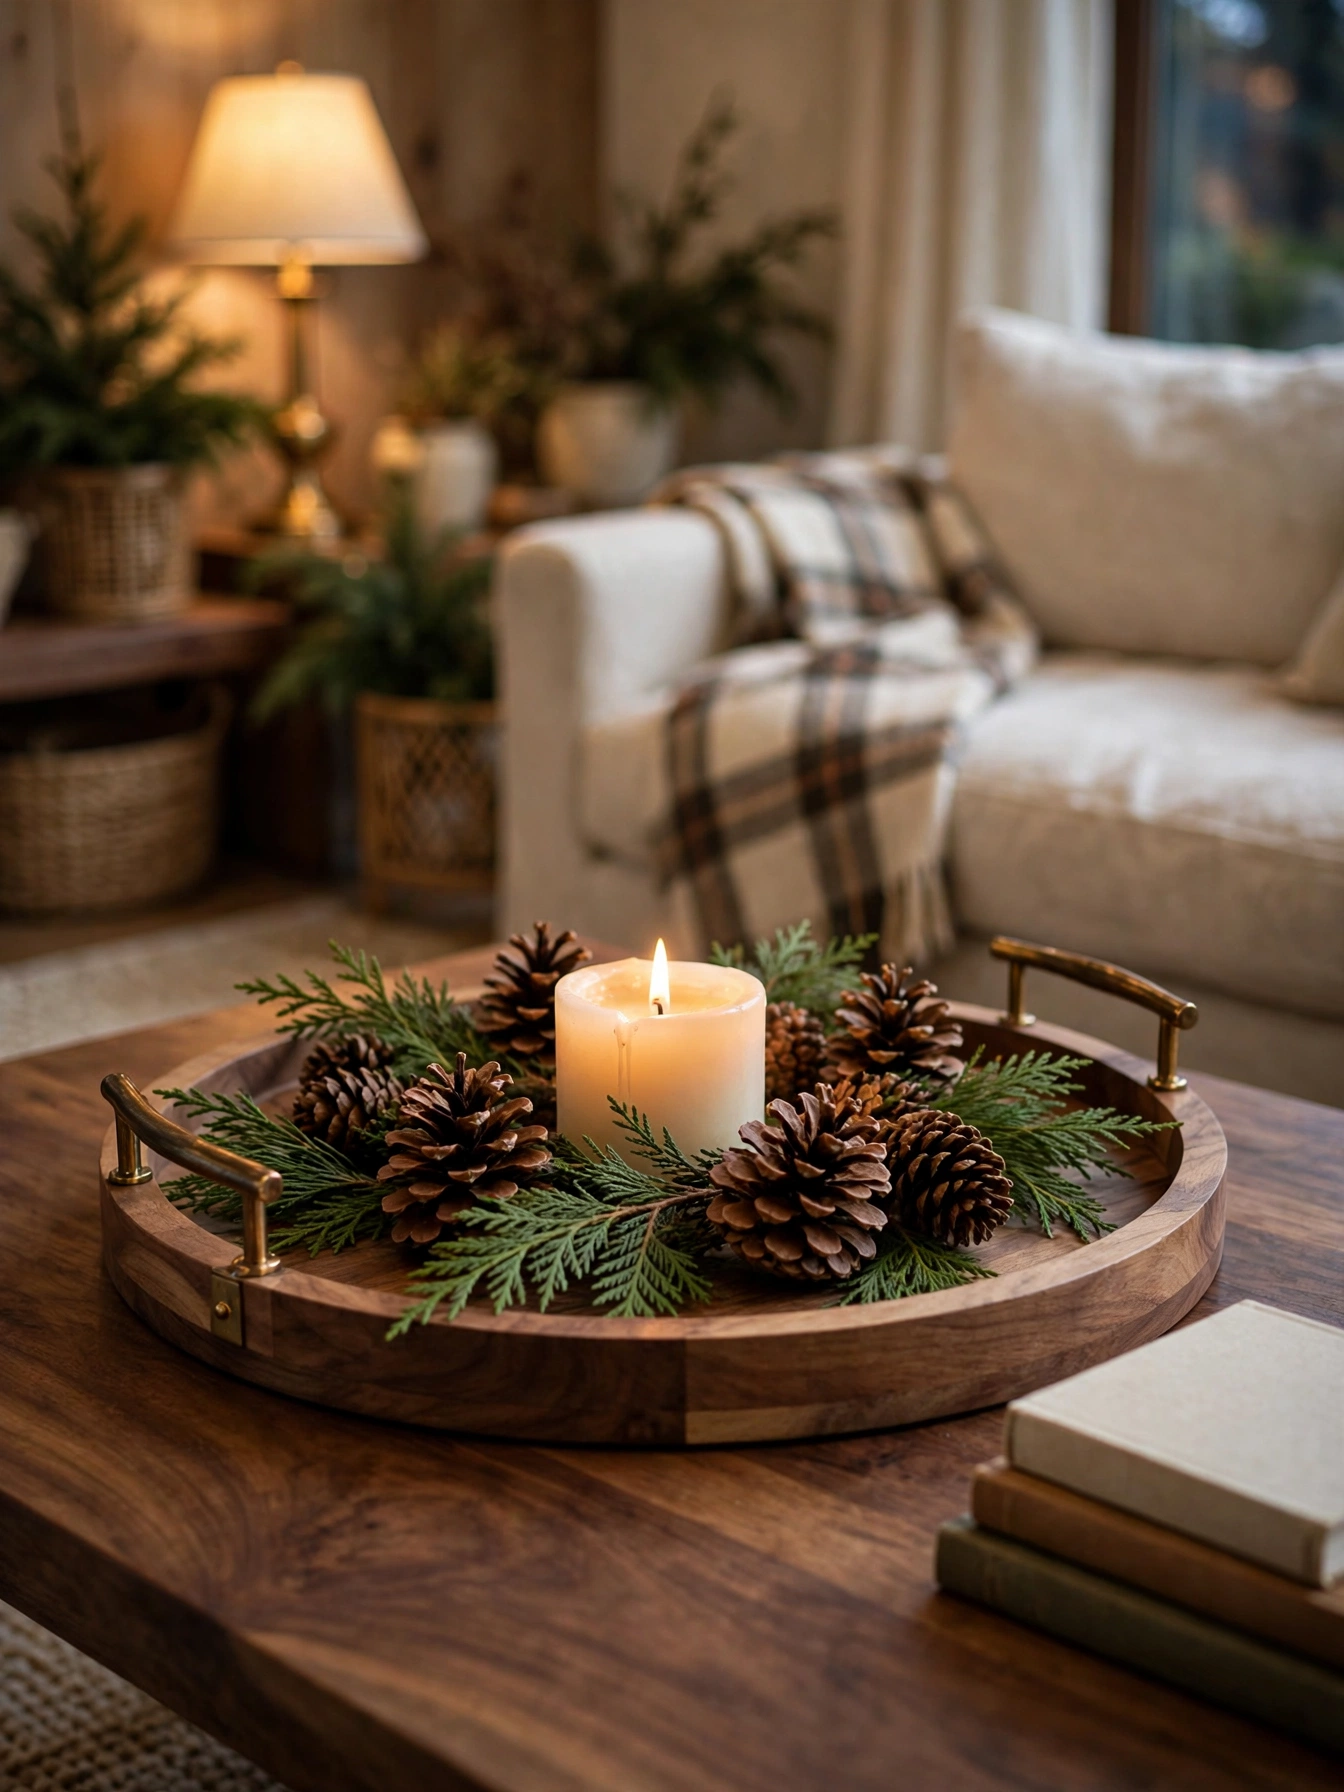
Why This Works:
- Pinecones fill a tray fast, so a bare tray looks styled in 5 minutes
- A 16-inch round tray holds 12 to 15 pinecones at 3 to 5 inches with room for a candle
- Cedar sprigs tucked between cones add scent and fill every gap
- The whole base costs under $15 if the pinecones come from the yard
Line the tray with a 14-inch circle of cedar sprigs first, then set pinecones in trios, pairing large 5-inch cones with little 3-inch ones, 2 inches between groups. Place one 3-inch pillar candle in the center on a brass coaster, keeping the flame 4 inches from the nearest pinecone. Before styling, spread yard pinecones on a baking sheet and heat them at 200 degrees for 45 minutes. The oven kills hidden insects and opens the scales for a fuller look. Keep a 12-inch gap between the tray and any curtain or book.
A pinecone base suits coffee tables where you want a natural centerpiece that survives the whole season, because pinecones do not wilt. Sap is the trade-off: fresh cedar leaks resin for the first week, so lay wax paper under the sprigs for 7 days. Beside a heat vent, use faux cedar; real sprigs dry and drop needles within 10 days near heat.
Pro Tip: Mist the pinecones with a clear matte sealant before arranging. A sealed coat keeps their shape all season and cuts scale shedding by about 90 percent.
Floating Candle Bowl
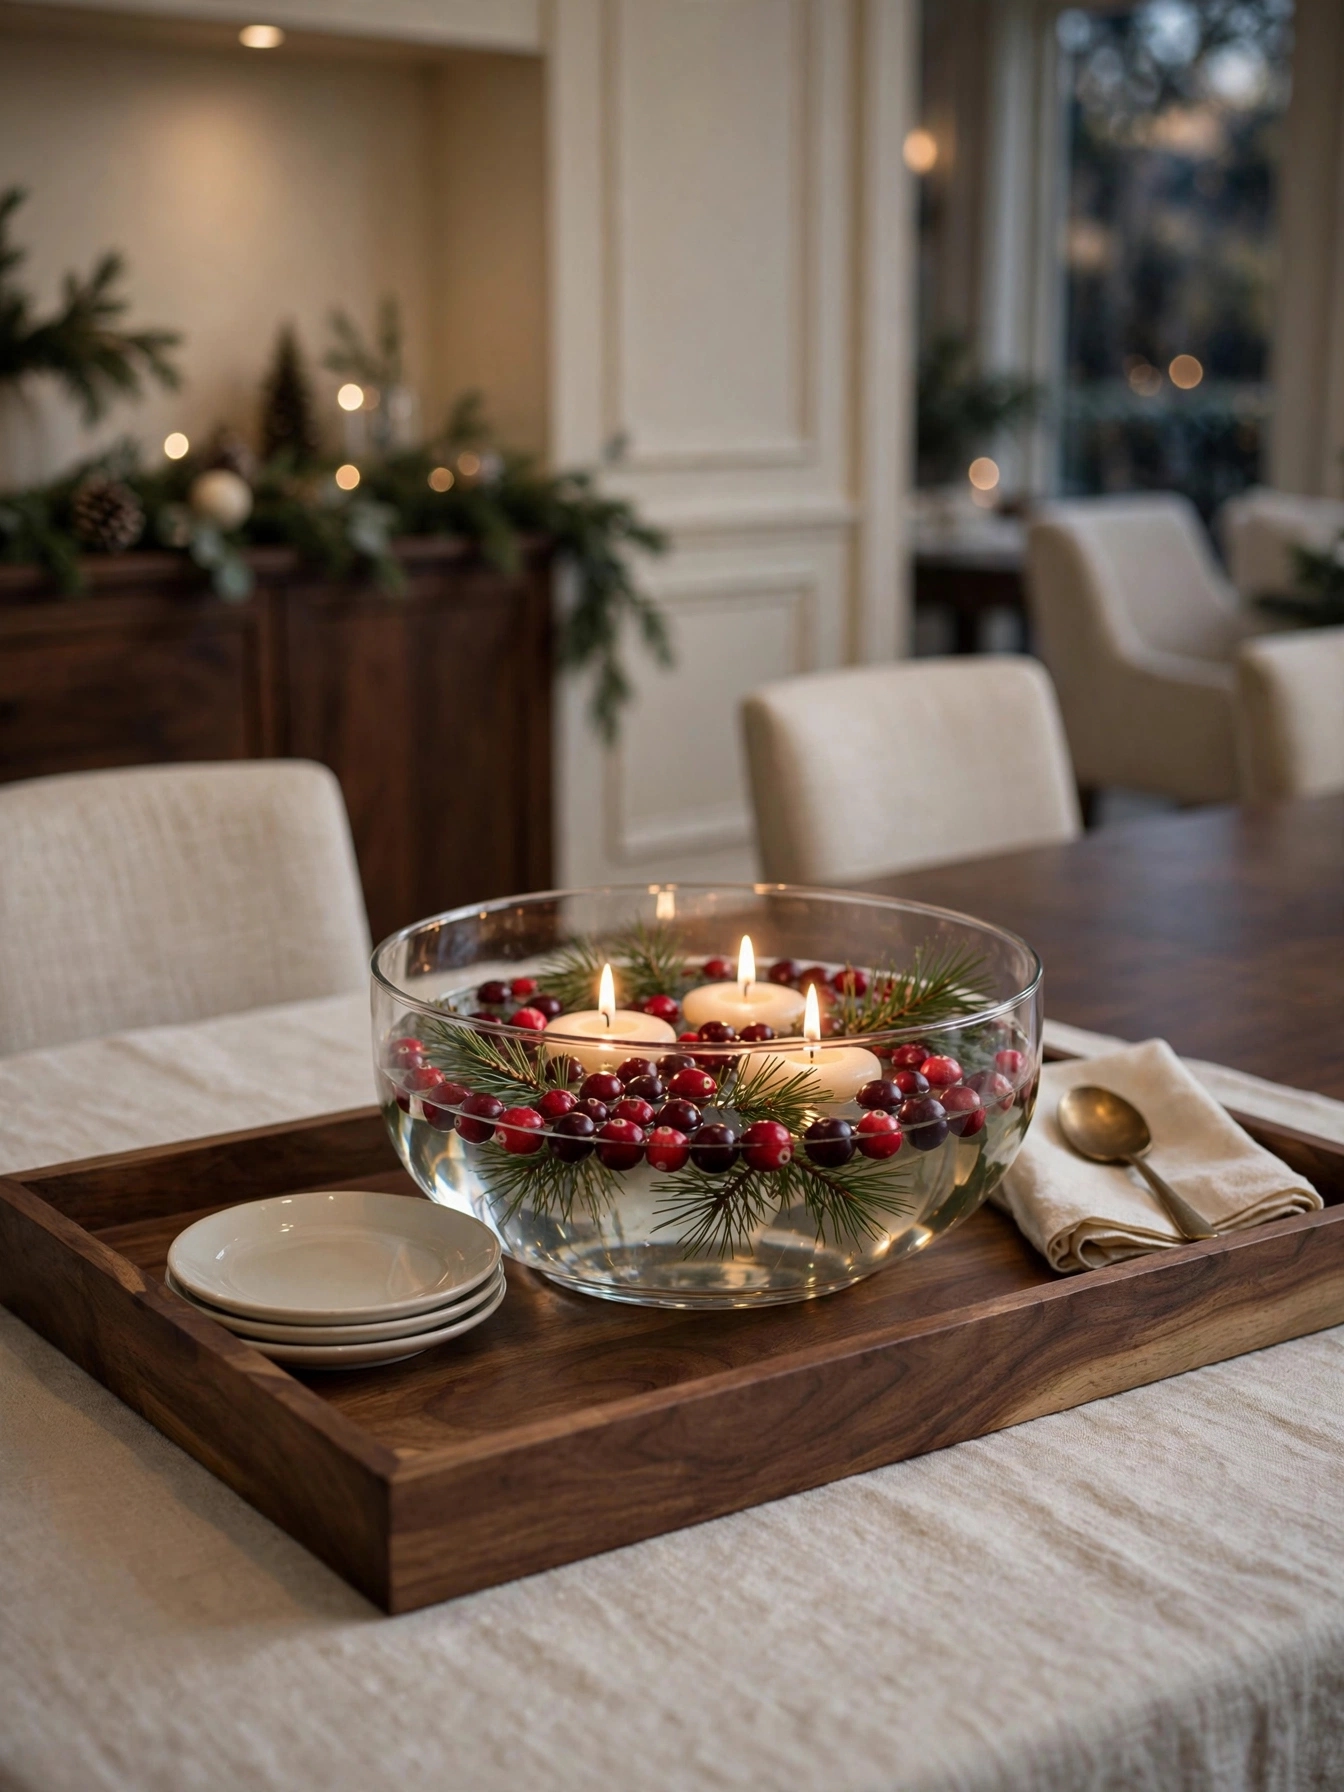
Why This Works:
- Floating candles on water double their glow through reflection
- A 12-inch bowl holds 3 floating candles plus 2 cups of cranberries
- Cranberries at $4 a bag add a bright red note for almost nothing
- The water keeps the display cool, so the tray never warms
Fill a 12-inch glass bowl with water to 1 inch below the rim, pour in 2 cups of cranberries, and float three 2-inch candles on top, spacing them 4 inches apart. Center the water bowl on the tray and ring it with pine sprigs, keeping the sprigs 3 inches from the nearest flame. Light the candles with a long match so your hand stays clear of the water. Keep the bowl a full foot from any paper or linen, since a bumped tray can slosh water onto the flames.
A floating candle bowl suits dining tables where you want a fresh, glowing centerpiece, because the water doubles the candlelight. The catch is the burn time: floating candles last about 4 hours, so light them just before dinner. If the tray is carried often, skip the water and use LED floating candles; a water-filled bowl spills on the first stair.
Pro Tip: Chill the water for 10 minutes before lighting. Cold water slows the wax melt and stretches each candle by about 30 minutes.
Christmas Tray Decor Ideas 2026: Velvet Ribbon Border
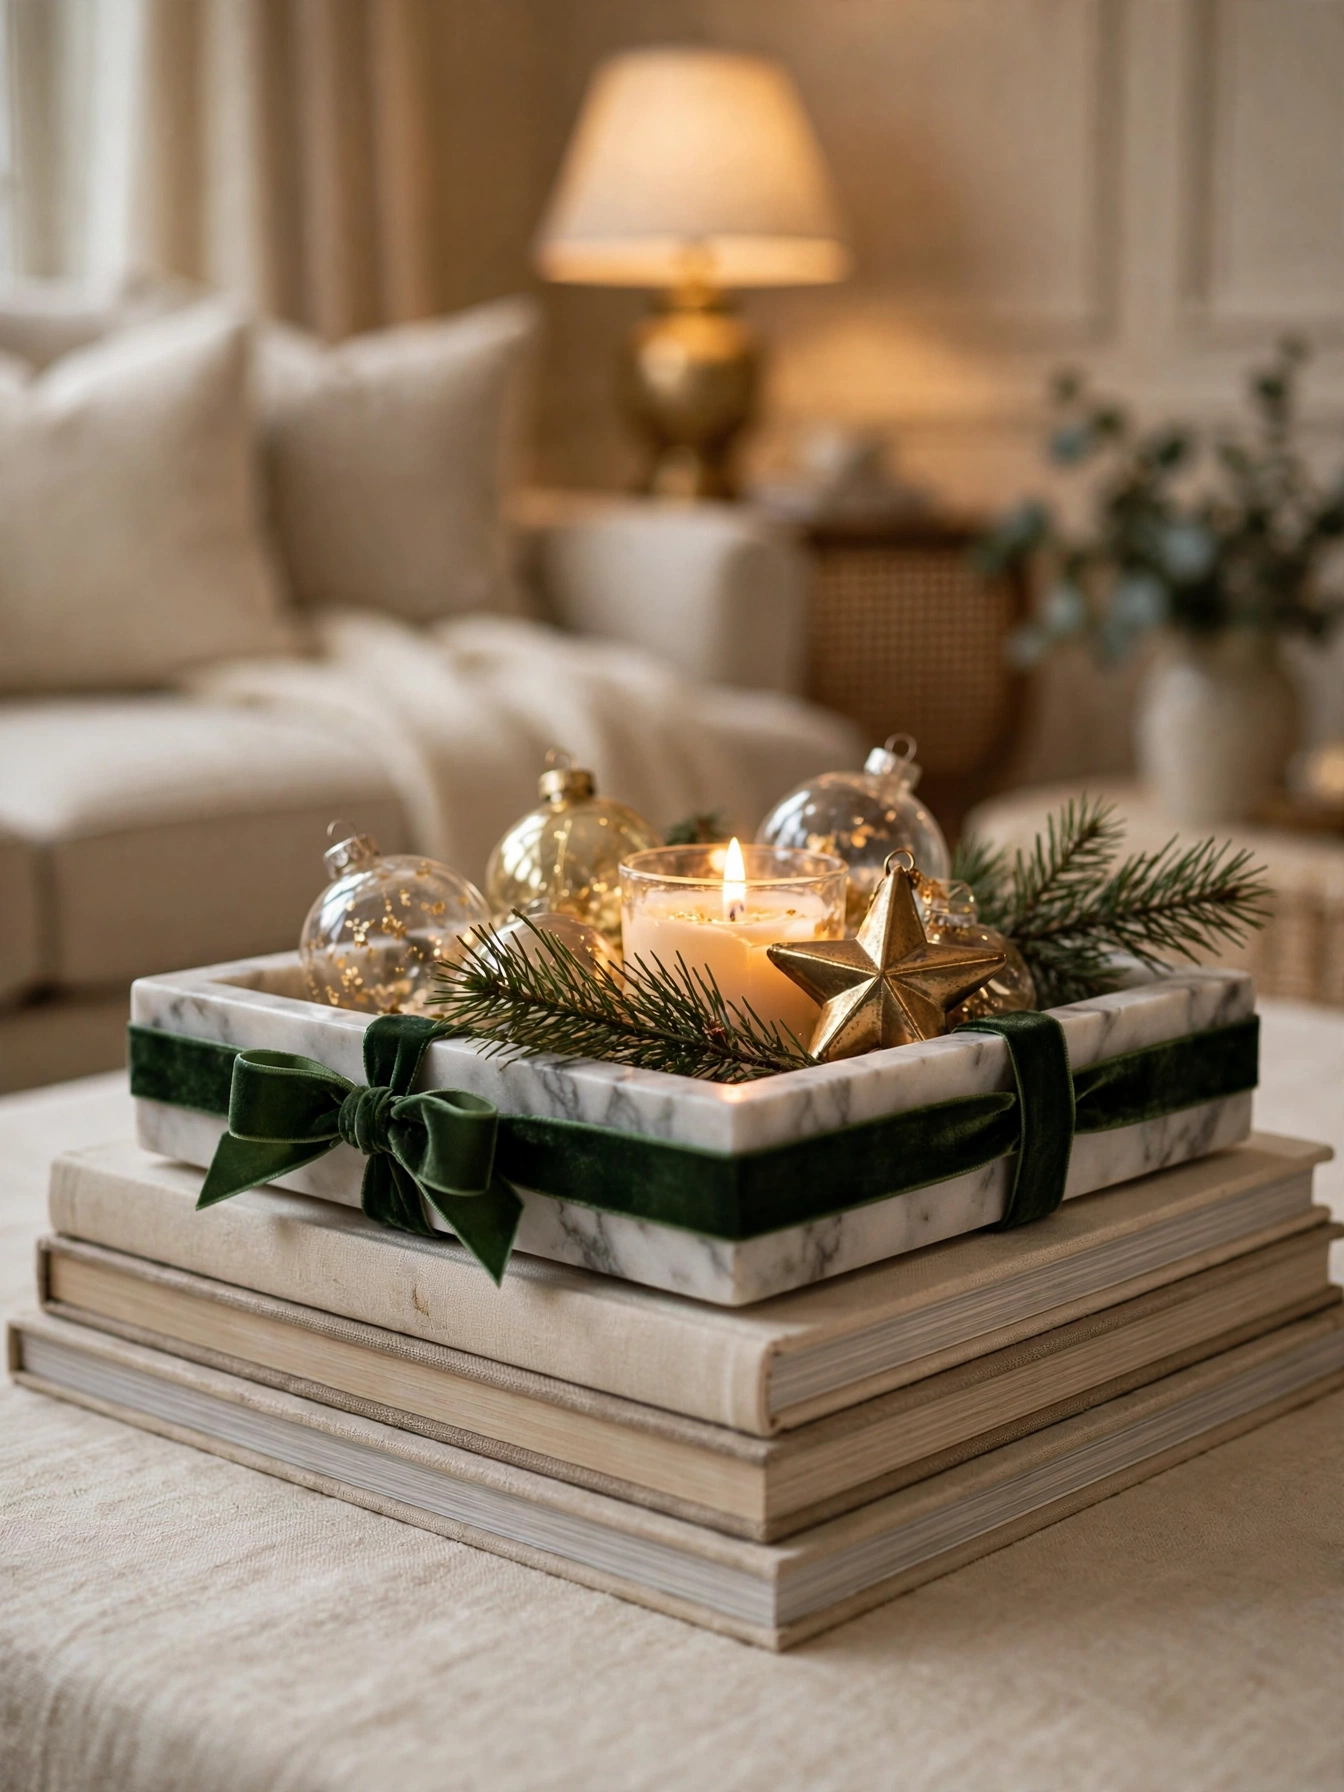
Why This Works:
- A velvet ribbon border turns a plain tray into a gift box with one yard of ribbon
- Deep green velvet at 2.5 inches wide reads as tailored against white marble
- A 14-inch square tray holds 8 ornaments at 2.5 inches plus one candle
- The ribbon ties on and off, so the tray returns to everyday use in January
Tie the ribbon around the tray’s outer edge with a flat knot at one corner, leaving two 8-inch tails with V-notched ends. Arrange ornaments in a loose cluster on one half of the tray, keeping the tallest ornament under 4 inches so the display stays low. Place one 3-inch candle on the other half, 4 inches from the nearest ornament. Choose velvet over satin; velvet grips the tray edge and does not slide, while satin slips within a day.
A velvet ribbon border suits marble and brass trays where you want a gift-box look, because the ribbon does the decorating. The knot is the catch: a loose knot unties when the tray is carried, so wire the ribbon to the tray handle or tuck the knot under the tray. A daily-carried tray does better without ribbon; use a ribbon-printed runner under the tray instead.
Pro Tip: Finish the ribbon tails with pinking shears. The zigzag cut keeps velvet from fraying and looks polished with no hemming.
Cocoa Bar Setup
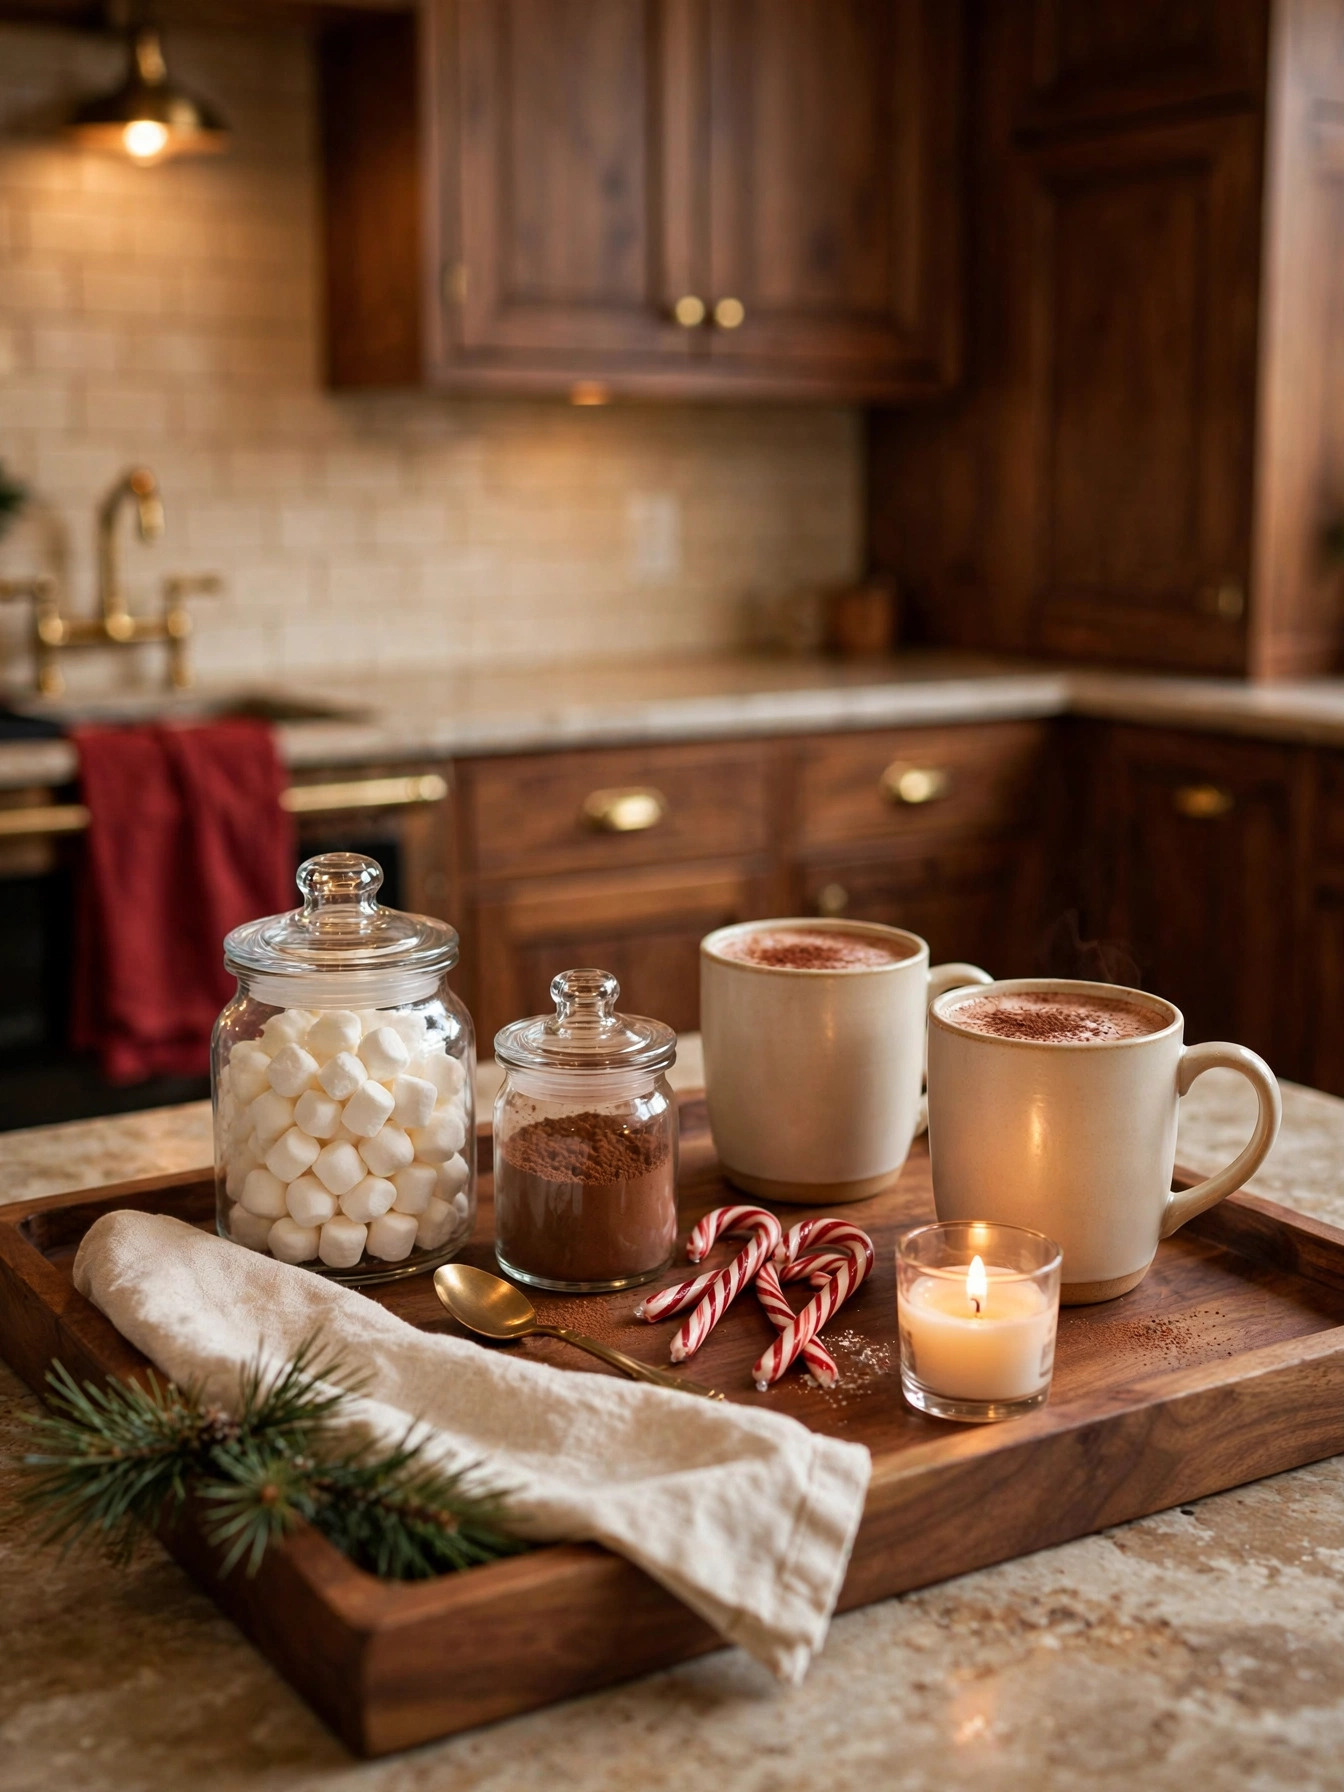
Why This Works:
- A cocoa bar tray keeps every mug, jar, and spoon in one liftable station
- A 14 by 20 inch tray holds 2 mugs, 2 jars, and a candle with room to pour
- Glass jars with lids keep marshmallows soft for 2 weeks
- The whole setup costs $20 to $35 if the mugs come from the cupboard
Place the two mugs at the back of the tray, the jars in front of them, and the candle at one end, keeping 3 inches of clear space in front for pouring. Fill one jar with mini marshmallows and one with cocoa powder, and stand 6 candy canes in a small jar between them. Lay a linen napkin under the mugs to catch drips. Allow 12 inches between the tray and the stove; steam from a kettle fogs the jars and softens the candy canes.
A cocoa bar suits kitchens and family rooms where hot drinks are a nightly ritual, because the tray makes the ritual feel special. Cocoa dust is the downside: it covers everything within 6 inches, so wipe the tray after each use and keep the cocoa jar lidded. For daily trips to the living room, choose a tray with raised handles and a 1-inch lip.
Pro Tip: Hang one candy cane over each mug handle. The canes read as garnish and keep guests from hunting through the jar.
Ornament Cluster Accent

Why This Works:
- Ornaments clustered on a tray add color without a single tall object
- A 14-inch tray holds 15 ornaments at 2.5 to 3 inches with space to breathe
- Brass trays at $25 to $40 are heavy enough to stay put when someone reaches in
- Three colors in a 50/30/20 split keep the cluster from reading as random
Place the largest ornaments at 3 inches first, spaced 3 inches apart, then fill the gaps with 2.5-inch pieces, and top with 3 metallic pieces as the catch-light. Slip one pine sprig flat under the ornaments so the greenery peeks out at the edges. Keep the tray centered on the table with 10 inches of clear space on each side for drinks. Pick shatterproof ornaments if the tray sits below 20 inches and children reach it.
An ornament cluster suits coffee tables that already carry tall objects, because it adds color at low height. The drawback is rolling: round ornaments escape a flat tray, so choose a tray with a 1-inch lip and a flat base. Near a lamp, use matte ornaments on the lamp side; shiny ones throw bright spots across the ceiling.
Pro Tip: Set one 3-inch gold ornament at the exact center. One bright piece at the center anchors the eye instead of letting it wander over a scattered pile.
Evergreen Sprig Frame

Why This Works:
- Evergreen sprigs around a tray edge frame the contents like a wreath
- A 12 by 18 inch tray needs 8 sprigs at 10 inches each to frame all four sides
- Fresh evergreen scents an entryway for 2 weeks with zero effort
- The frame costs nothing if the sprigs come from the yard
Lay the sprigs around the tray edge in overlapping 6-inch sections, working in one direction so the tips all point the same way. Pin each sprig with a dot of museum putty so it stays put when the tray is carried. Set one 3-inch candle in the center and one brass ornament beside it, keeping the ornament 4 inches from the flame. Mist the sprigs every 3 days; fresh evergreen dries within 10 days near a heat vent.
An evergreen frame suits entries where you want scent and greenery without a full garland, because a tray frame delivers both in 10 minutes. Needle drop is the downside: fresh sprigs shed after 2 weeks, so lay wax paper under the tray for the first week. When the tray moves daily, use faux sprigs; real ones slip and shed when moved.
Pro Tip: Trim the sprig tips at a 45-degree angle before laying them. Angled cuts lay flatter against the tray edge and shed fewer needles.
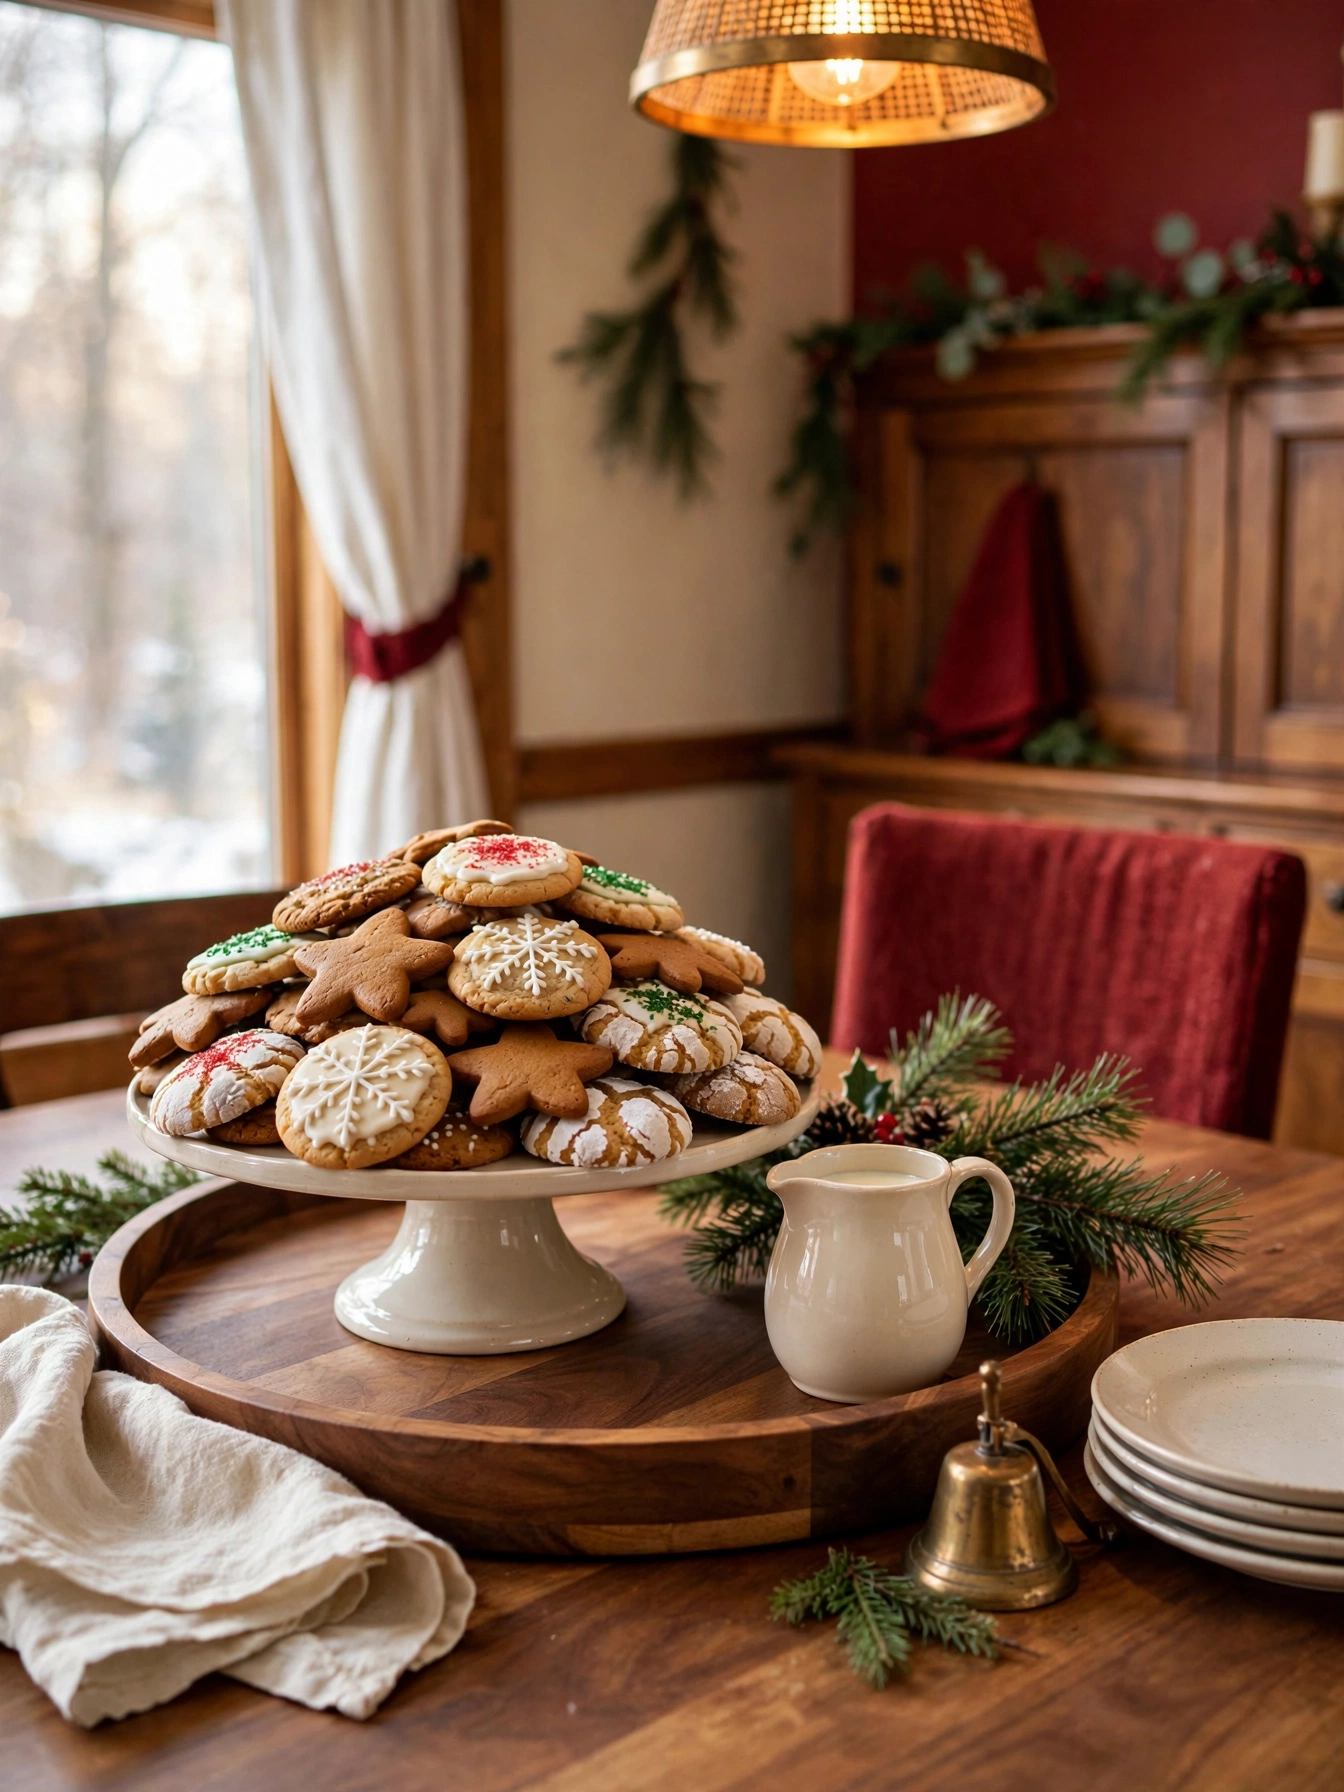
Cookie Serving Spread
Why This Works:
- A cookie tray with a cake stand in the center serves 12 guests without a second trip
- An 18-inch tray holds a 10-inch cake stand plus 2 dozen cookies around it
- A raised stand keeps the best cookies visible above the flat ones
- The whole spread sets up in 15 minutes and clears in 5
Set the cake stand in the center of the tray, then arrange cookies in rings around it: large cookies at the outer edge, small cookies near the stand. Place a milk pitcher at one end and a stack of 6 napkins at the other, keeping 4 inches of clear space for hands. Slide one pine sprig flat under the stand so the greenery peeks out. Give the tray 12 inches of clearance from any candle; cookie trays draw hands, and hands knock candles.
A cookie serving spread suits holiday open houses and cookie swaps, because it keeps the food in one liftable station. Crumbs are the downside: they spread fast, so lay a linen napkin under the cookies and shake it out after guests leave. For a tray heading to another room, choose one with a 1-inch lip and handles; a flat board spills cookies.
Pro Tip: Stack the tallest cookies on the cake stand and the flattest on the tray. The height difference makes the spread look abundant with the same number of cookies.
Gilded Candle Glow

Why This Works:
- A gilded candle on a gold tray turns one flame into a room-wide glow
- A 4-inch pillar on a 12-inch tray leaves room for 2 ornaments and a sprig
- Gold trays at $20 to $35 reflect light better than any other finish
- The setup needs one candle, so it costs under $40 total
Center the candle on the tray, then place one ornament on each side, 3 inches from the candle, and lay the pine sprig flat behind the candle. Keep the flame 4 inches from the nearest ornament; a glass ornament cracks if one side heats faster than the other. Choose a gilded pillar with a gold-dipped base rather than a fully gold candle; fully coated candles burn unevenly and drip colored wax. Trim the wick to 0.25 inch before lighting.
A gilded candle suits side tables where you want maximum glow from one object, because the gold tray multiplies the flame. Wax is the catch: gold-dipped candles drip gold wax onto the tray, so place a brass coaster under the candle. In a child’s room, use a flameless LED pillar with a gold shell; the tray hides the fake flame at 6 feet.
Pro Tip: Burn the candle for 2 hours the first time so the wax melts edge to edge. A short first burn tunnels the candle and wastes half the wax.
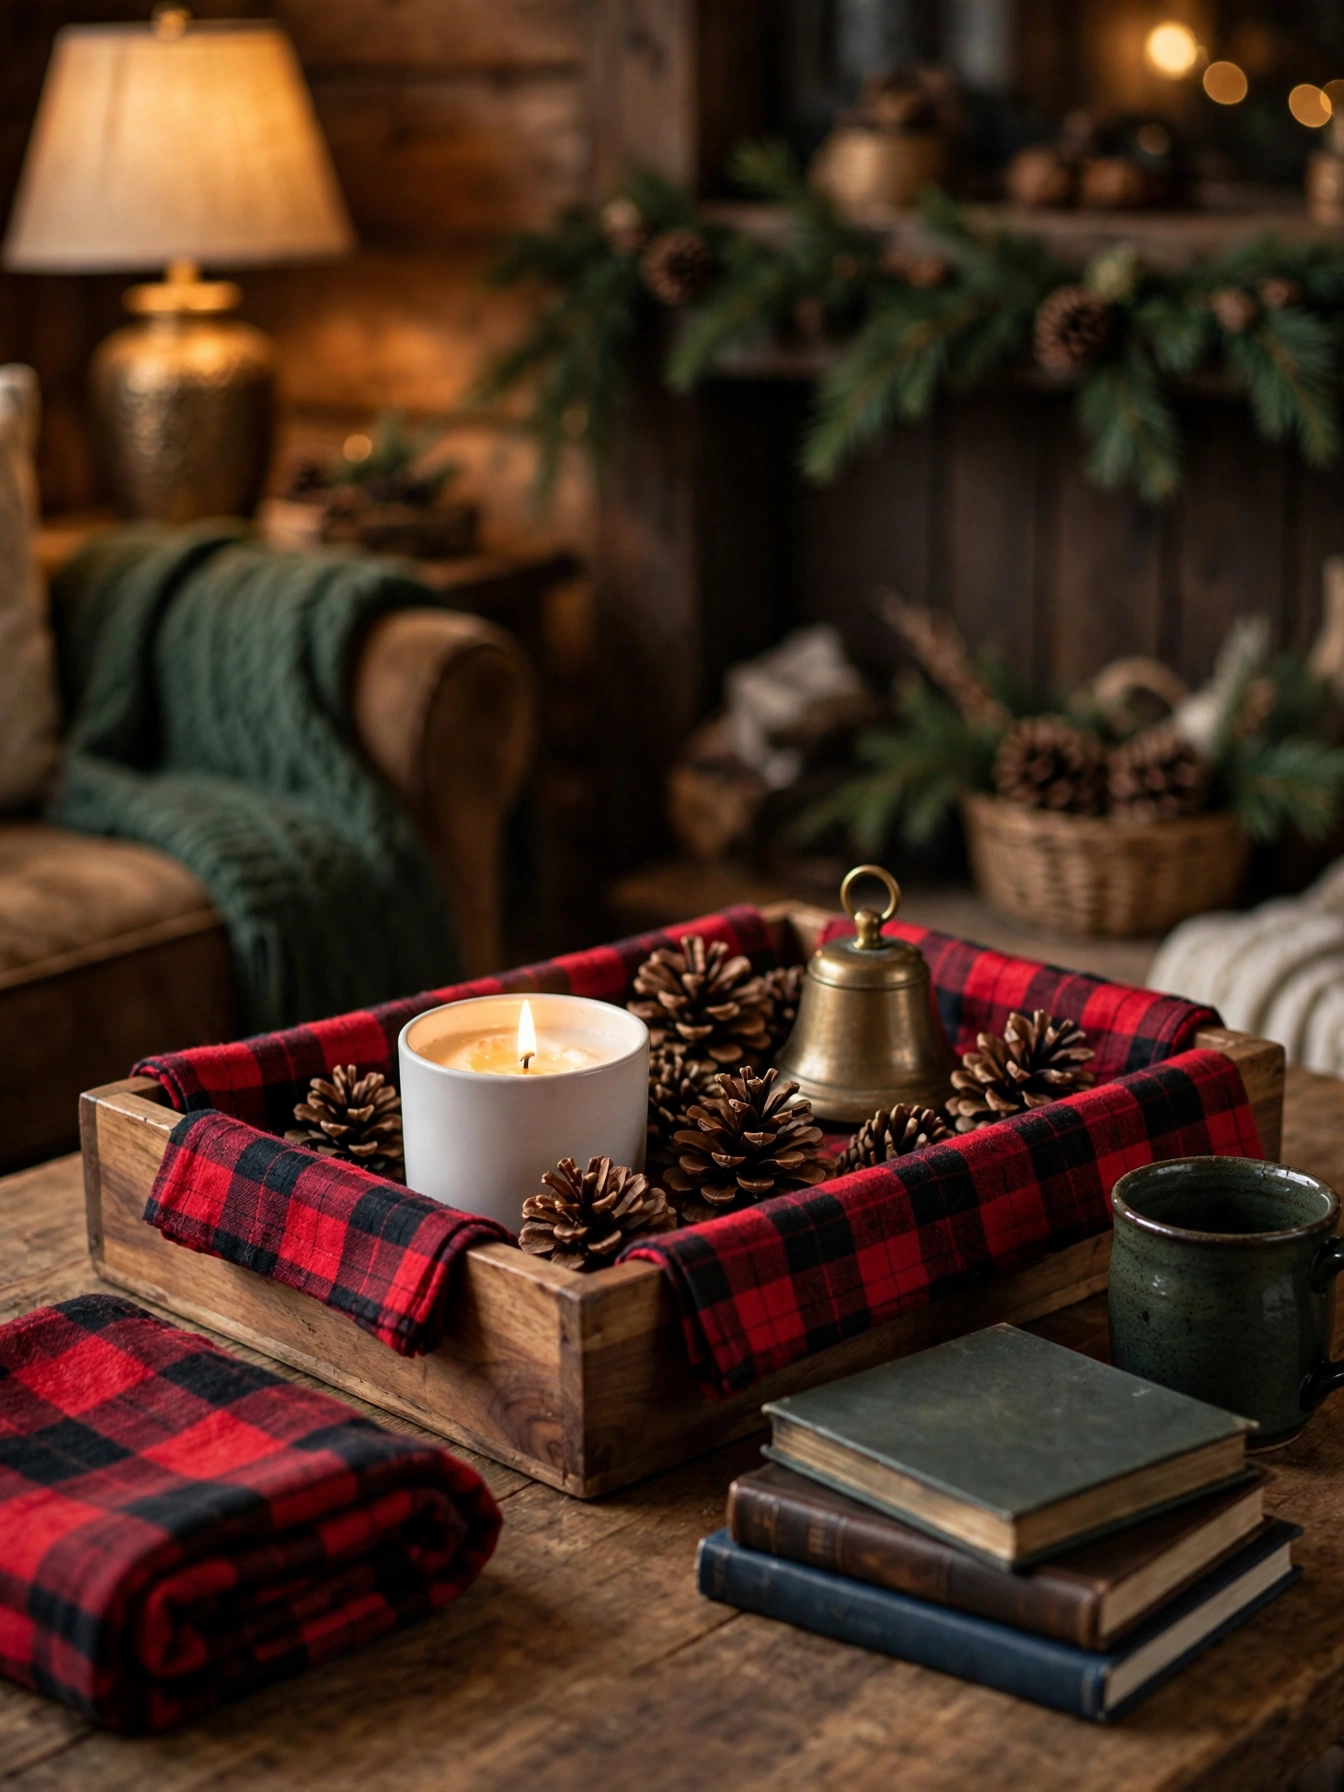
Christmas Tray Decor Ideas 2026: Plaid Linen Lining
Why This Works:
- Plaid linen inside a tray adds holiday pattern without a single ornament
- A 14 by 20 inch tray needs a 16 by 22 inch linen square for a 1-inch fold over the edge
- Cotton plaid at $8 to $12 a yard washes clean after the season
- The lining protects the tray from candle wax and pine sap
Cut the linen 2 inches larger than the tray on all sides, lay it in, and fold the edges over the rim so the plaid shows as a border. Place the candle in the center, pinecones in the corners, and the bell at one end, keeping the flame 4 inches from the linen. Iron the linen before lining; wrinkles under a candle read as sloppy. A bold 2-inch check or larger reads clearly from across the room; tiny checks blur into noise at 10 feet.
A plaid lining suits wooden trays where you want fast holiday color, because one layer changes the whole tray. Flame is the risk: linen burns, so keep the candle on a brass coaster and never leave it burning unattended. A tray carried daily needs no loose linen; use a plaid runner taped under the tray instead.
Pro Tip: Fold the linen corners into hospital corners, like a bedsheet. The crisp folds keep the lining flat and stop it from bunching when the tray moves.
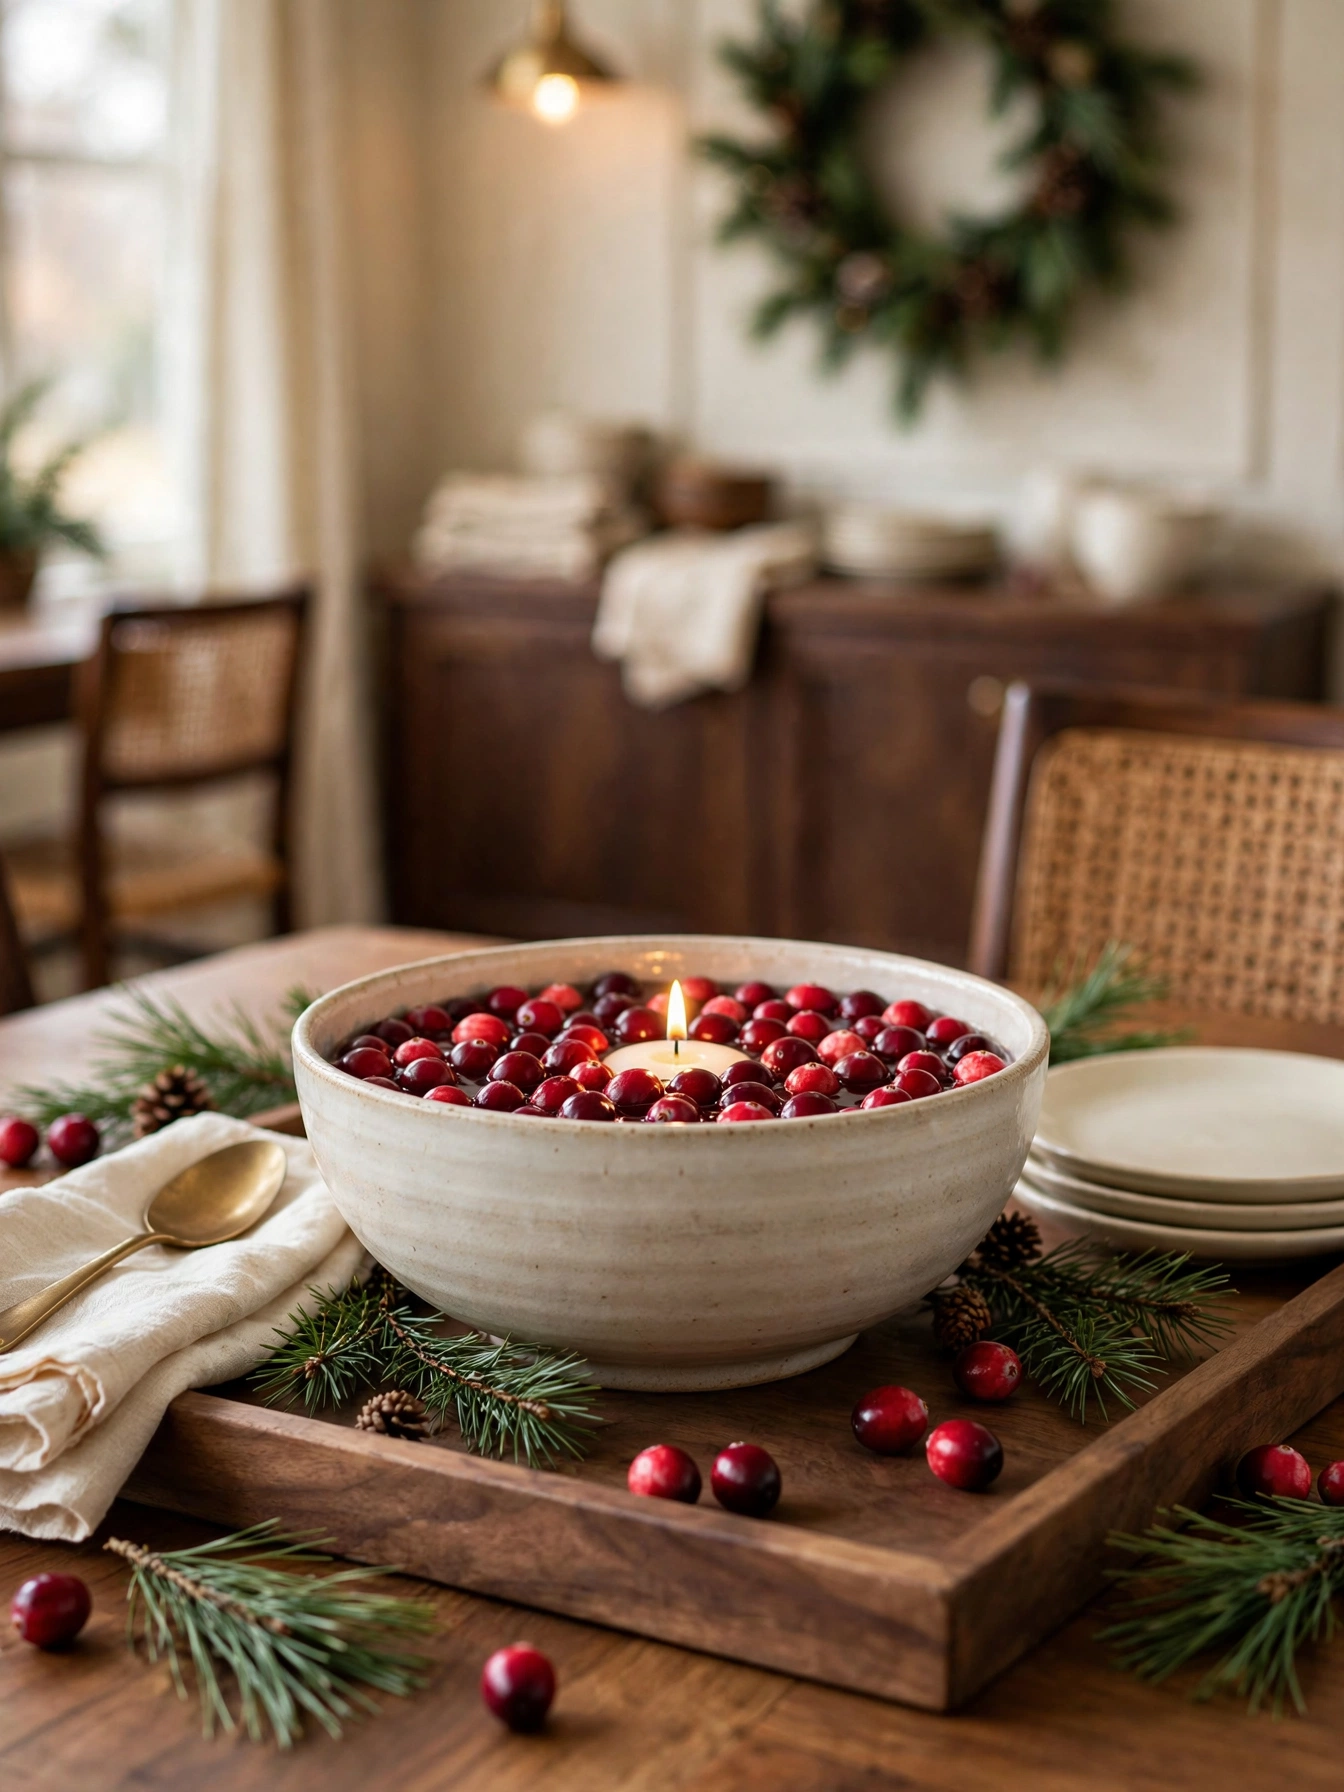
Cranberry Bowl Center
Why This Works:
- Fresh cranberries in a bowl give the tray a bright red center for about $4
- A 10-inch bowl holds 3 cups of cranberries plus one floating candle
- Cranberries keep their color for 7 days in water before softening
- The water reflects the candlelight and doubles the glow
Fill the bowl with water to 1 inch below the rim, add 3 cups of cranberries, and float one 2-inch candle in the center. Set the bowl on the tray with pine sprigs around the base, keeping the sprigs 3 inches from the flame. Change the water every 3 days so it never clouds. Give the bowl a full foot of clearance from any paper or linen, since a bumped tray sloshes water onto napkins and books.
A cranberry bowl suits dining tables where you want a fresh, bright centerpiece, because the red berries pop against a wooden tray. Lifespan is the catch: cranberries soften after a week, so refresh them the morning of any dinner party. For a travelling tray, leave the water out and use faux cranberries; a full bowl spills on the first stair.
Pro Tip: Squeeze one drop of lemon juice into the water. The acid keeps the water clear for 5 days instead of 3 and stops the berries from browning.
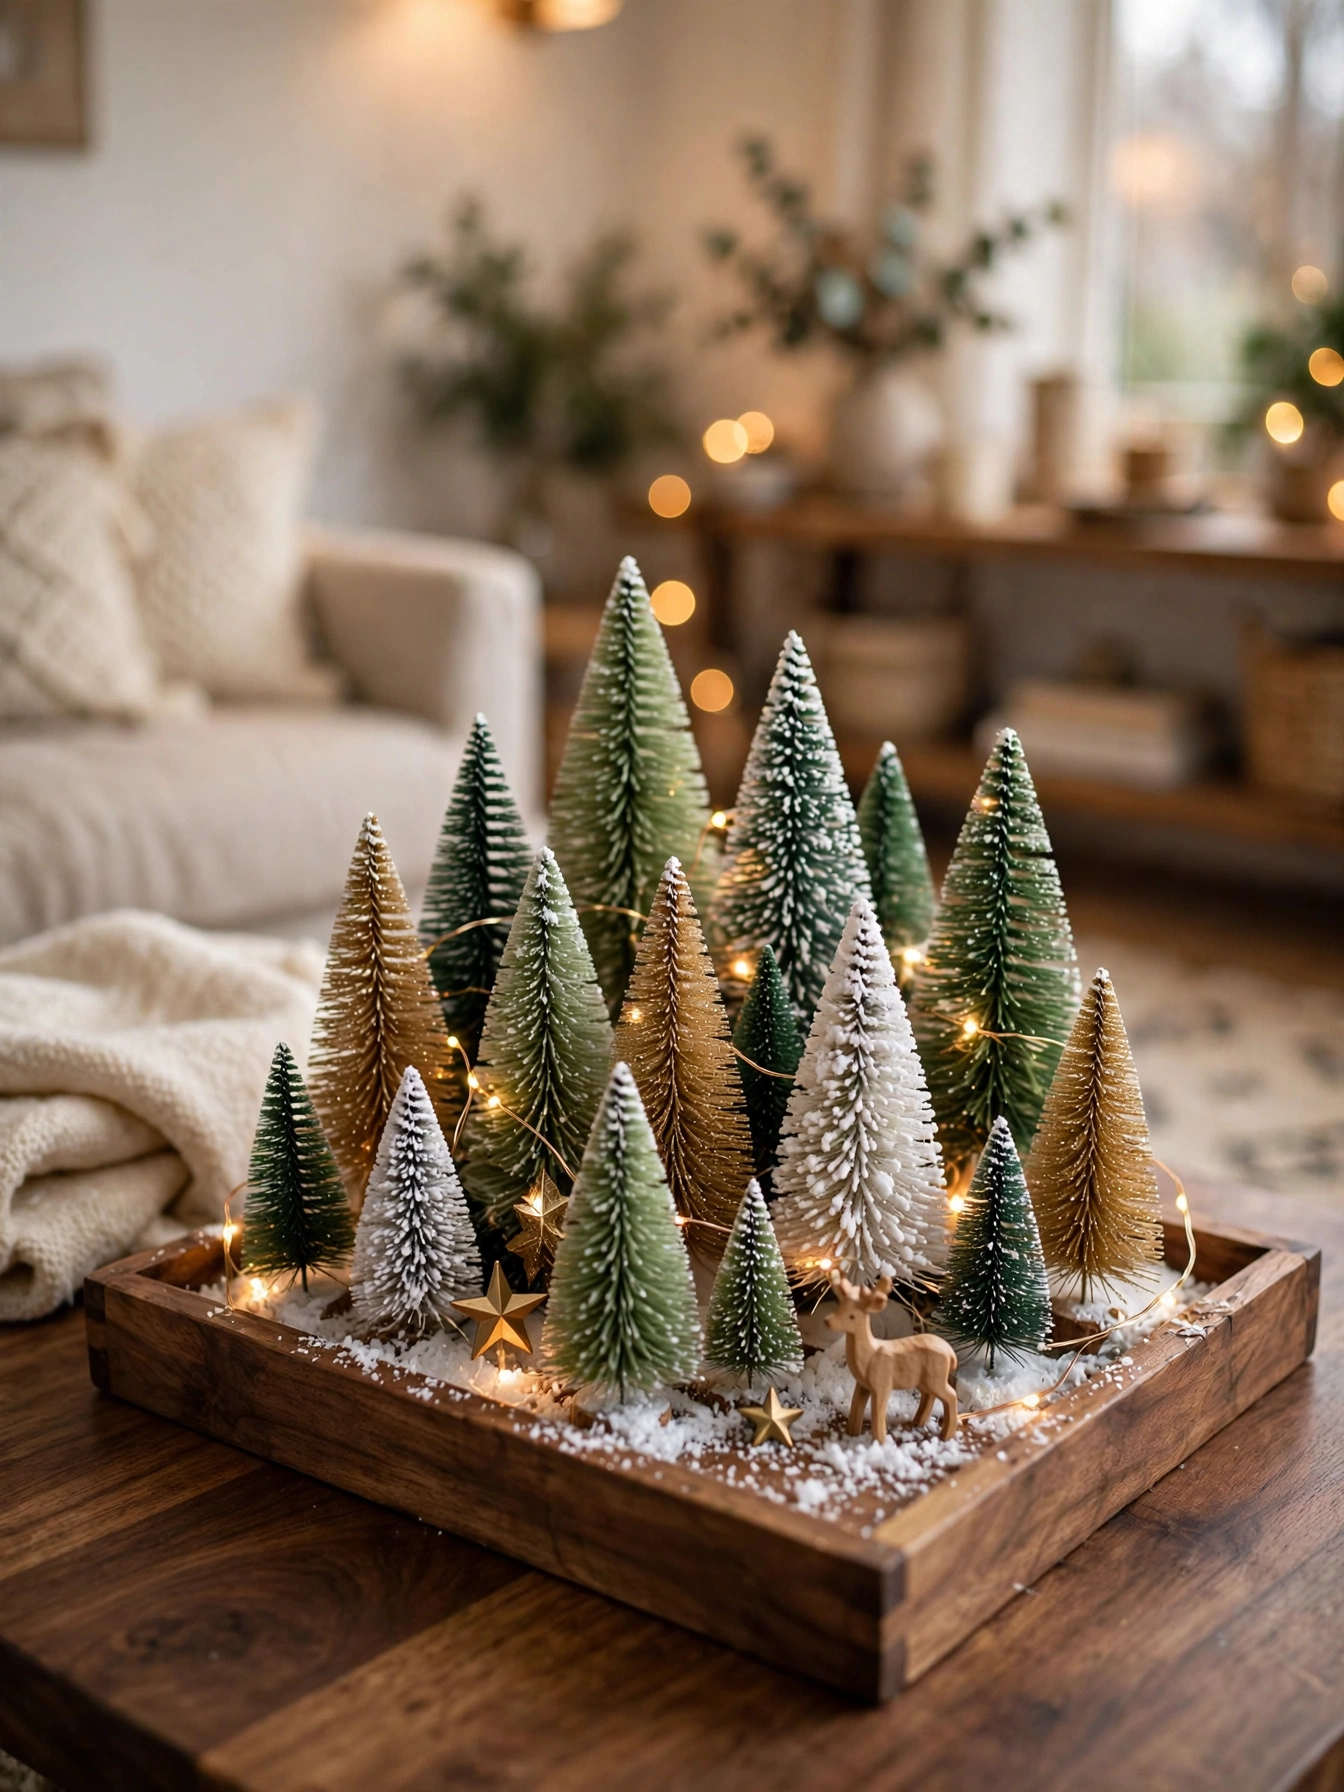
Bottle Brush Forest
Why This Works:
- Bottle-brush trees in three colors read as a snowy forest on a single tray
- A 14 by 20 inch tray holds 9 trees at 4 to 8 inches tall with room to breathe
- Battery lights woven through the trees glow for 6 hours a night on one set of batteries
- The whole forest costs $25 to $40 and stores in one small box
Arrange the trees tallest at the back (8 inches) and shortest at the front (4 inches), spacing them 2 inches apart so each tree reads separately. Sprinkle fake snow in a thin layer between the trees, keeping it off the battery pack. Weave one 20-light battery strand through the trees, tucking the pack behind the tallest tree. Add one tiny deer and one brass star to give the forest a story.
A bottle-brush forest suits coffee tables where children look for details, because it invites close looking. Fake snow is the catch: it shows every speck of dust, so cover the tray with a pillowcase when you dust. Near a heat vent, skip the fake snow; heat melts it into a sticky film.
Pro Tip: Glue each tree to a small felt pad. The pads stop the trees from tipping when the tray moves and keep the tray surface scratch-free.
Coffee Table Centerpiece

Why This Works:
- A tray centerpiece keeps the coffee table usable, since the whole display lifts off
- An 18-inch tray leaves 10 inches of table on each side for drinks on a 38-inch table
- A garland ring at 14 inches diameter frames the candle without blocking the view
- The centerpiece moves to the dining table in 10 seconds for a party
Set the garland ring in the tray first, then place the candle in the center, pinecones in the ring gaps, and 3 ornaments at the outer edge. Keep the candle top below the garland height so the flame never touches a needle. Choose a handled tray; a handle-free tray is hard to lift when it is fully loaded. Keep the centerpiece 12 inches from any book or magazine; a bumped tray spills the whole display.
A tray centerpiece suits coffee tables where the surface does double duty, because the tray keeps the decor portable. Heft is the catch: a loaded 18-inch tray weighs 6 to 8 pounds, so lift with two hands. For a small table (under 30 inches), drop to a 14-inch tray and skip the garland ring.
Pro Tip: Place a cork mat under the tray. The cork stops the tray from sliding on a glass table and protects a wood table from the tray’s base.
Breakfast in Bed

Why This Works:
- A breakfast tray with one pine sprig turns a slow morning into a holiday ritual
- A 12 by 18 inch tray with legs straddles a lap without tipping
- The pine sprig costs nothing and scents the tray for a day
- The whole setup takes 5 minutes and needs no extra shopping
Set the cup at the back of the tray, the plate in front, and the sprig flat along one edge so it never touches the food. Go for a tray with folding legs and a 1-inch lip; a flat board slides off a duvet. Keep the tray 6 inches from the pillow so the cup does not tip when someone sits up. If the bed is a soft mattress, place a hardcover book under the tray legs to keep them from sinking.
A breakfast tray suits Christmas morning, when the house wakes slowly, because it makes the first hour feel special. Spills are the catch: a full cup on a soft bed tips easily, so fill the cup only two-thirds full. A daily-use tray needs a wipeable lacquer finish; raw wood stains from coffee within a week.
Pro Tip: Tie the pine sprig to the tray handle with a 6-inch ribbon. The sprig stays put when the tray moves and reads as a gift tag.
Birch Candle Holders

Why This Works:
- Birch log holders bring a cabin texture that no glass holder can match
- Three holders at 4, 6, and 8 inches tall form a natural stair-step
- Birch holders at $10 to $18 each cost less than a brass set
- The bark texture hides wax drips that would show on glass
Drill each log to fit a 3-inch pillar with 0.5 inch of clearance on all sides, and set the candle so its top sits 1 inch below the log rim. Arrange the holders in a triangle with 3 inches between them, tallest at the back. Tuck pine sprigs flat between the holders, keeping every sprig 2 inches from the nearest flame. Hold a 12-inch gap between the tray and any curtain; birch bark is flammable.
Birch candle holders suit rustic rooms where the tray already carries wood tones, because the holders extend the palette. Bark is the weak spot: it dries and cracks within one season if the tray sits near heat, so keep the tray 24 inches from any vent. For the look with zero fire risk, use LED pillars; the birch hides the fake flame well.
Pro Tip: Rub the birch bark with a thin coat of clear matte sealant before the season. The sealant stops the bark from peeling and keeps the holders looking fresh through January.
Christmas Tray Decor Ideas 2026: Nordic Wood Base
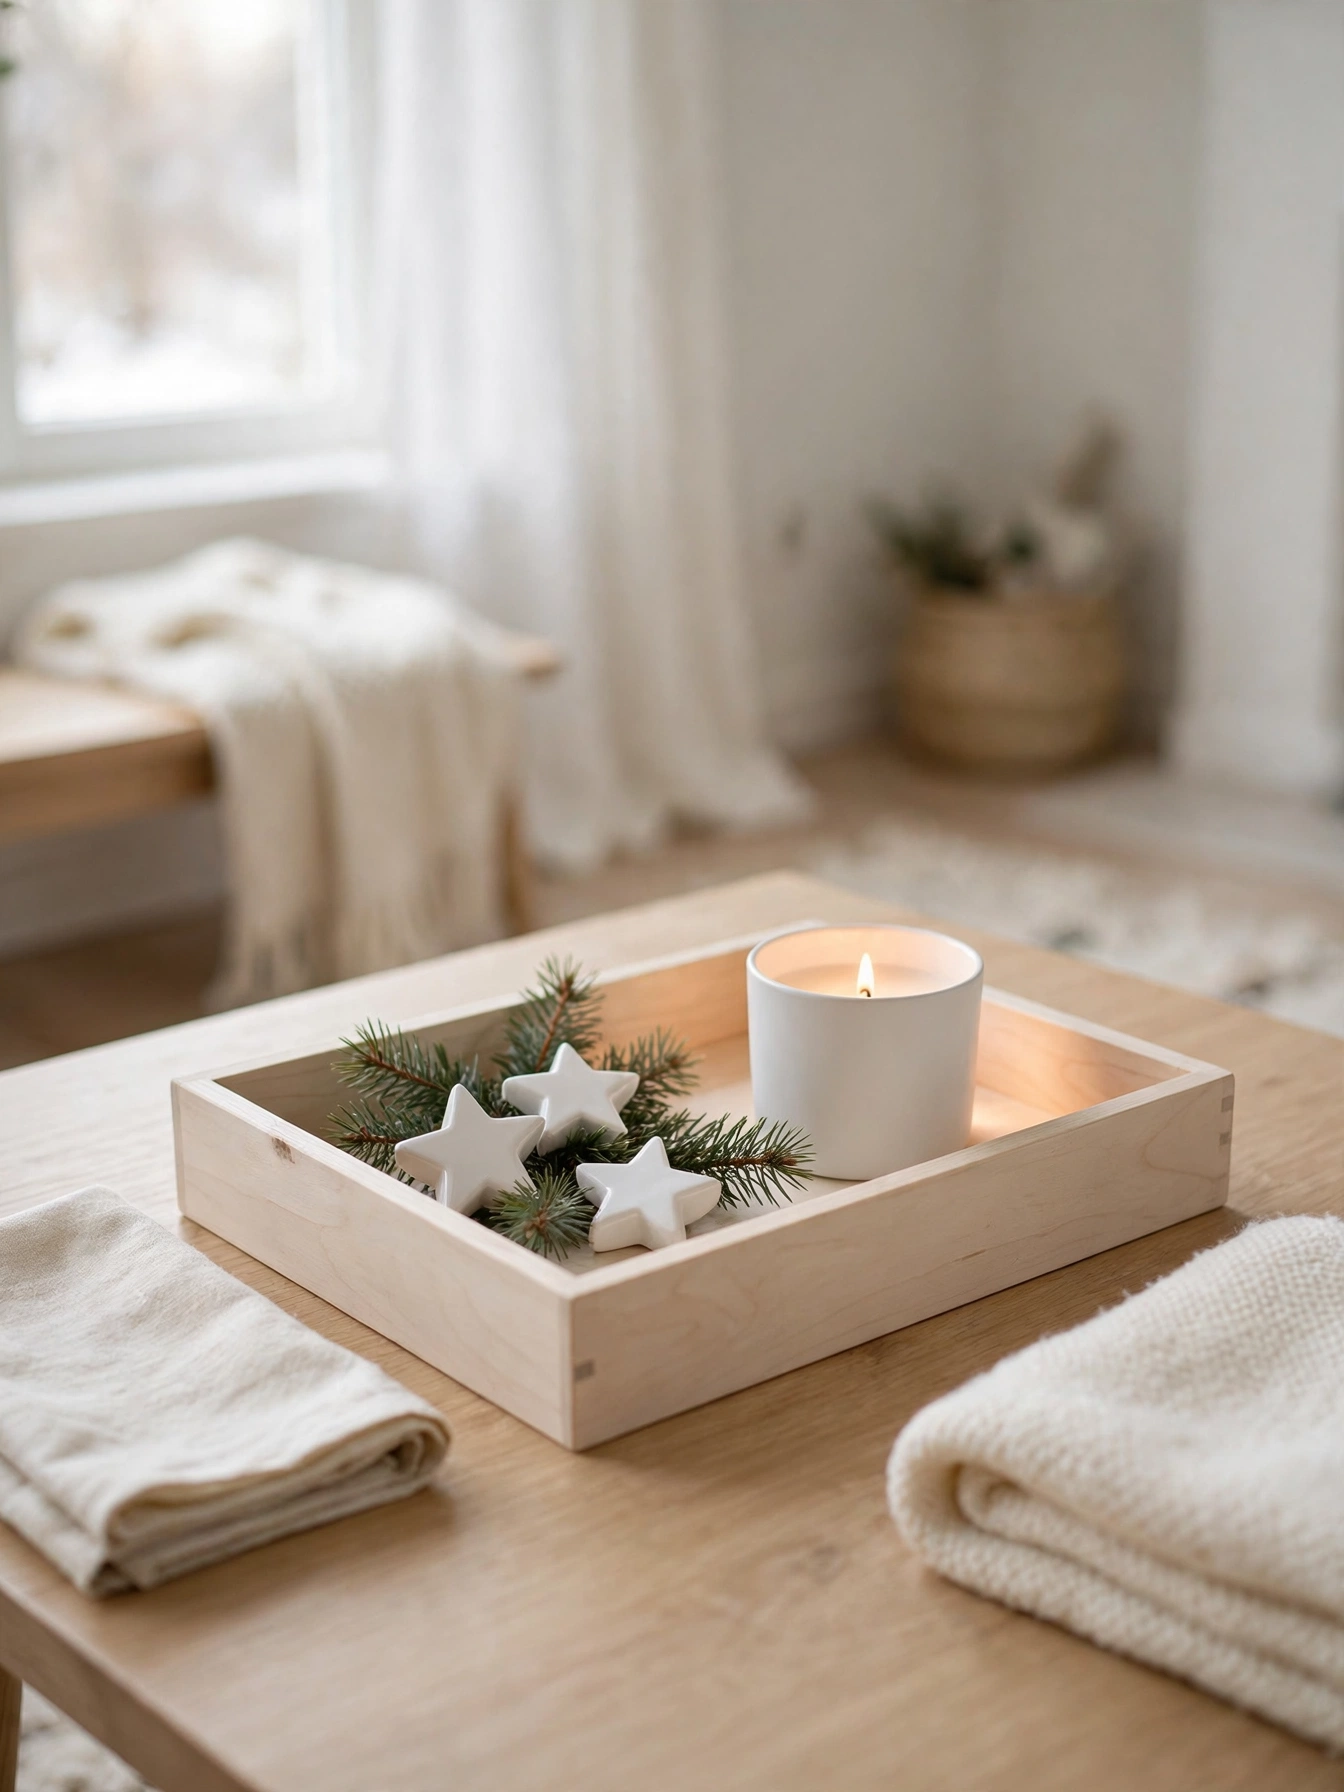
Why This Works:
- A pale birch tray keeps the display light, which suits small or white rooms
- A 12 by 16 inch tray holds a candle, a branch, and 3 stars with room to breathe
- White ceramic stars at $3 to $5 each add shape without color
- The Nordic palette works through January, not just Christmas week
Place the candle at the back center of the tray, the pine branch flat along the front edge, and the stars in a loose triangle between them, keeping the stars 3 inches from the flame. Pick a tray with a pale, unfinished birch look; a dark stain fights the Nordic palette. Keep the branch 2 inches from the flame; pine dries fast and catches easily. Dust the tray weekly with a dry cloth; pale wood shows dust within days.
A Nordic wood base suits white and light-oak rooms where a dark tray would look heavy, because the pale wood keeps the display airy. The trade-off is staining: pale birch marks from candle wax and pine sap, so lay a linen napkin under the candle. A tray used for food needs a food-safe finish; skip the candle.
Pro Tip: Sand the tray with 220-grit sandpaper before the season. A fresh sanding lifts last year’s stains and restores the pale birch color in 10 minutes.
Entryway Catchall Corner
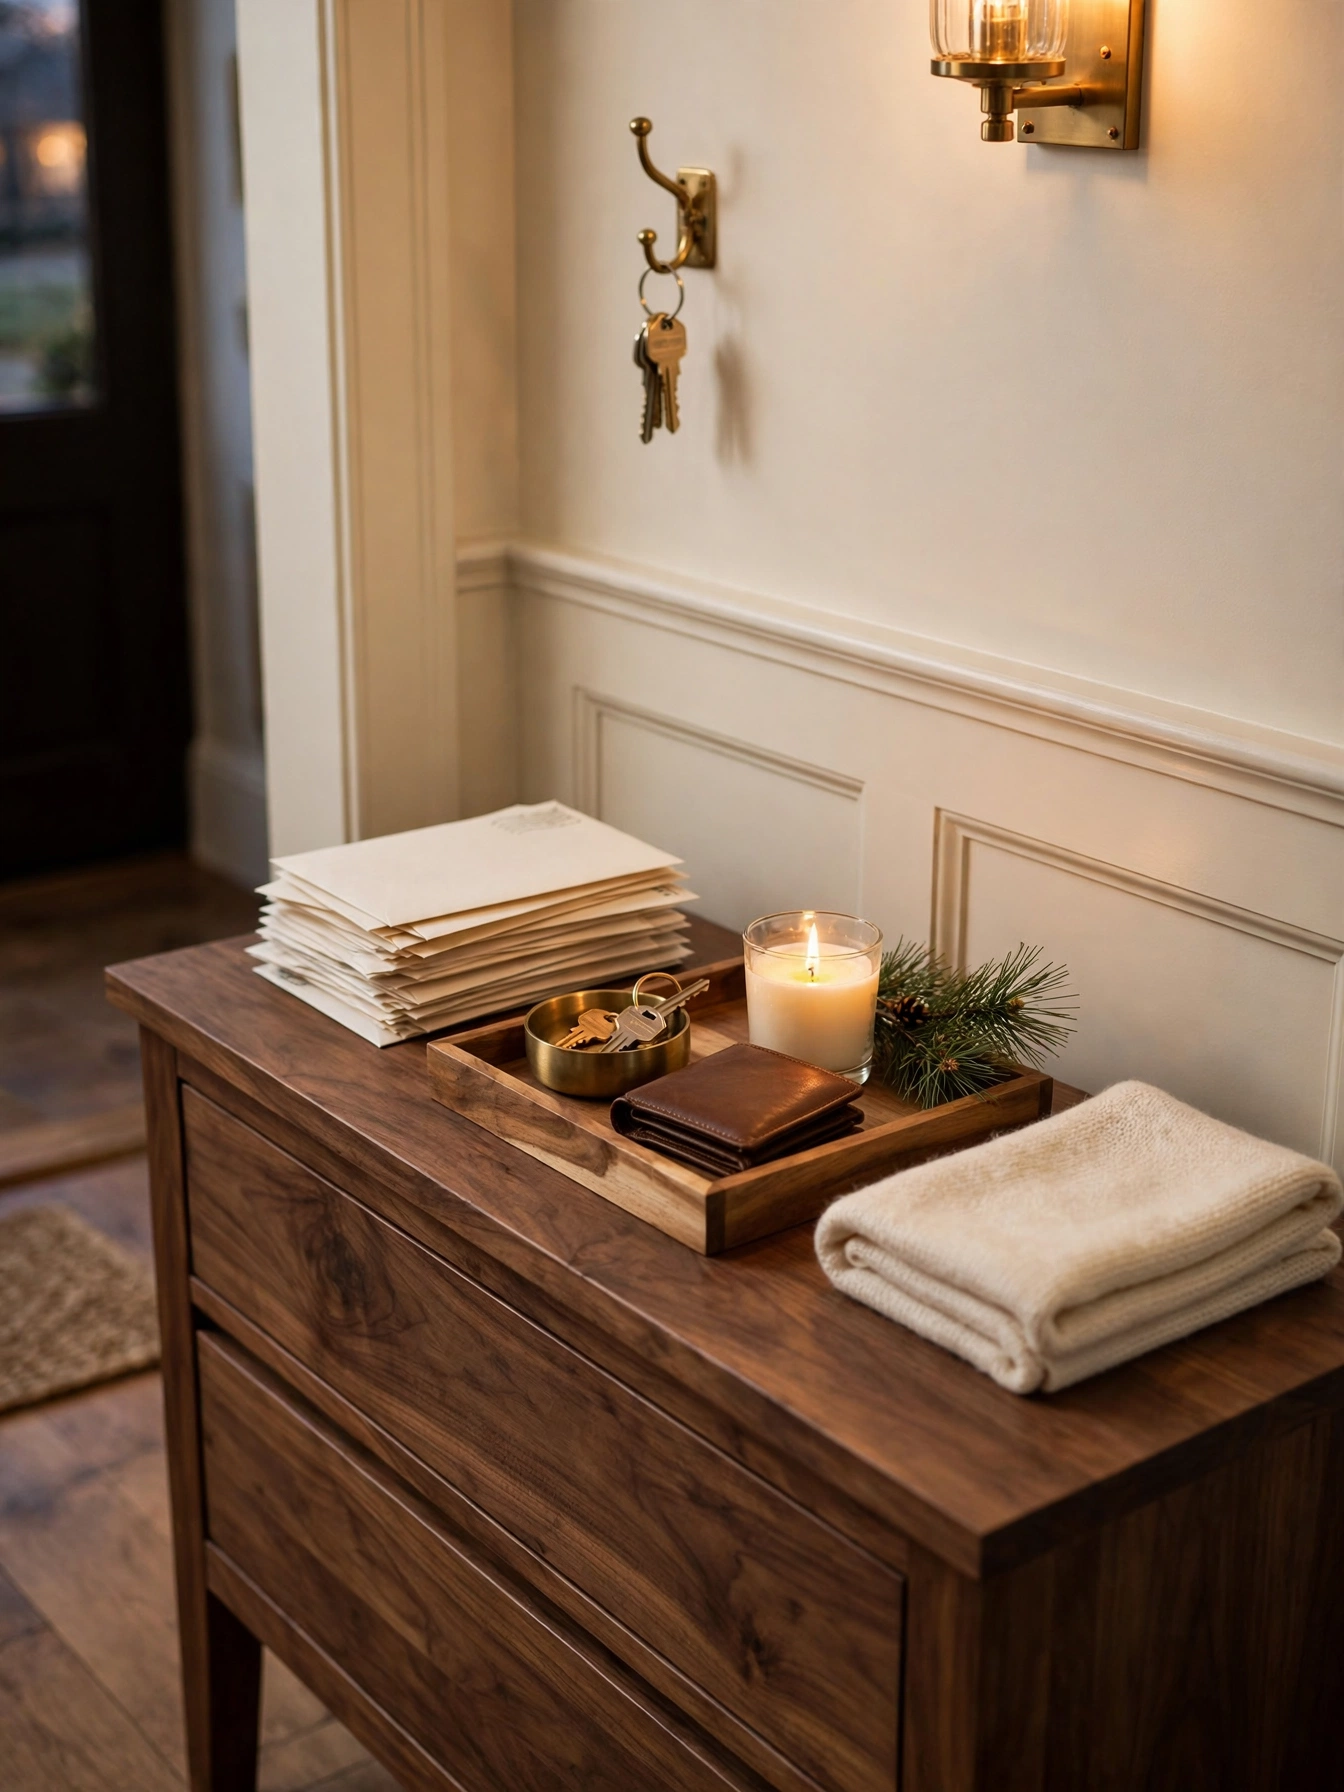
Why This Works:
- A catchall tray gives keys and mail a home, so the entry stays tidy
- A 10 by 14 inch tray fits a 16-inch-deep console with room for a candle
- One pine sprig makes the practical tray feel seasonal
- The tray costs nothing if it comes from a kitchen cupboard
Set the tray at the console end nearest the door, with the key bowl at the back, the mail slot in front, and the candle at one end, keeping the flame 6 inches from any paper. Rest the pine sprig flat along the tray edge so it never touches the mail. Empty the tray weekly; a catchall that fills up stops catching and starts cluttering. Set the candle on a brass coaster and never leave it burning in an empty entry.
An entryway catchall suits homes where the console collects keys, mail, and gloves, because it gives every object a place. The candle is the risk: an entry candle burns unattended more often than any other, so use a flameless LED pillar if the entry is unstaffed. If the console is narrow (under 12 inches), drop to an 8 by 10 inch tray and skip the candle.
Pro Tip: Add a small label to the tray with one word: Keys. A labeled tray gets used; an unlabeled tray becomes a junk drawer.
Vanity Tray Styling
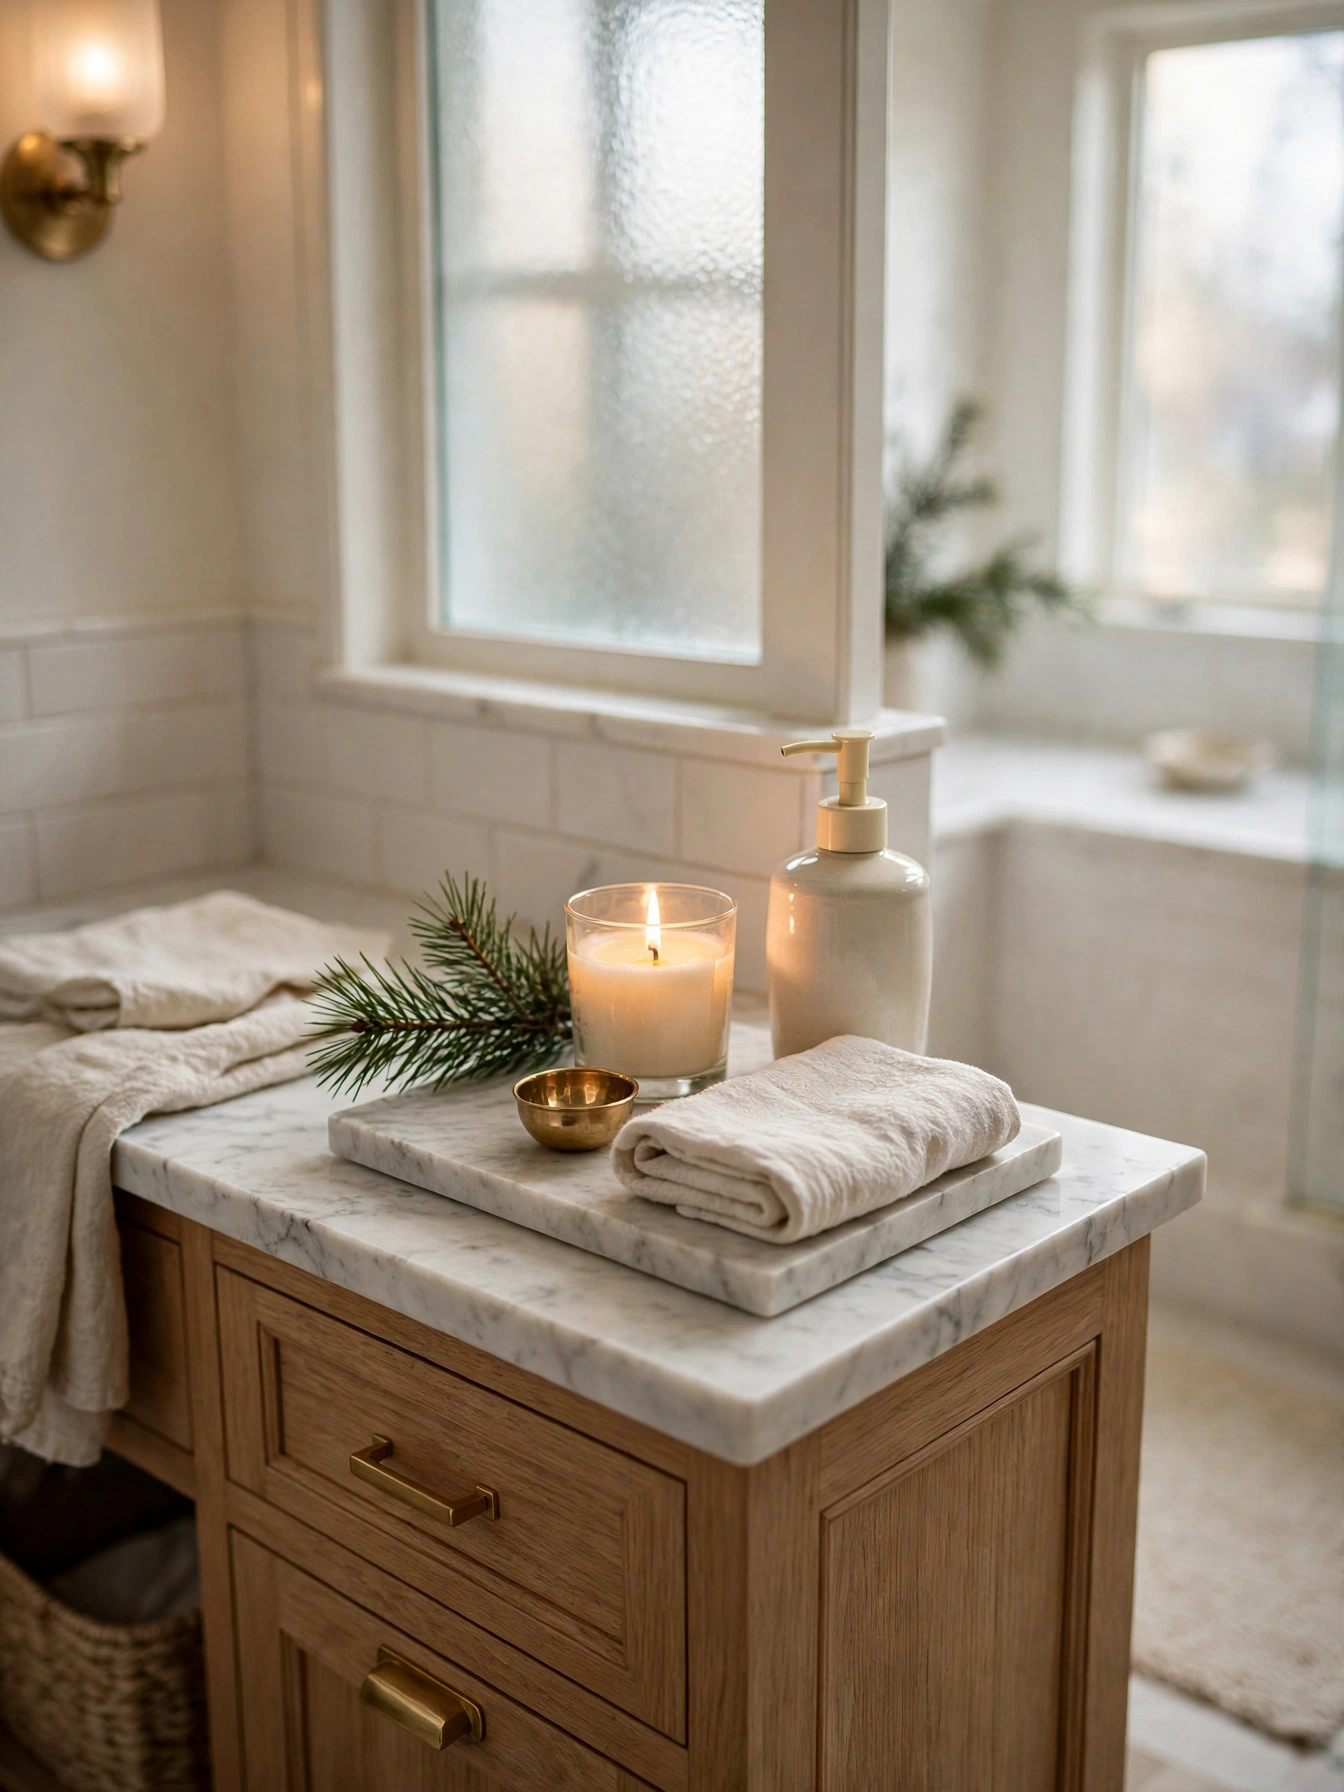
Why This Works:
- A vanity tray corrals soap, candles, and towels into one clean station
- A 10 by 14 inch tray fits a standard 24-inch vanity with room for a faucet
- Marble trays at $20 to $30 wipe clean and resist water stains
- One pine sprig gives the bathroom a holiday scent without a plug-in
Place the soap dispenser at the back of the tray, the candle at one end, and the folded towel in front, keeping the candle 6 inches from the towel. Lay the pine sprig along the tray rim, clear of the soap, so it never touches it. Wipe the tray weekly; bathroom humidity leaves water spots on marble within days. Rest the candle on a brass coaster and never burn it with the bathroom door closed.
A vanity tray suits bathrooms where the counter collects bottles, because it gives every bottle a home. Moisture is the catch: marble stains if water sits on it, so dry the tray after each use. If the vanity is small (under 18 inches wide), drop to an 8 by 10 inch tray and skip the towel.
Pro Tip: Choose a soap dispenser in a pine or cedar scent for December. The soap does the scenting, so the candle can stay unlit and the tray stays safe.
Wine Service Tray

Why This Works:
- A wine service tray keeps glasses, bottles, and snacks together for one-trip serving
- On a 14 by 20 inch tray, 2 glasses, a bottle, and a bowl fit with room to pour
- Brass trays at $30 to $50 reflect the candlelight and read as festive
- The tray moves from kitchen to dining table in one trip
Place the bottle at the back center of the tray, the glasses on either side, and the grape bowl in front, keeping 4 inches of clear space for pouring. Tuck the pine sprig against the tray rim, away from the glasses, so it never touches them. Leave 12 inches between the tray and any candle; wine glasses tip easily when someone reaches for a pour. A frequently carried tray needs a 1-inch lip and handles.
A wine service tray suits dinner parties where drinks are served away from the table, because it keeps the service in one place. The loaded weight is the catch: 6 to 8 pounds for a full tray, so lift with two hands. With daily use, pick a tray with a wipeable finish; brass tarnishes from wine spills within a week.
Pro Tip: Cool the tray for 10 minutes before guests arrive. A cold brass tray keeps the wine cool for an extra 20 minutes without a bucket.
Miniature Skating Rink

Why This Works:
- A mirror rink on a tray turns one surface into a frozen pond scene
- A 10-inch round mirror fits a 14 by 20 inch tray with room for trees
- Skater figurines at 2 inches tall read as people gliding, not toys
- The whole rink costs $20 to $30 and stores in one small box
Lay a 10-inch round mirror in the center of the tray, then place two skater figurines on the mirror, one gliding and one standing, 4 inches apart. Ring the mirror with bottle-brush trees spaced 3 inches apart, the taller ones behind, the shorter ones in front. Scatter fake snow in a thin border around the trees, keeping it off the mirror. Keep the tray 8 inches from any heat vent; the mirror fogs near heat.
A skating rink suits coffee tables where children hunt for tiny details, because it rewards a closer look. Mirror upkeep is the downside: it shows every fingerprint, so wipe it with a dry cloth before guests arrive. On a tray that moves rooms often, glue each skater to a felt pad so nothing slides.
Pro Tip: Tilt one skater 10 degrees as if mid-turn. A skater caught mid-motion reads as alive; two skaters standing straight read as statues.
Gift Wrap Station
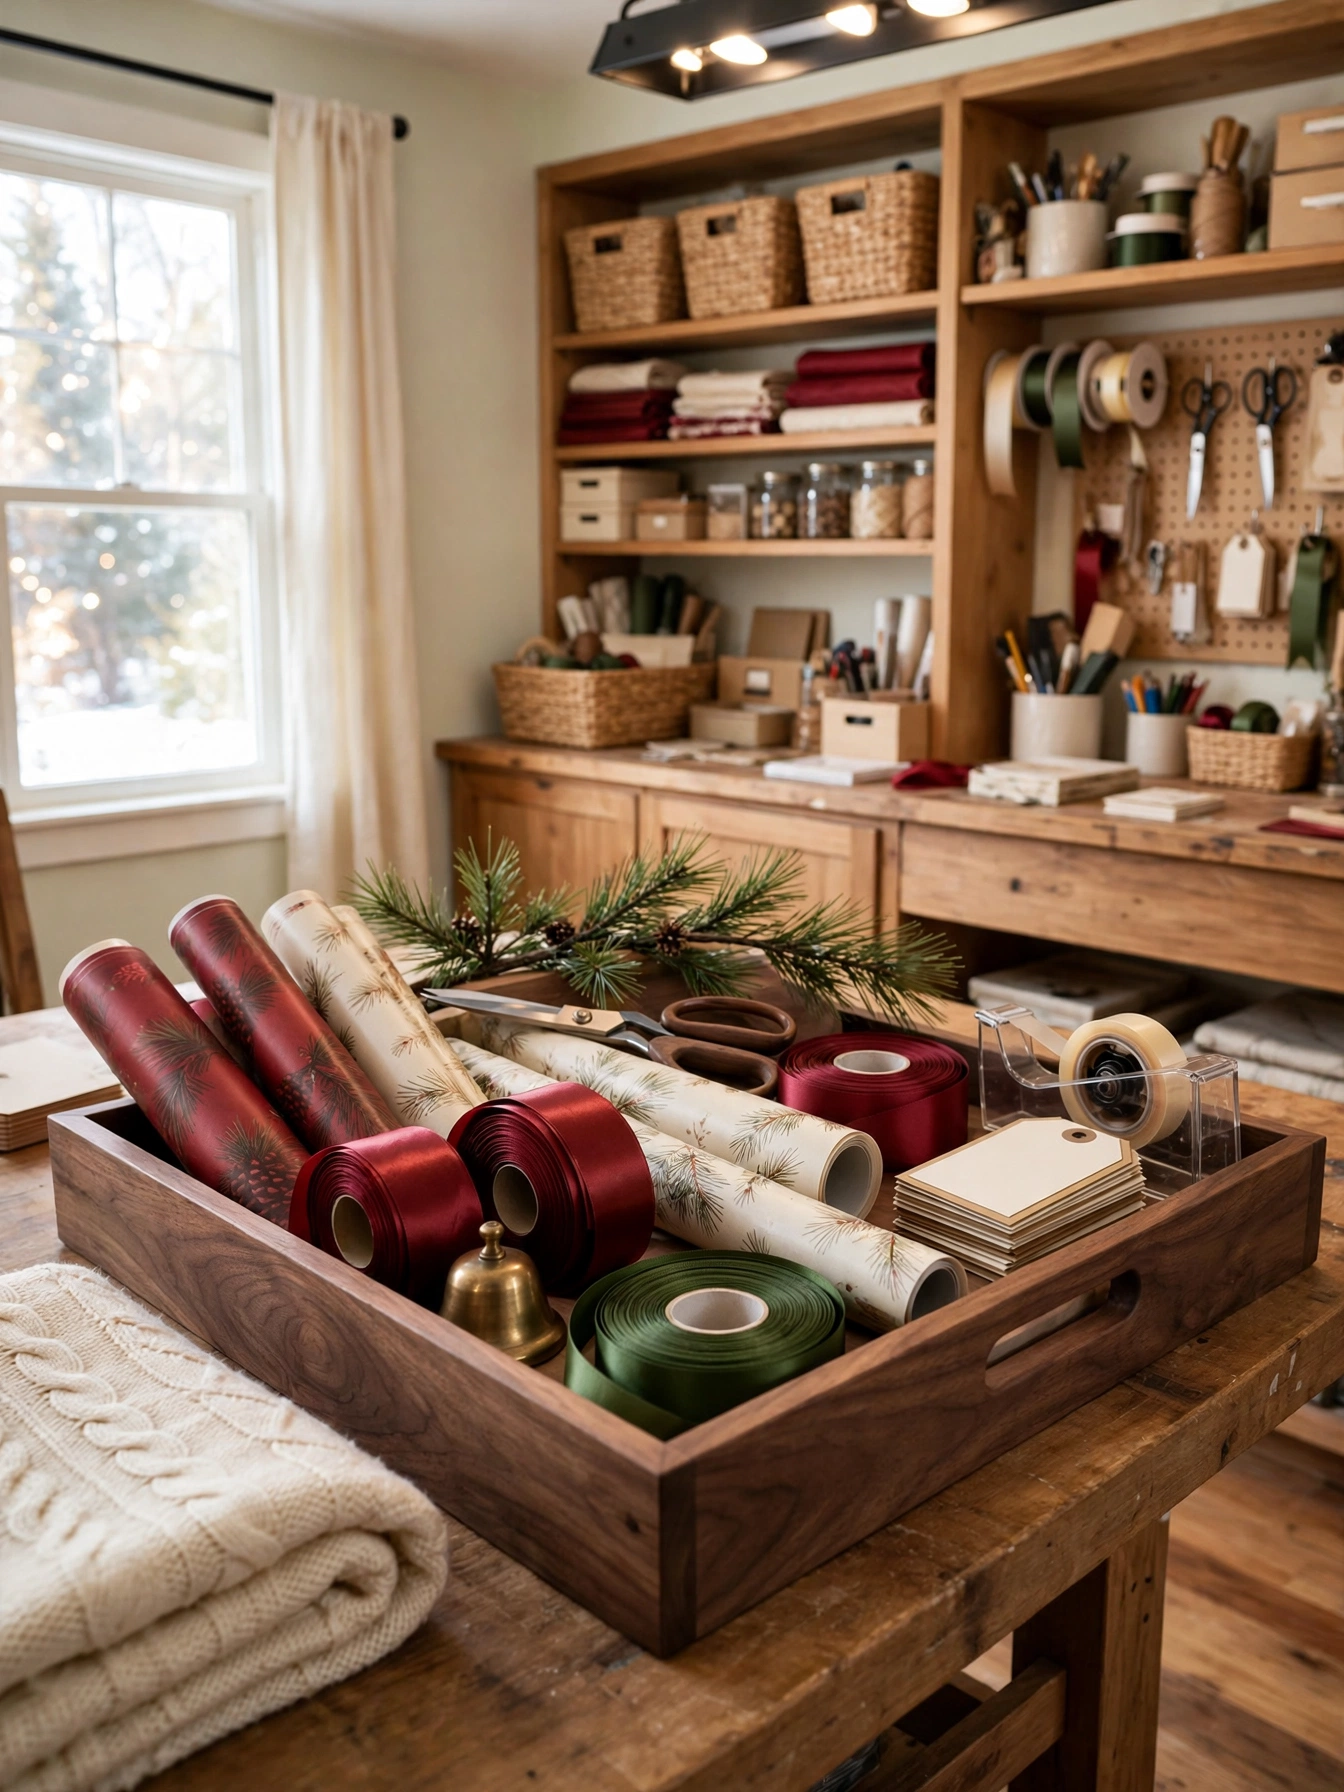
Why This Works:
- A wrap station tray keeps paper, ribbon, and tape in one portable station
- An 18 by 24 inch tray holds 2 rolls of paper, 3 ribbons, and tools with room to cut
- The tray moves from table to floor when the wrapping gets big
- The whole station sets up in 10 minutes and clears in 5
Stand the paper rolls at the back of the tray, coil the ribbons in front, and lay the scissors and tape at one end, keeping 6 inches of clear space for cutting. Tuck the pine sprig flat along the tray edge so it never tangles with the ribbon. Allow the tray 12 inches of clearance from any candle; wrapping paper ignites in seconds. A tray carried often needs a 1-inch lip so the rolls do not slide off.
A gift wrap station suits homes where wrapping happens in several rooms, because the tray keeps the supplies together. Paper is the catch: rolls unroll when the tray moves, so wrap a rubber band around each roll. Between sessions, store the tray flat; a tilted tray dumps the ribbons.
Pro Tip: Cut 10 strips of tape and stick them along the tray edge before you start. Pre-cut tape saves the one-hand fumble that ruins wrapping paper.
Citrus Clove Simmer
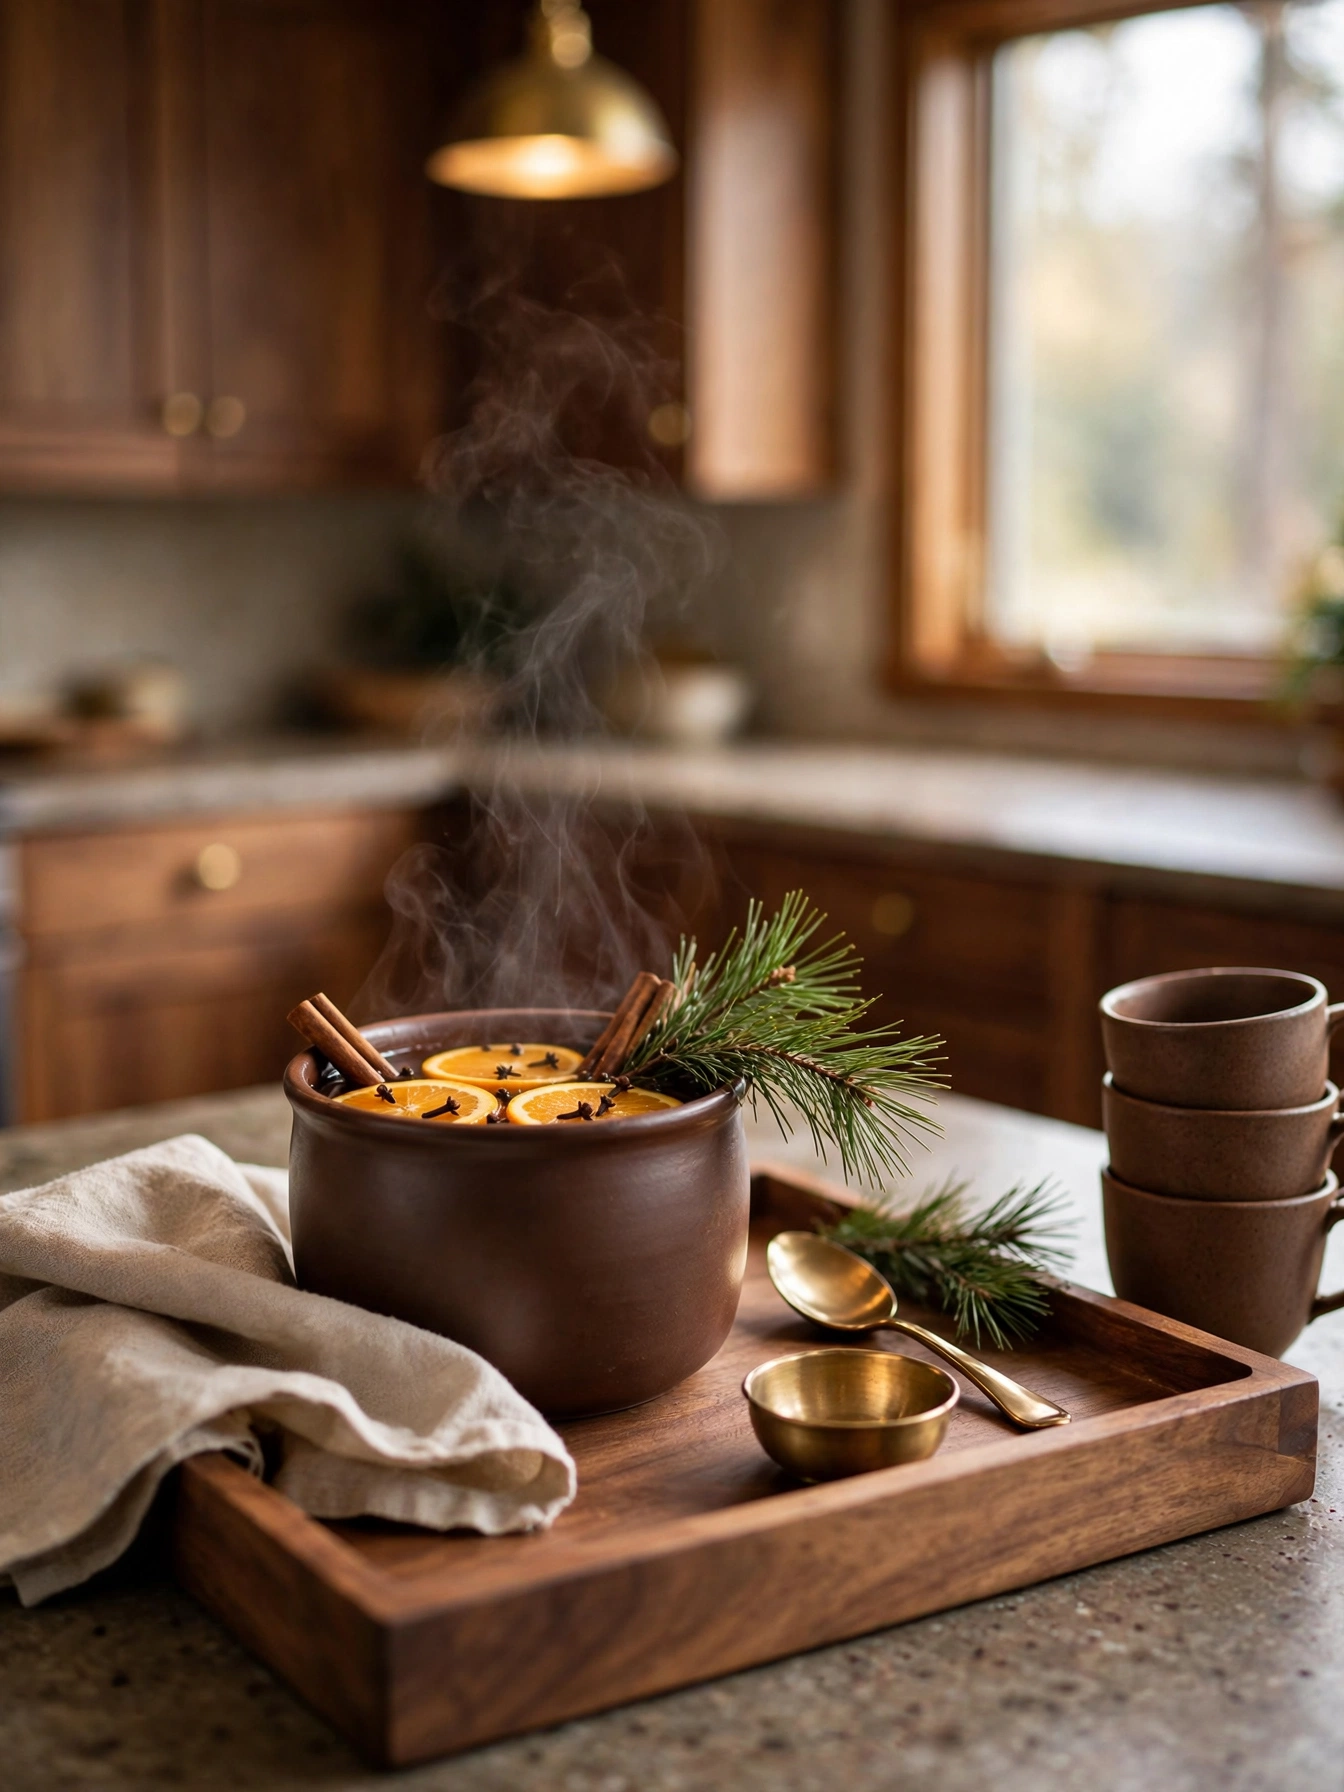
Why This Works:
- A simmer pot on a tray scents the kitchen for hours with zero fragrance oil
- A 6-inch pot with 4 cups of water simmers for 3 hours before needing a refill
- Orange slices, cloves, and cinnamon cost under $5 for a full pot
- The tray catches drips and makes the pot portable
Fill the pot with 4 cups of water, add 3 orange slices, 10 cloves, and 2 cinnamon sticks, and simmer on low, never boiling. Place the pot on the tray with a cork mat under it, and lay the pine sprig flat beside the pot. Refill the water every hour so the pot never boils dry. Allow a 12-inch gap between the tray and any paper or linen; a simmer pot steams constantly.
A citrus clove simmer suits kitchens where you want scent without a candle, because the pot does the work. The stove is the catch: a simmer pot needs a burner, so it cannot move to the living room. To carry the scent to another room, simmer for 1 hour, then carry the tray (with the pot off the heat) to the room; the scent lingers for 30 minutes.
Pro Tip: Drop one star anise into the pot. The anise adds a warm licorice note that makes the whole kitchen smell like a bakery.
Book Stack Base
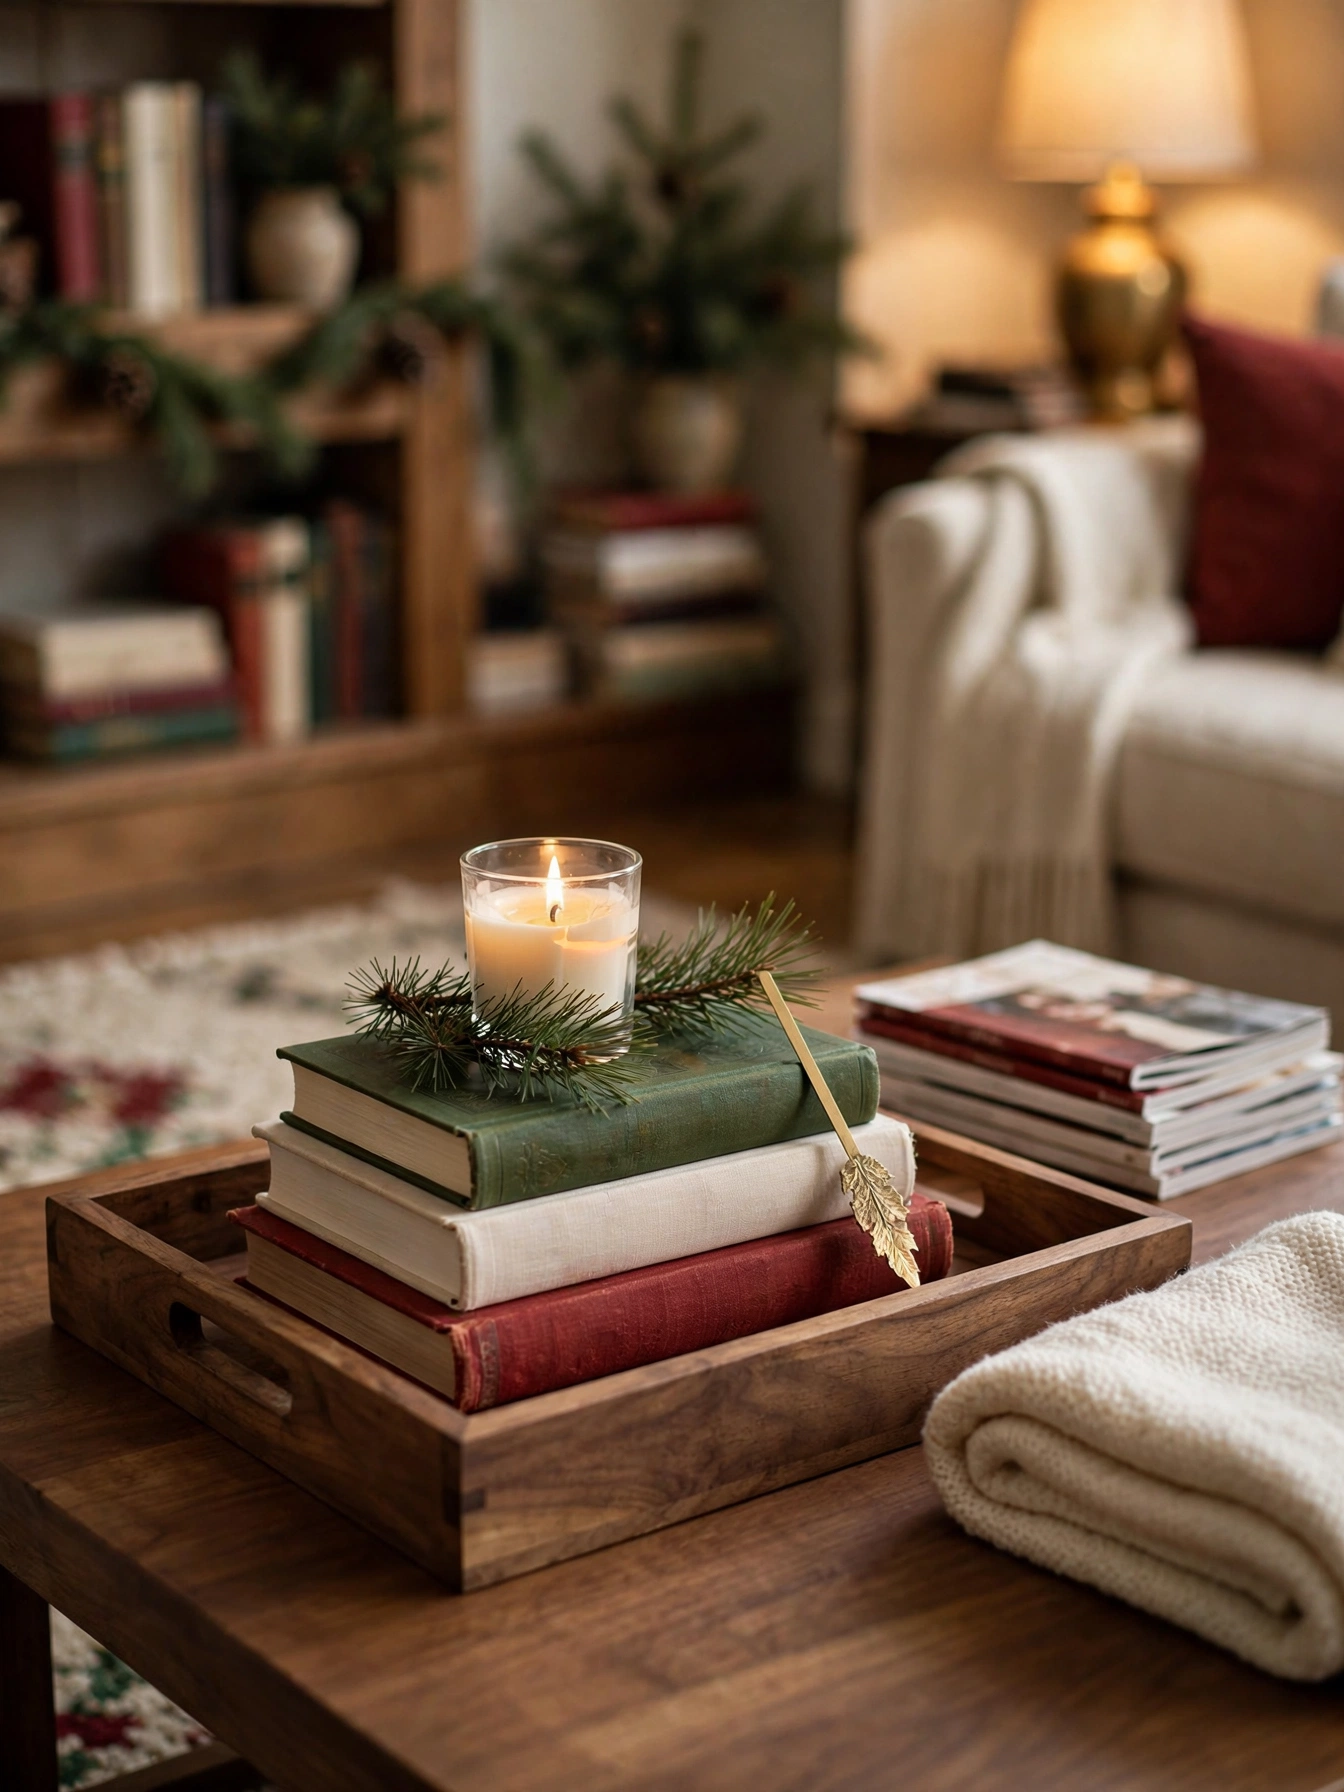
Why This Works:
- A book stack on a tray turns reading material into a display base
- Three books at 1 inch thick each lift the candle 3 inches above the tray
- Hardcover books at $0 (from the shelf) cost nothing and look curated
- The stack reads as a reader’s tray, not a decorator’s prop
Stack the books largest at the bottom, smallest at the top, aligning the spines on one side so the stack reads as intentional. Place the candle on the top book, on a brass coaster, and lay the pine sprig flat beside it. Keep the candle 4 inches from the book edges; a candle on a book needs a coaster, since wax ruins paper. Choose books with cloth or leather covers; paperback covers curl near candle heat.
A book stack base suits living rooms where the tray already holds books, because it uses what is there. Fire risk is the catch: never leave a candle burning on a book in an empty room, and keep the flame 12 inches from any curtain. On travel days, skip the books; a book stack slides when the tray tilts.
Pro Tip: Turn the top book spine-out so its cover faces the room. A visible cover acts like art and breaks the wall of spines.
Midnight Snack Board
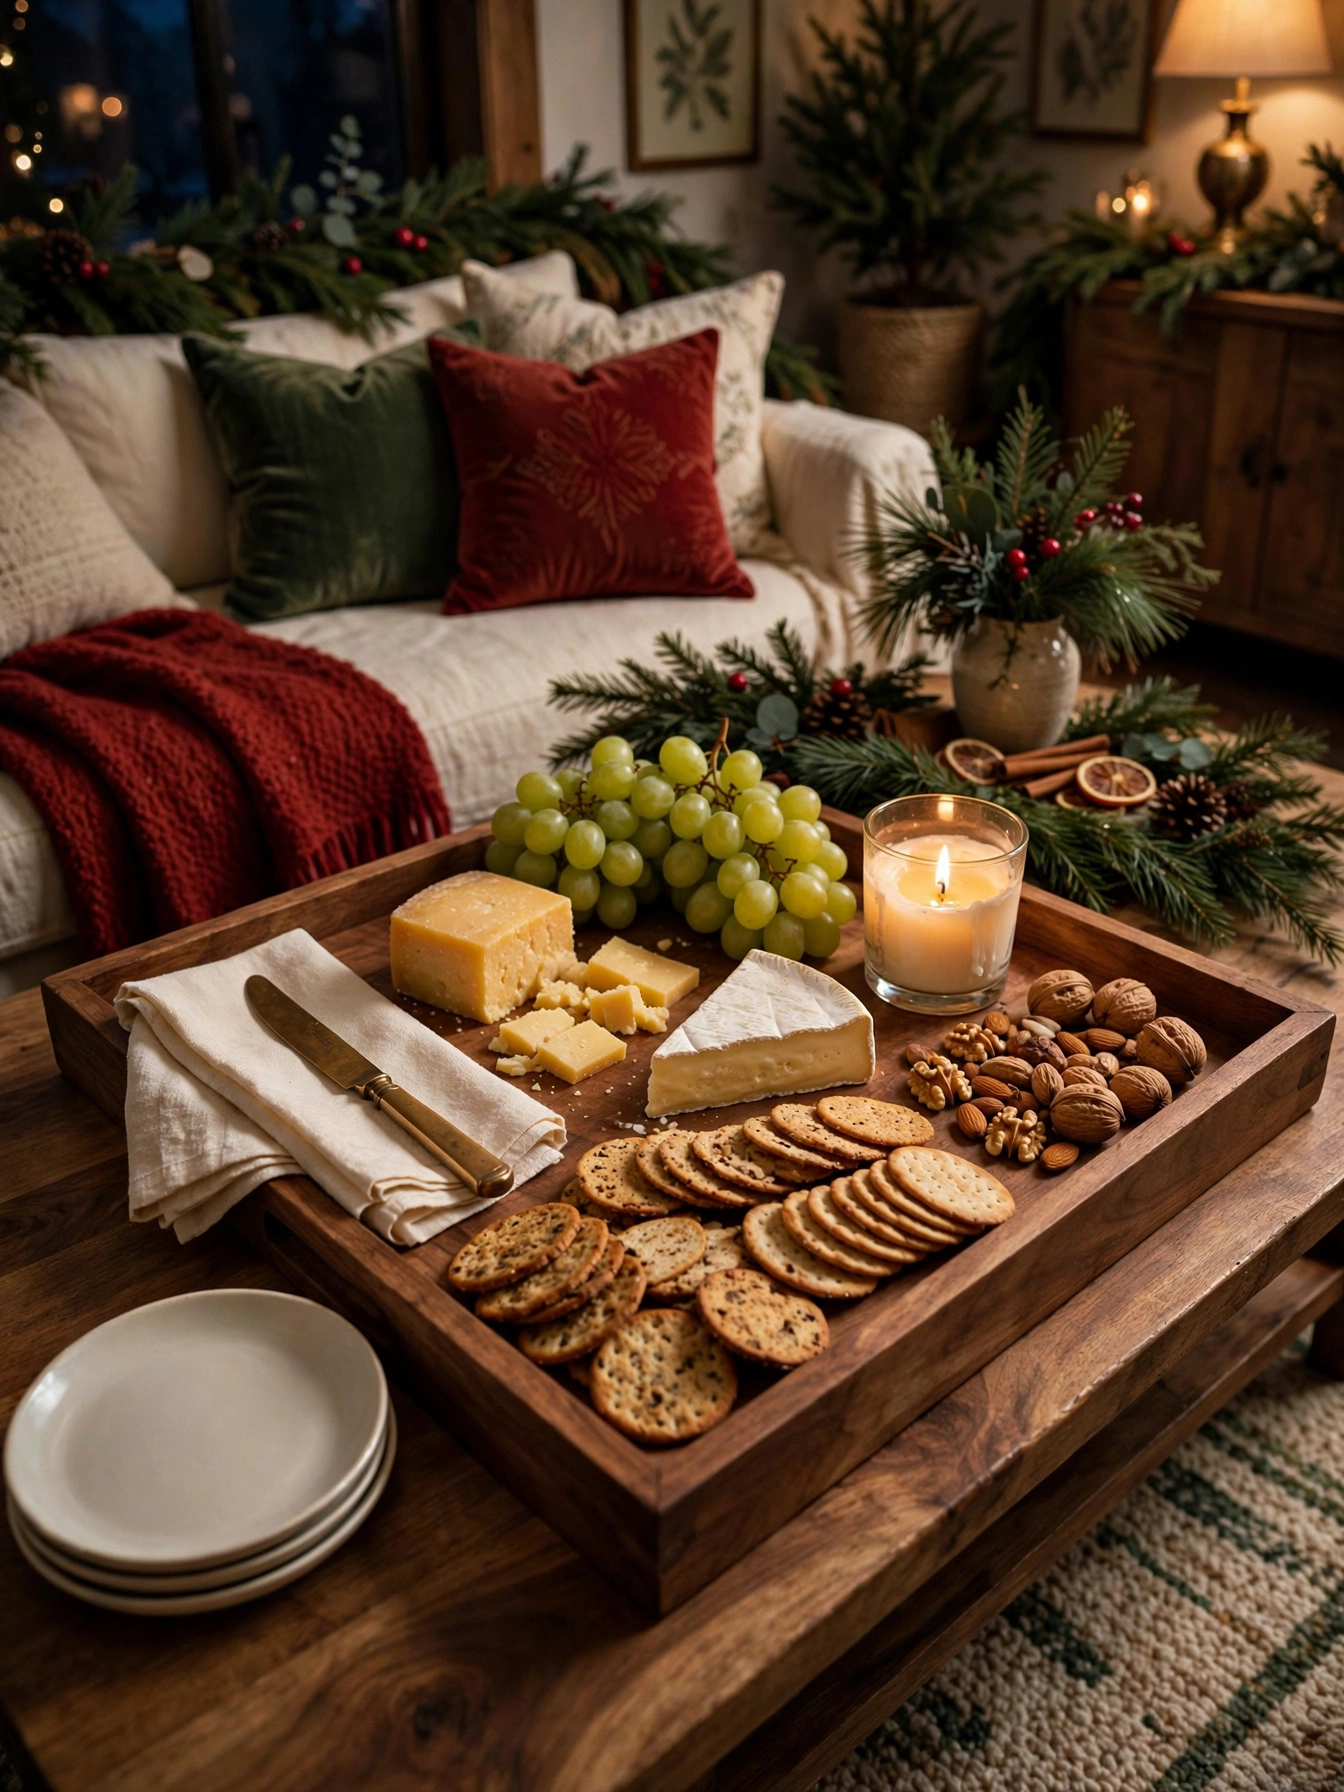
Why This Works:
- A snack board on a tray feeds a movie-night crowd without a second trip
- An 18 by 24 inch tray holds cheese, crackers, fruit, and nuts for 6 people
- The tray moves from kitchen to sofa in one trip
- The whole board sets up in 15 minutes and clears in 5
Place the cheese in the center of the tray, crackers around it, grapes in one corner, and nuts in a small bowl at the other end, keeping 4 inches of clear space for hands. Lay the candle at one end, 12 inches from any food; a candle near food draws hands and risks a tip. Keep 12 inches between the tray and any book or magazine; snack boards draw crumbs. For a tray bound for the sofa nightly, a 1-inch lip and handles keep the load safe.
A midnight snack board suits holiday movie nights, because it keeps the food in one liftable station. Crumbs and cheese are the downside: they scatter everywhere, so set a linen napkin under the cheese and shake it out after the movie. Daily use calls for a wipeable finish; raw wood stains from cheese oil within a week.
Pro Tip: Serve the nuts in a small bowl, not loose on the tray. Loose nuts roll off the tray the first time someone reaches for cheese.
FAQs
What size tray works best for christmas tray decor ideas 2026?
A 14 by 20 inch rectangular tray suits most setups, holding a candle, ornaments, and greenery with room to breathe. Round trays at 16 inches diameter suit centerpieces, while 18 by 24 inch trays suit serving. Measure the surface first; a tray that overhangs by more than 2 inches looks oversized.
Are candles safe on a Christmas tray?
Yes, with rules: keep flames 4 inches from any greenery, 12 inches from curtains, and never leave a candle burning in an empty room. Use a brass coaster under every candle, and choose a tray with a 1-inch lip to contain drips. Flameless LED pillars take the risk away completely.
Can I use a tray I already own for christmas tray decor ideas 2026?
Yes, any tray with a 1-inch lip works, whether wood, brass, marble, or ceramic. Wooden trays need a coaster under candles to prevent wax stains, while marble trays need a dry cloth to prevent water spots. Trays with handles carry more safely, so choose a handled tray for serving setups.
How do I keep a Christmas tray from looking cluttered?
Limit the tray to 3 objects plus greenery, and leave 30 percent of the tray surface empty. A candle, one ornament cluster, and one pine sprig read as styled; five objects read as a junk drawer. Step back 6 feet after styling; if you cannot name the focal point in 3 seconds, remove one item.
When should I set up a Christmas tray?
Thanksgiving weekend (November 26 to 29) is the ideal window: a full month of enjoyment, yet late enough that fresh greenery lasts through Christmas. Faux greenery and candles can go up in early November. Take fresh sprigs down by January 2, before the needles drop into the tray.
Conclusion
These 23 christmas tray decor ideas 2026 all come back to three takeaways: measure the tray first, keep it to three objects plus greenery, and let the tray move with the party. Start with the tray you already own, add one candle layer, and let the season’s gatherings carry it from room to room. Your first action tonight is simple: pick one tray, clear it, and give it a candle and a sprig of pine. Follow HomelyCrafter on Pinterest for more ideas. Save this to your Pinterest boards so you can refer back to it!

Muhammad Israr is a home decor enthusiast and the writer behind Homely Crafter. He spends his days researching paint colors, layouts and budget-friendly styling ideas, then breaks them down into practical, easy-to-follow guides so you can decorate with confidence.